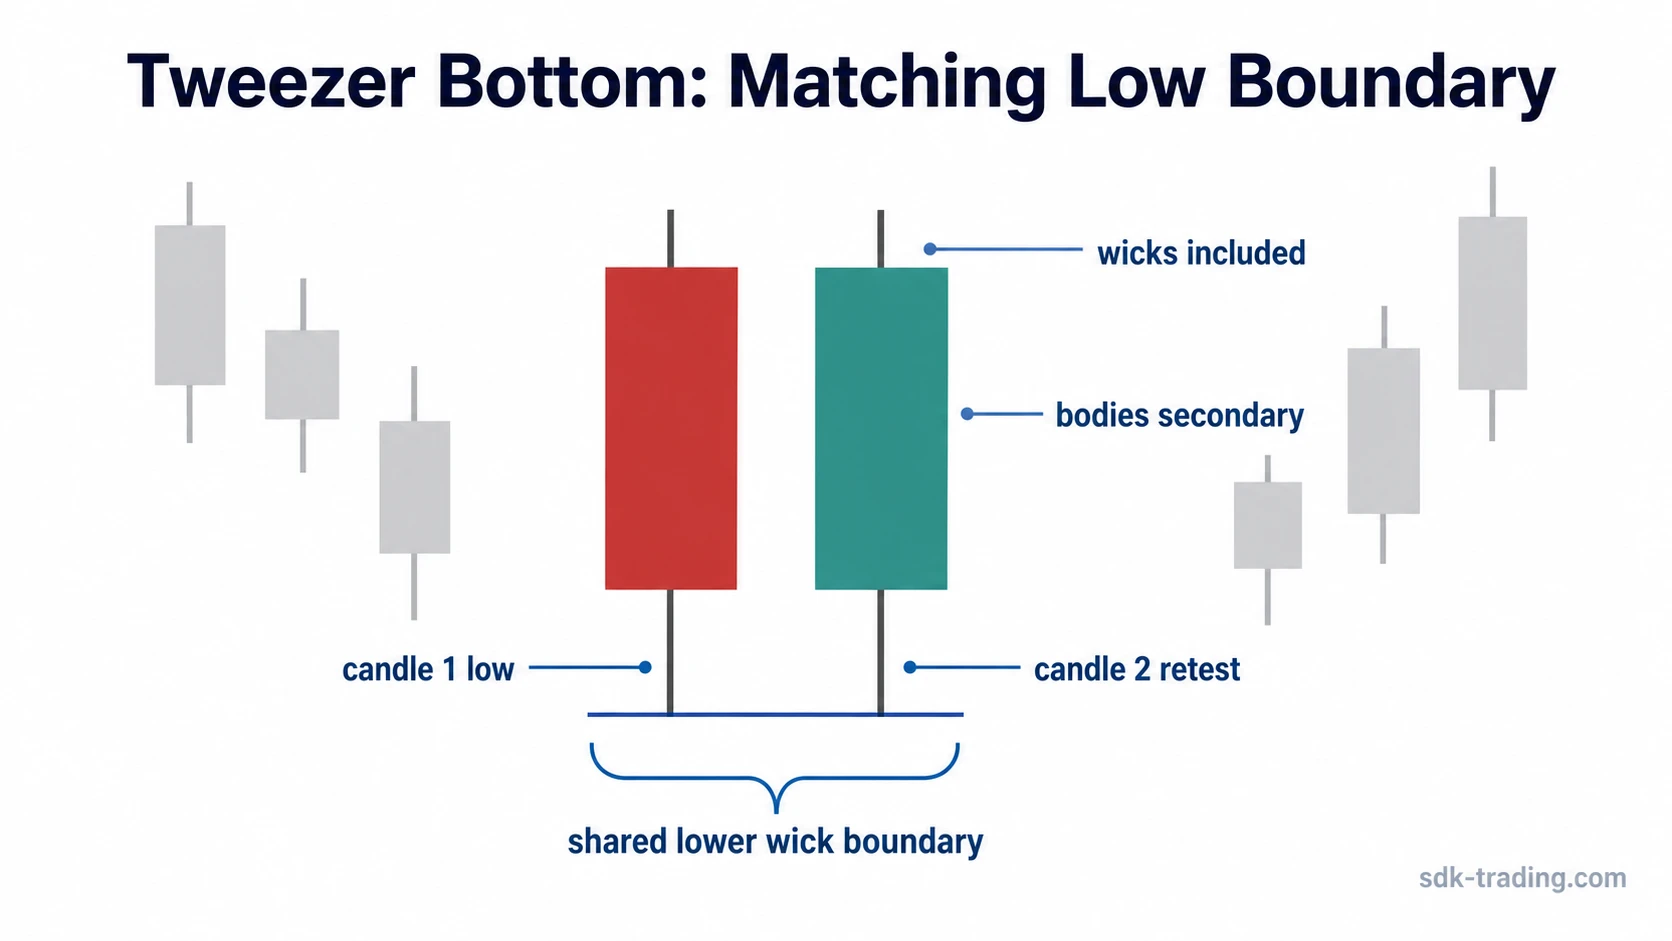
A tweezer bottom is a two-candle candlestick pattern defined by two adjacent candles marking the same or nearly the same low. That low is measured from the full candle range, including lower wicks, so the structural reference is the shared wick boundary rather than the candle bodies.
Definition: A tweezer bottom forms when the second candle retests the first candle’s low without clearly breaking below it. Body color and body size can affect interpretation, but the pattern is defined by the repeated low, not by a reversal assumption alone.
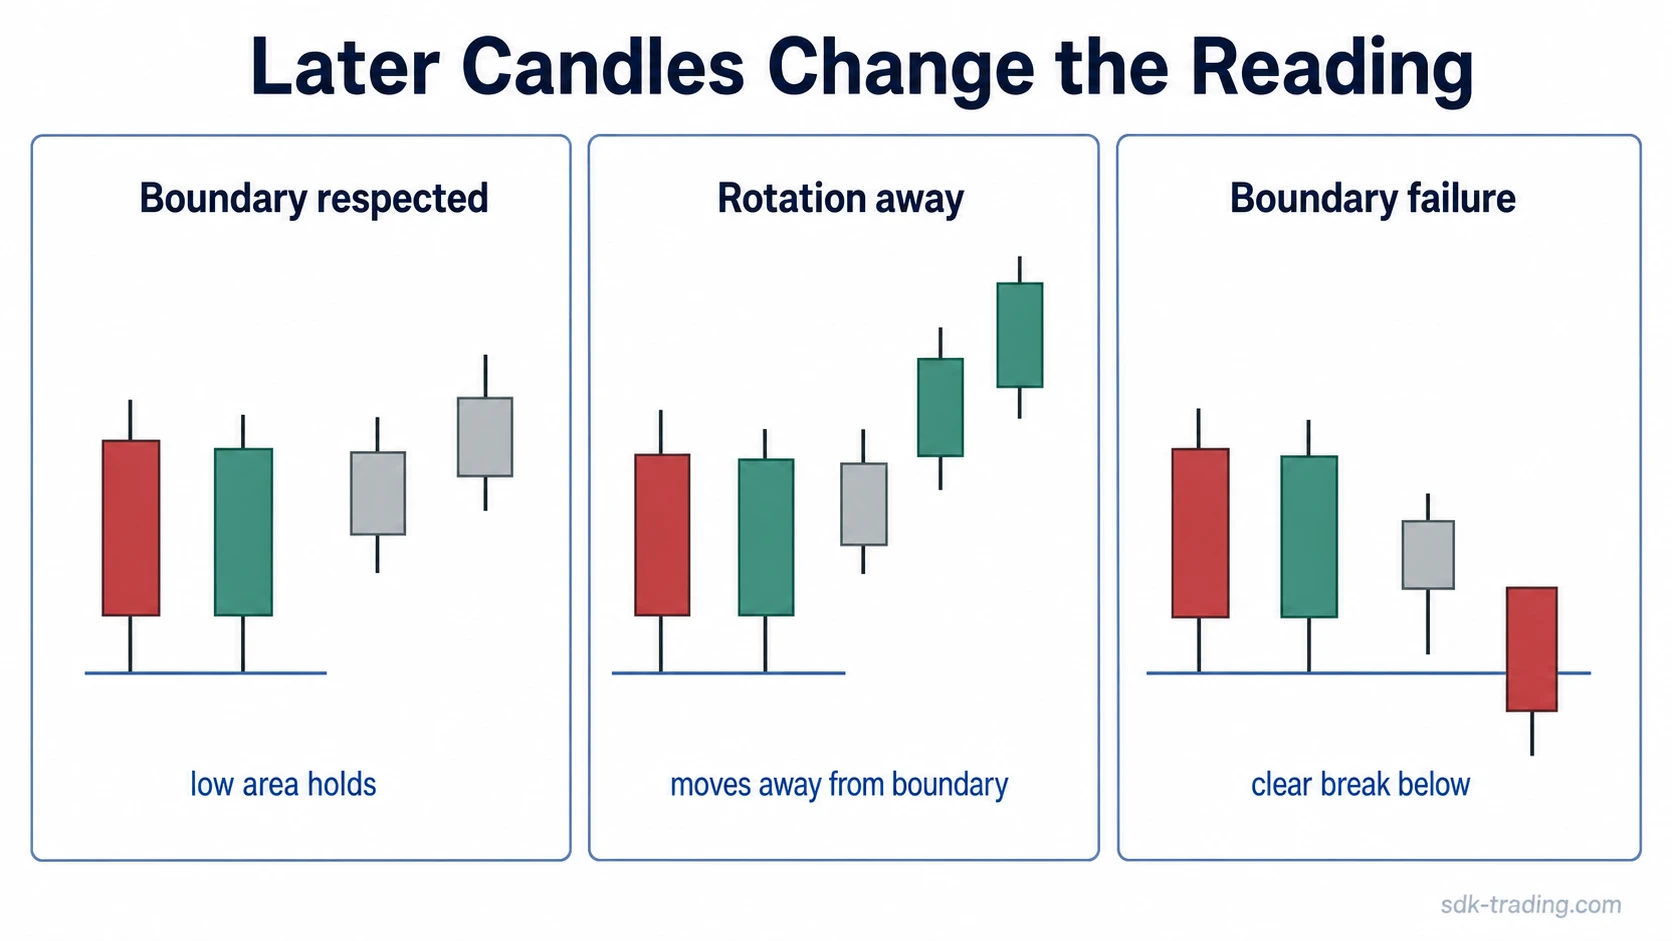
The pattern can warn that sellers struggled to extend below a repeated low area. That warning remains incomplete until later candles show whether price respects the boundary, rotates away from it, or breaks below it.
Key Points
- A tweezer bottom is defined by two adjacent lows that match or nearly match.
- The lower wick boundary matters more than the real bodies.
- Candle color may affect the reading, but it is secondary to the repeated low.
- A clear second-candle break below the first candle’s low weakens or invalidates the structure.
- The pattern is different from engulfing, outside bar, and inside bar logic because it compares lows rather than bodies or full ranges.
How to Recognize a Tweezer Bottom
The cleanest tweezer bottom reading starts with two neighboring candles. The first candle sets a low. The second candle tests the same area and holds at, or very near, that first low. The repeated lower boundary is the feature that separates the pattern from a general bullish candle pair.
- Two adjacent candles: the pattern is read across a pair, not across a long sequence of separated lows.
- Same or nearly same low: the second low should closely match the first low without a clear downside break.
- Wicks included: the low is measured from the full candle range, including lower shadows.
- Bodies are secondary: body size and color can add context, but they are not the structural rule.
- Boundary failure matters: a decisive move below the first low changes the reading.
Repeated Low Boundary Diagnostic
The repeated low is the diagnostic reference. If the candles share a similar lower wick area, the pair can be read as a defended or retested lower boundary. If the second candle pushes clearly below the first low, the structure no longer behaves like a clean tweezer bottom.
| Diagnostic question | Required answer |
|---|---|
| What is the boundary? | The lower wick or low area shared by the two candles. |
| What defines the pattern? | Equal or near-equal lows across two adjacent candles. |
| What does not define it? | Body size, candle color, or the reversal label alone. |
| What strengthens the reading? | Later candles respect the repeated low area or rotate away from it. |
| What invalidates the reading? | The second candle clearly breaks below the first candle’s low. |
Matching Lows as the Structural Boundary
The structural boundary is the shared lower area where both candles stop declining. Because the full candle range matters, the lower wick is part of the pattern even when the real body closes well above the low. Ignoring the wick can make the pattern look cleaner or weaker than it really is.
Near-equal does not require a fixed numeric tolerance. The lows should be close enough that they read as the same tested area on the chart, rather than two clearly separate downside levels. The more obvious the break below the first low, the less defensible the tweezer bottom reading becomes.
Reading note: A small difference between the two lows may still preserve the pattern if the second candle is retesting the same lower boundary. A clear downside extension below the first low changes the structure from repeated boundary to boundary failure.
When the Repeated Low Holds or Fails
The repeated low becomes more meaningful when price respects that shared boundary and rotates away from it. The reading weakens when price clearly breaks below the shared lower wick area and accepts lower prices.
The structure deteriorates when price cannot hold the shared low area. If the second candle clearly breaks below the first candle’s low, the repeated boundary is no longer intact. If later candles keep pressing below the area, the pattern remains weak even if the original two candles looked visually similar.
Limitation: Matching lows do not prove a bullish reversal. Candles can warn, but structure decides whether the warning is useful. The repeated low is a reference point for interpretation, not a standalone trading signal.
Simple Tweezer Bottom Example
Price sells off into a visible low and the next candle tests almost the same lower wick area. The second candle does not clearly push below the first low, so the pair creates a shared reference point. The pattern becomes more meaningful only when later candles stop accepting lower prices or rotate away from that area. If price breaks and holds below the shared low, the original pair becomes a failed low test rather than a clean tweezer bottom.
Tweezer Bottom vs Nearby Candlestick Patterns
A tweezer bottom compares two lows, not two bodies or two full candle ranges. That is why it should not be read the same way as engulfing, outside bar, or inside bar logic. The neighboring tweezer top uses the same boundary idea on the opposite side of the candle pair.
| Pattern | Main reference point | Practical distinction |
|---|---|---|
| Tweezer bottom | Repeated low boundary | Two adjacent candles test the same or nearly the same lower wick area. |
| Tweezer top | Repeated high boundary | Two adjacent candles test the same or nearly the same upper wick area. |
| Piercing pattern | Real-body recovery into the prior candle body | The focus is on where the second candle closes inside the prior real body. |
| Outside bar | Full high-low expansion | The second candle expands beyond both the prior high and prior low. |
| Inside bar | Full high-low containment | The second candle stays inside the prior candle’s full range. |
| Harami cross | Small doji or contained body relationship | The focus is on a small doji-like body contained within the prior body or range context. |

Common Mistakes With Tweezer Bottoms
Mistake 1: Treating any two nearby lows as a tweezer bottom. The candles should be adjacent and should mark a clearly repeated lower boundary.
Mistake 2: Ignoring the lower wicks. A tweezer bottom is based on the full low, so wick lows are part of the measurement.
Mistake 3: Making candle color the main rule. A bullish second candle can make the pattern easier to notice, but the repeated low is the defining feature.
Mistake 4: Keeping the label after a clear downside break. If the second candle clearly trades below the first low, the lower boundary has failed.
FAQ
What is a tweezer bottom?
A tweezer bottom is a two-candle candlestick pattern where two adjacent candles mark the same or nearly the same low. The shared lower wick area is the defining boundary.
Do the lows have to be exactly equal?
No. The lows can be nearly equal if they still represent the same tested lower wick area. A clear second-candle break below the first candle’s low weakens or invalidates the pattern.
What invalidates a tweezer bottom?
A tweezer bottom is weakened or invalidated when the second candle clearly breaks below the first candle’s low. Later candles pressing below the shared low also weaken the reading.
What is the difference between a tweezer bottom and a tweezer top?
A tweezer bottom compares repeated lows. A tweezer top compares repeated highs. They use a similar boundary idea on opposite sides of the candle pair.