Support in trading is a lower price area where downside movement has previously slowed, paused, or reversed. It marks an area where price stopped making clean downside progress before, giving the chart a reference point for later tests.
Support can appear as one visible price level, but many charts behave more like zones. A support zone allows for small overshoots, wicks, and uneven reactions without treating every minor breach as a complete loss of the area.
What Support in Trading Means
Support forms around a lower area where previous selling stopped producing the same downside progress. That area may come from a prior low, repeated reactions near the same price, a range boundary, a round-number area, a moving average zone, or another visible point where the decline stalled.
The reaction can develop because behavior changes around that price area. Some market participants may become more willing to buy at lower prices, existing sellers may become less willing to keep selling, and traders who remember an earlier reaction may respond to the same area again. The chart shows the combined result of those decisions rather than the motive behind every individual order.
One reaction is enough to create a possible reference. Repeated tests provide more information, but the number of touches alone does not tell you whether support is becoming stronger or weaker.
Simple definition: Support in trading is a lower chart area where price has previously slowed, reacted, or failed to continue lower, creating a reference point for later price-action analysis.
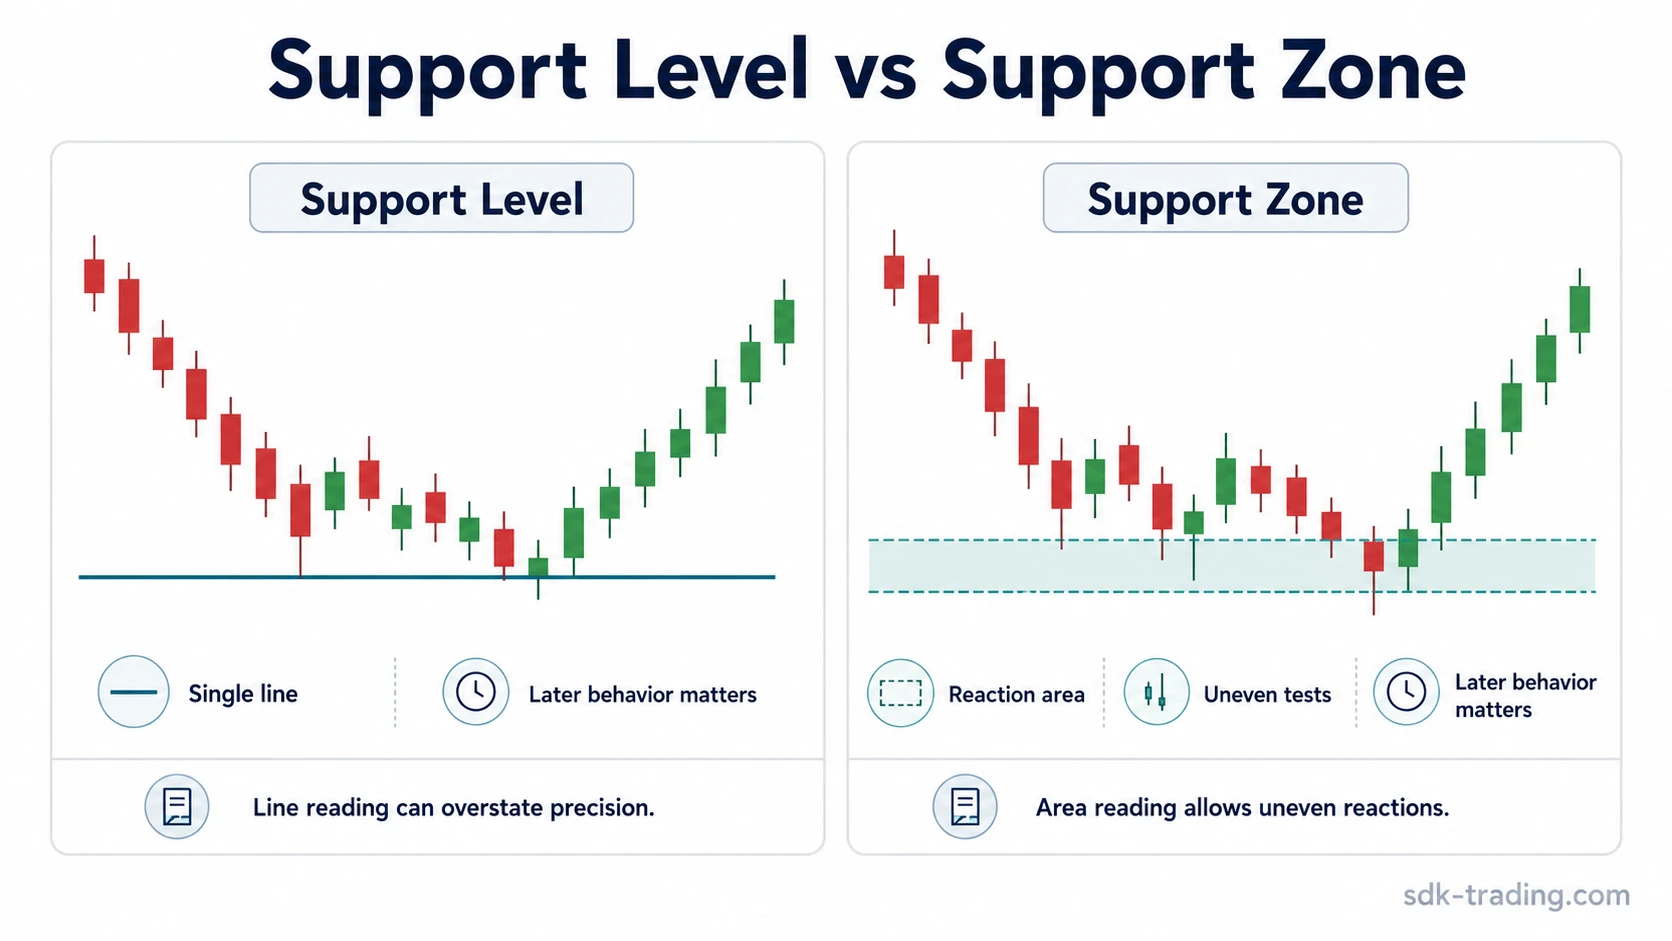
Support Level vs Support Zone
A support level is a simplified line. A support zone is a broader area around that line. The distinction matters because real price behavior often touches, overshoots, or slightly pierces a marked level before moving away from it.
| Type | What It Represents | Useful When | Main Limitation |
|---|---|---|---|
| Support level | A specific price line drawn from a prior reaction point. | The chart has clean prior lows or repeated reactions near the same price. | A small wick through the line can look more important than it is. |
| Support zone | A broader lower reaction area rather than one exact price. | Price reactions cluster around the same area without matching one exact level. | The zone can become too wide if its boundaries are repeatedly adjusted. |
| Broken support | An old support area where price moves below the prior reaction zone and remains there. | Recovery attempts struggle to regain the old area. | A brief probe below support can still return above the zone. |
A line is useful for clarity, but the line itself is not the mechanism. What matters is how price behaves around the area marked by that line.
How to Identify Support on a Chart
Start with visible price structure. A potential support area should come from something the chart has already shown rather than from placing a line where a reaction would be convenient.
| Chart Reference | What to Look For | How to Treat It |
|---|---|---|
| Prior swing low | A visible decline stopped and price moved clearly higher from that area. | Use the low and nearby reaction prices as a possible support reference. |
| Repeated lows or reactions | Several declines stalled around a similar price area. | Mark the cluster as a zone rather than forcing every reaction onto one exact line. |
| Lower range boundary | Price repeatedly turns higher from the lower side of a trading range. | Treat the lower boundary as support while price continues to react from that part of the range. |
| Round-number area | Price has previously reacted around a clearly visible round-number region. | Use the actual reaction area on the chart rather than assuming every round number must become support. |
| Moving average area | Price has repeatedly reacted around the same moving average during an established trend. | Treat it as a dynamic reference only when the chart has already shown repeated interaction with it. |
Finding a possible support area is only the first step. Once price returns to the same zone, compare the new reaction with the earlier one. How far price moves away from support and how quickly it comes back can reveal more than the location of the level by itself.
How Support Forms on a Chart
The first reaction at a lower area establishes the reference. The next thing to compare is how much distance price creates from that area and how soon it returns to test it again.
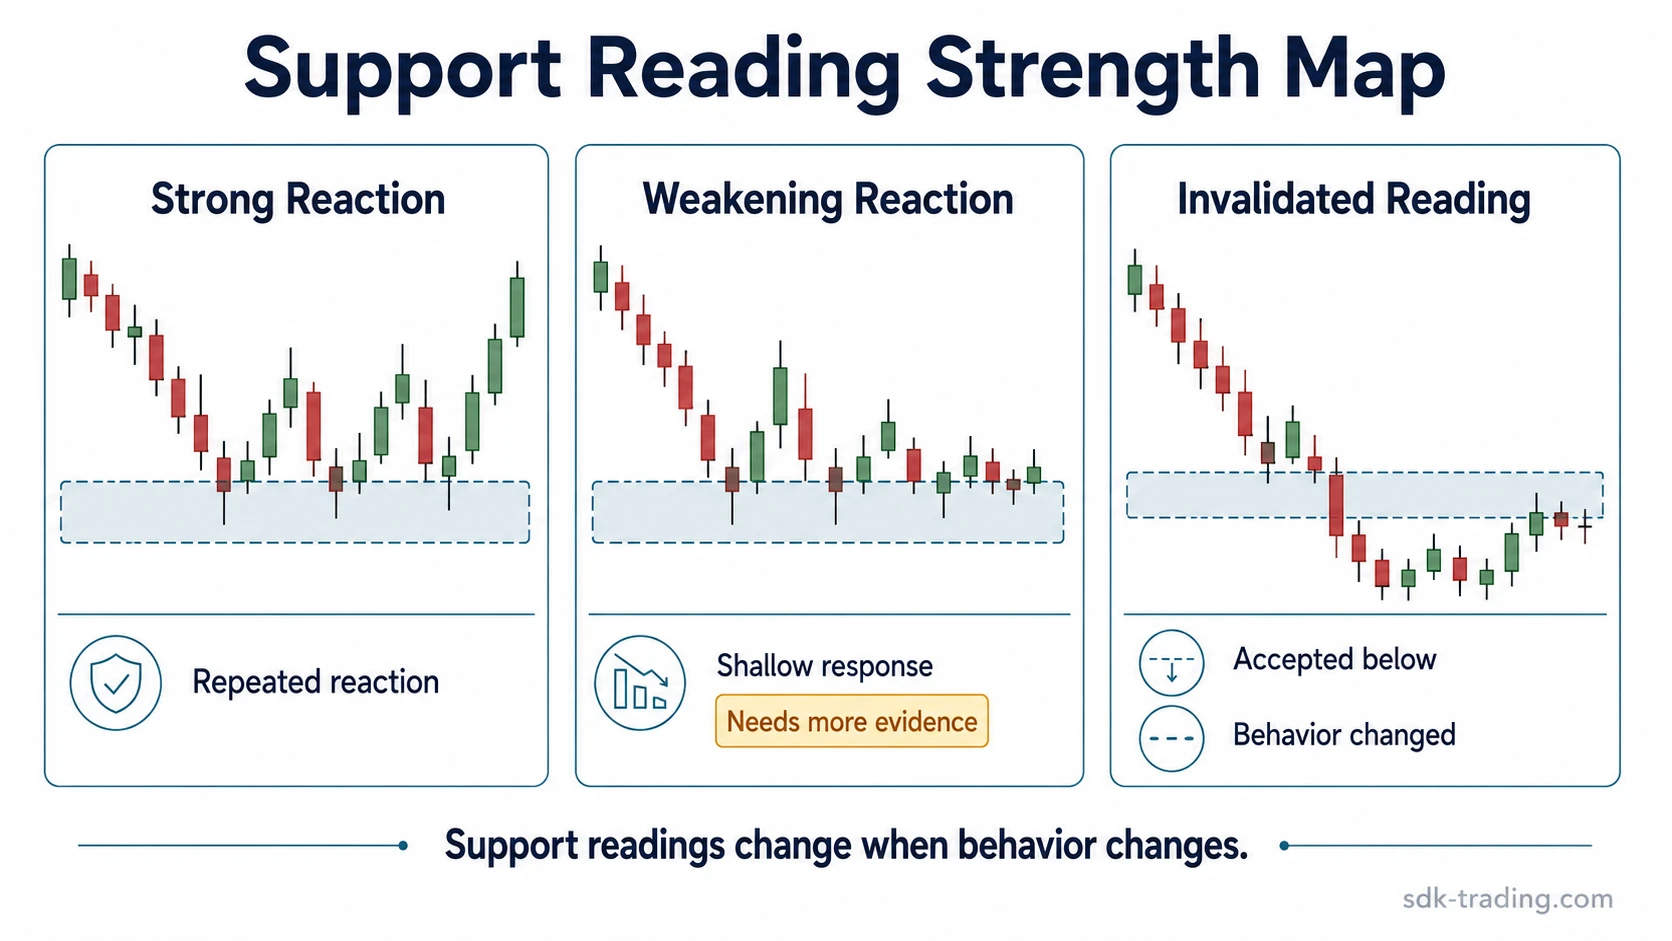
A strong departure from support followed by a long period away from the zone is different from a small bounce followed by an immediate return. If each bounce travels less distance and price reaches the same area again more quickly, downside pressure is reaching support with less interruption even though the zone may still be intact.
Common mistake: Counting touches without comparing the reactions. More tests do not automatically make support stronger. Compare the distance of each move away from the zone, the speed of the return, and what happens when price trades through the lower boundary.
| What Happens | Move Away From Support | Return to the Area | What the Chart Shows |
|---|---|---|---|
| First clear reaction | Price moves away from the lower area. | No earlier test is available for comparison. | A potential support reference has formed. |
| Another test produces a clear departure | Price again creates meaningful distance from the zone. | The market does not immediately return. | The area is still interrupting downside progress. |
| Another test produces only a small bounce | Price creates less distance than before. | The market returns to the same area sooner. | The reaction at support is losing force even if the zone has not broken. |
| Price moves below the zone and cannot reclaim it | Recovery attempts stop near the old support area. | Price begins spending more time below the zone. | The old support is no longer functioning in the same way. |
This comparison is more informative than simply counting how many times support has been touched. Two areas can each have three tests while showing very different behavior.
Support vs Resistance
Support and resistance describe opposite reaction areas. Support is below current or recent price and marks an area where downside progress previously stalled. Resistance is above price and marks an area where upside progress previously stalled.
| Concept | Chart Location | Previous Behavior | What Can Change It |
|---|---|---|---|
| Support | Below current or recent price | Downside movement previously slowed or reversed there. | Price remaining below the area and failing to reclaim it. |
| Resistance | Above current or recent price | Upside movement previously slowed or reversed there. | Price holding above the area instead of falling back below it. |
Support can become resistance after a break. If price moves below the old support zone and later recovery attempts stall underneath it, the same area can begin to act as an overhead boundary instead of a lower one.
When Support Weakens or Fails
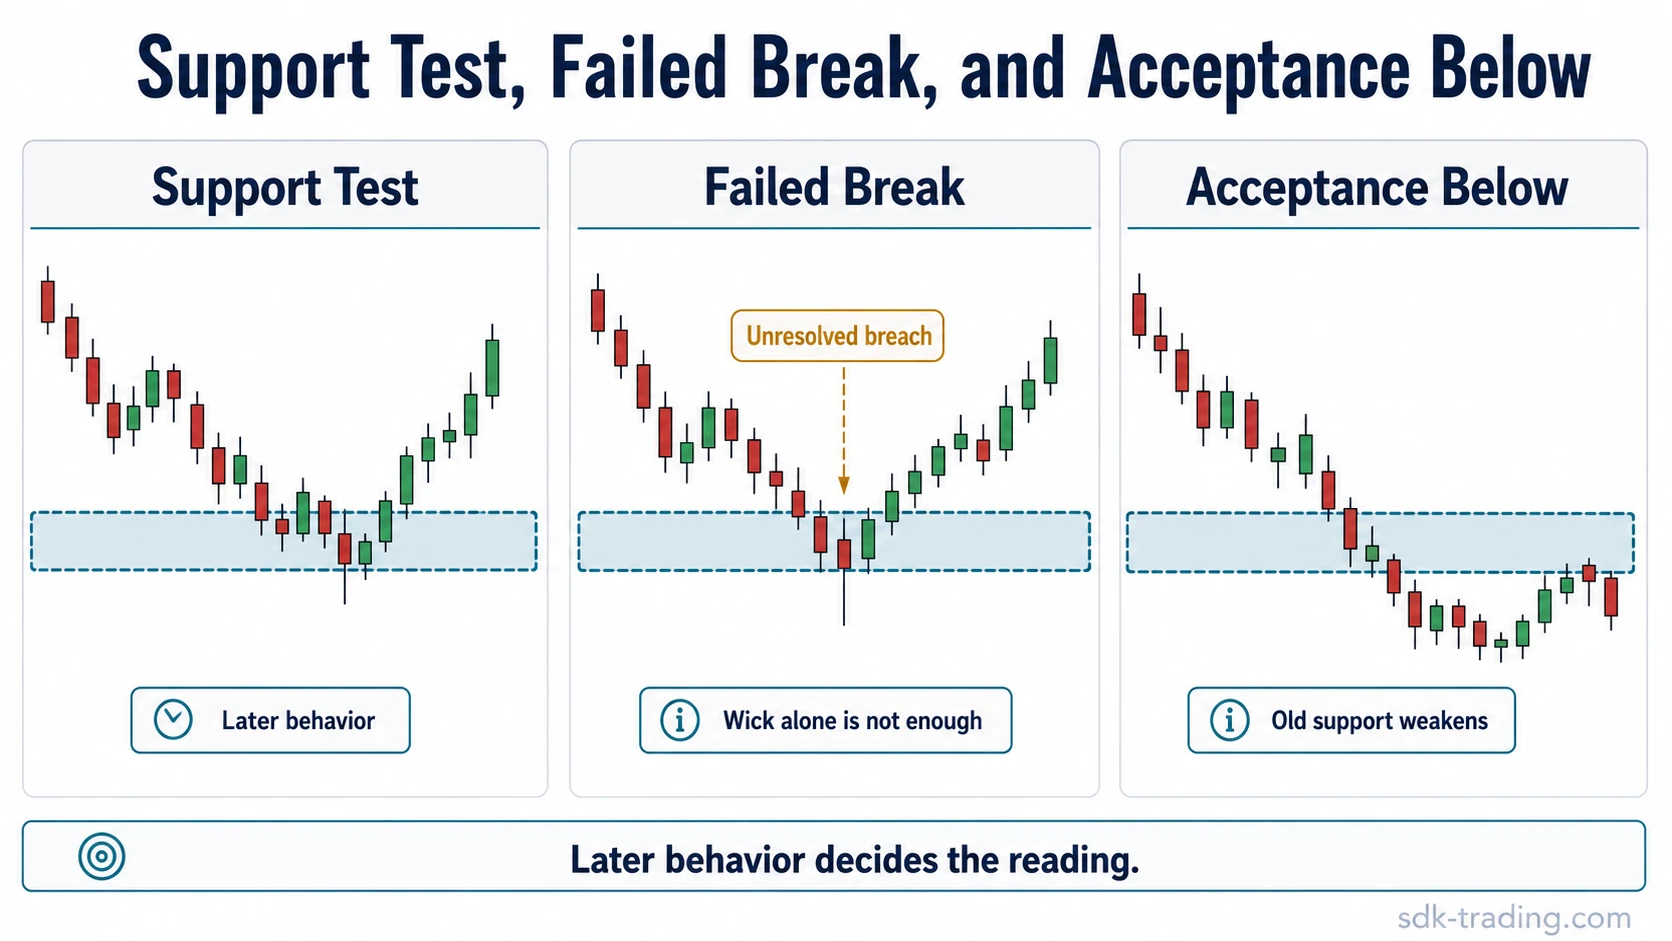
The clearest warning is usually not one wick below a support line. More useful clues are smaller reactions from the area, faster returns to the same zone, repeated closes through it, or a move below support that cannot be reclaimed.
A failed break and a sustained break are different. In a failed break, price trades below the support area briefly and then gets back above it. In a sustained break, price remains below the zone and recovery attempts repeatedly fail near the old boundary.
Limitation: Support is a chart reference, not a timing tool by itself. A broader support and resistance trading strategy requires defined conditions, risk boundaries, and review criteria beyond the existence of a support area.
The zone should not be repeatedly redrawn to preserve an earlier opinion. If its boundaries must keep moving to accommodate every new candle, the marked area is no longer describing the original support structure clearly.
Support vs Supply and Demand
Support describes where price has previously reacted. Supply and demand analysis looks more specifically at pressure and imbalance around a price area. The two ideas can overlap on the same chart, but they are not interchangeable.
Supply and demand analysis asks whether buying or selling pressure created an imbalance. Support asks whether downside progress previously stalled around a lower area. A support zone can coincide with demand, but the existence of support alone does not establish that the same imbalance is still present when price returns.
This distinction becomes important on repeated tests. A prior low can remain a useful support reference even while each reaction from that area becomes smaller and price returns to it more quickly.