A belt hold candlestick pattern is a single-candle structure where price opens at or near one extreme of the candle and closes strongly toward the opposite extreme.
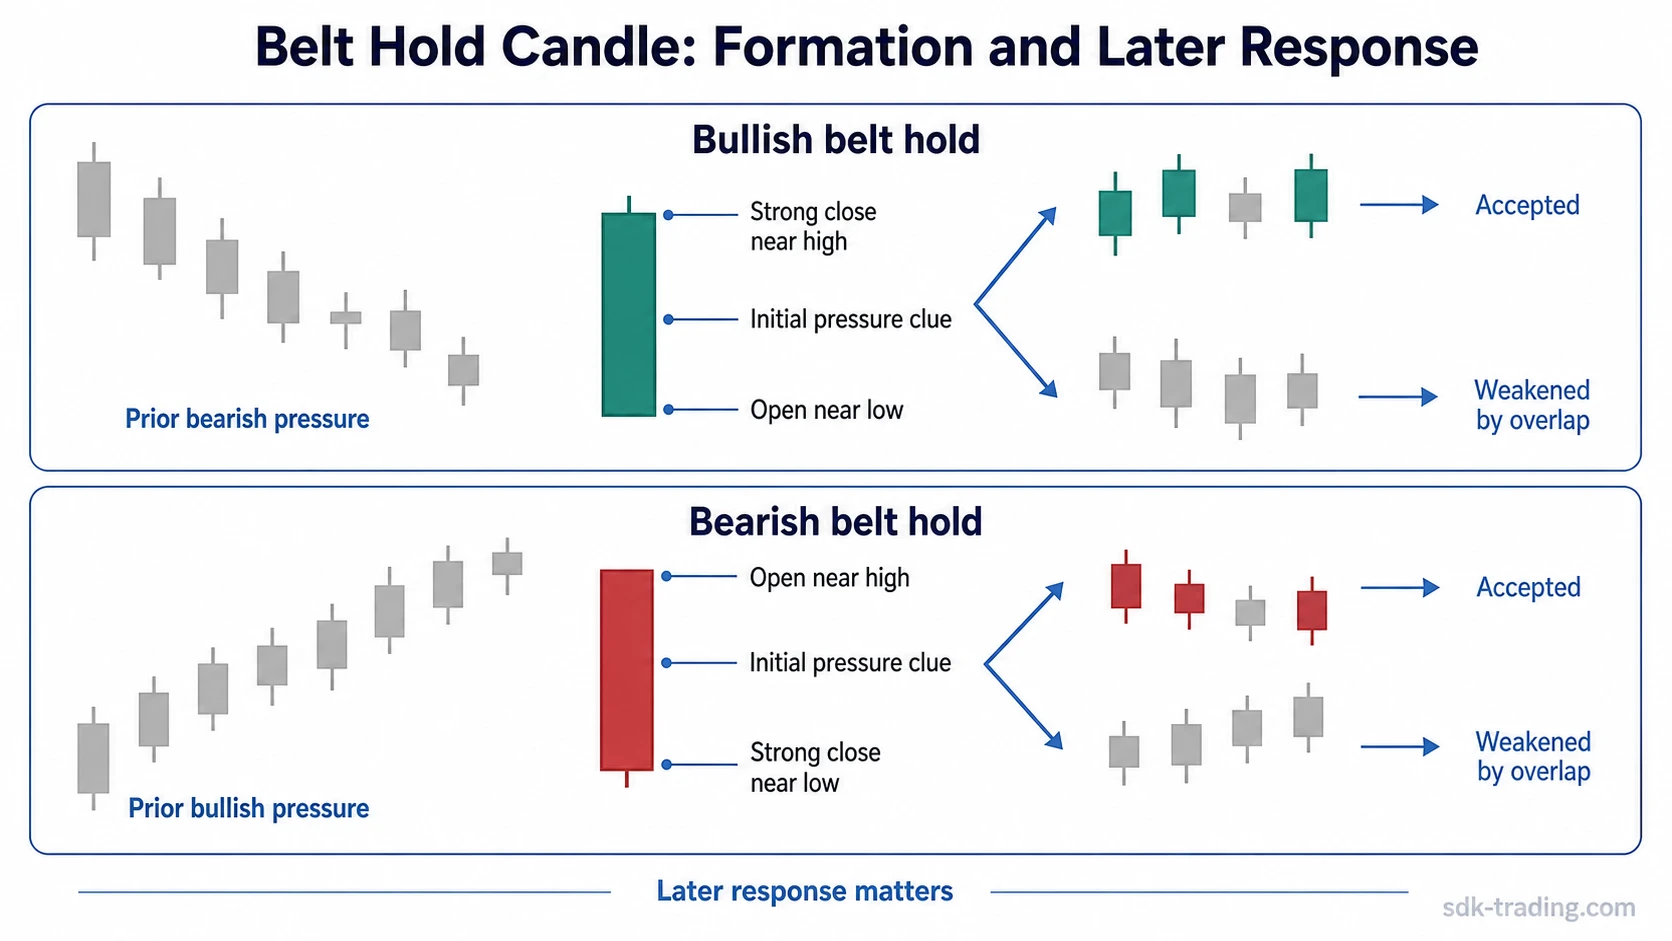
A bullish belt hold opens near the low and closes near the high after bearish pressure. A bearish belt hold opens near the high and closes near the low after bullish pressure. The useful reading is not “reversal confirmed.” The useful reading is that one side controlled most of the candle period, while subsequent price action shows whether that control is accepted or absorbed.
Belt Hold Recognition Checklist
- The candle opens at or very near one side of its full range.
- The opening-side shadow is very small or absent.
- The real body is large enough to show one-sided pressure during the candle period.
- The candle closes near the opposite side of the range.
- The pattern appears after visible prior pressure, not in the middle of random overlap.
- The follow-up response either respects the body, overlaps it, or erases it.
What Is a Belt Hold Candlestick?
Definition: A belt hold candlestick is a strong-bodied single candle that opens near one range extreme, has little or no shadow on the opening side, and closes near the opposite range extreme after prior pressure.
The term belt hold line is often used for the same pattern family. The name does not change the test. The candle is judged by open location, body strength, prior movement, close location, and whether the body is later accepted or absorbed.
In basic candle anatomy, the open, high, low, and close show where pressure began, how far price traveled, and where the period finished. A belt hold focuses on the distance between the open and close because that distance shows whether the candle was controlled by one side for most of the period.
Is a Belt Hold a Single-Candle or Two-Candle Pattern?
A belt hold is best treated as a single-candle structure with required prior context. The candle itself carries the pattern: it opens near one range extreme, forms a strong real body, and closes near the opposite extreme. The previous candles do not form the belt hold by themselves, but they decide whether the candle appears after meaningful pressure or inside random overlap.
This distinction matters because some references describe the setup as a two-candle sequence when they include the prior trend, previous candle, or gap condition. A cleaner diagnostic rule is: one candle forms the belt hold, while the surrounding candles decide whether the reading is clean, weak, or invalid.
How the Belt Hold Candle Forms
A bullish belt hold forms when price opens near the candle low, rejects lower prices early, and closes near the candle high. The lower shadow should be small or absent, and the body should be large enough to separate the candle from ordinary upward movement.
A bearish belt hold forms when price opens near the candle high, fails to hold the upper area, and closes near the candle low. The upper shadow should be small or absent, and the body should show that selling pressure controlled most of the candle period.
The prior move gives the candle its diagnostic role. A bullish version has a cleaner reading after downside pressure because it shows that sellers lost control during the candle. A bearish version has a cleaner reading after upside pressure because it shows that buyers could not defend the opening strength.
Bullish vs Bearish Belt Hold
| Pattern | Prior pressure | Open location | Close location | Diagnostic reading | What weakens it |
|---|---|---|---|---|---|
| Bullish belt hold | Bearish pressure, decline, or lower-area test | At or near the candle low | Near the candle high | Buyers controlled the candle after a weak opening area | Immediate overlap back through the body, failure to hold the upper close area, or mixed follow-through |
| Bearish belt hold | Bullish pressure, advance, or upper-area test | At or near the candle high | Near the candle low | Sellers controlled the candle after a strong opening area | Immediate recovery through the body, failure to hold the lower close area, or quick absorption of the decline |
Strict vs Practical Belt Hold Recognition
Belt hold recognition can be stricter on a scanner than on a chart. A scanner may require a gap beyond the previous candle extreme or a body that exceeds an average-body threshold. Manual chart reading usually focuses on the same idea in a less mechanical way: open-extreme behavior, strong body control, prior pressure, and whether the body is later respected.
| Recognition style | What it checks | Best use | Main limitation |
|---|---|---|---|
| Strict scanner logic | Open near or beyond the prior candle extreme, large body, little or no opening-side shadow | Rule-based filtering and platform recognition | Can miss valid-looking candles that do not meet exact gap or average-body rules |
| Practical chart reading | Open-extreme behavior, strong body control, prior pressure, and follow-up response | Manual pattern interpretation | Can become subjective if body size and context are not defined |
Belt Hold vs Marubozu
A belt hold and a marubozu can look similar because both may have a large real body and little shadow on one side. The difference is diagnostic context. A marubozu mainly describes body dominance inside one candle. A belt hold adds prior pressure and opening-extreme behavior, so the candle is read as a pressure shift or continuation test rather than only as a strong-bodied candle.
The overlap between the two is useful, but it should not erase the boundary. A candle can be marubozu-like in shape without giving a clean belt hold reading if it appears in the middle of noisy overlap or lacks a meaningful pressure context.
Clean, Weak, and Invalid Belt Hold Readings
| Reading | Candle condition | Follow-up response | Interpretation boundary |
|---|---|---|---|
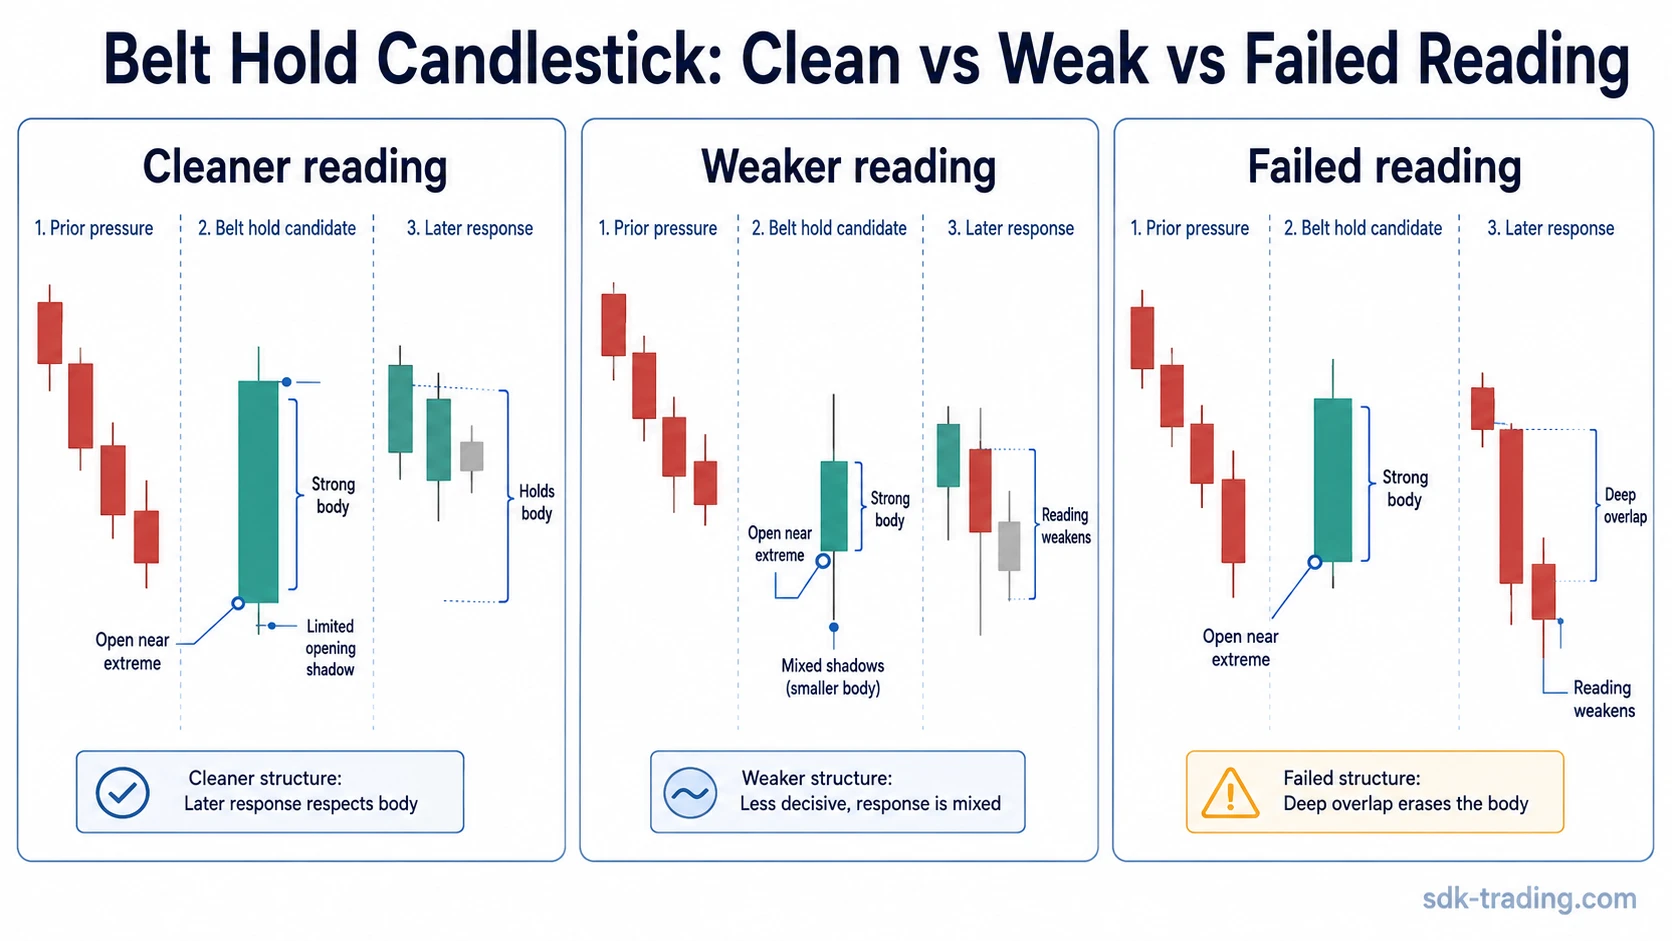
| Clean | Open near one extreme, large real body, minimal opening-side shadow, close near the opposite extreme | Later candles avoid deep overlap and continue to respect the body area | The pressure event is still being accepted by the market structure around it |
| Weak | Body is smaller, shadows are larger, or the candle appears inside noisy overlap | Later candles hesitate, overlap part of the body, or fail to expand away from it | The candle shows pressure, but the evidence is not clean enough to isolate the pattern |
| Invalid or failed | The candle initially looks strong, but the body is quickly absorbed | Price moves back through the candle body and erases the strong close area | The original pressure clue no longer has support from later price behavior |
What Counts as Confirmation?
Confirmation does not mean that the belt hold becomes a trade signal. It means later candles stop contradicting the body of the belt hold. A cleaner follow-up holds above the body midpoint in a bullish reading or below the body midpoint in a bearish reading. A weaker follow-up overlaps the body quickly. A failed follow-up erases the strong close and returns through most of the candle range.
This keeps the pattern in the correct role. The belt hold marks a pressure event. Confirmation tests whether that pressure is accepted, only partially accepted, or rejected by the next price structure.
What the Candle Can and Cannot Show
A belt hold can show a sharp transfer of control during one candle period. In the bullish version, sellers begin with pressure near the low, but buyers finish near the high. In the bearish version, buyers begin near the high, but sellers finish near the low.
The candle cannot prove that a new trend has started. A single strong body can also come from short-term imbalance, thin liquidity, a news reaction, or temporary order flow. The cleaner distinction is candle first, response second: the candle shows the pressure event, and the following structure shows whether that pressure is accepted or faded.
The most useful boundary is body acceptance. If price holds around the belt hold body without quickly erasing it, the reading remains more defensible. If the next candles immediately travel back through the body, the belt hold becomes a failed pressure clue rather than a strong diagnostic reading.
Belt Hold vs Nearby Candle Types
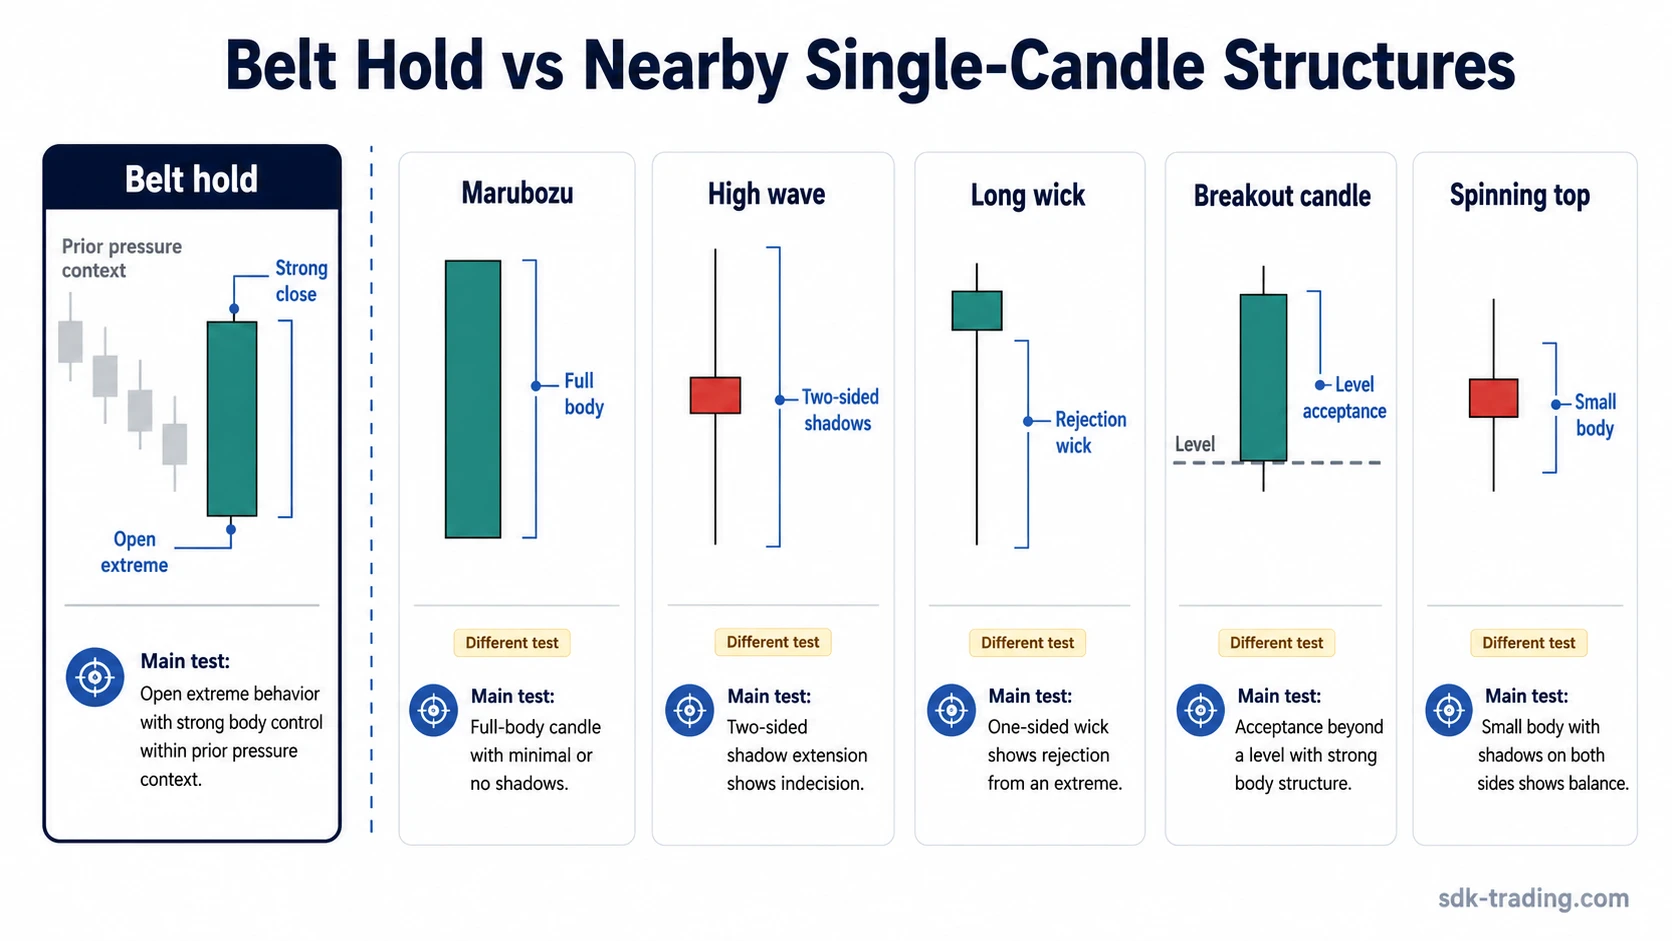
A belt hold can look similar to other strong or unusual single-candle structures, but the diagnostic test is different. The belt hold is defined by open-extreme behavior and body control after prior pressure, not by body size alone.
| Nearby candle | Main test | How it differs from a belt hold |
|---|---|---|
| Marubozu | Full or near-full body with very small shadows | A marubozu is classified mainly by candle shape, while a belt hold also needs open-extreme behavior after prior pressure. |
| High wave candle | Large upper and lower shadows | A high wave candle shows two-sided volatility and uncertainty, while a belt hold shows one-sided body control. |
| Long wick candle | Rejection from one side of the range | A long wick candle emphasizes rejection through the wick; a belt hold emphasizes the opening extreme and the close across the body. |
| Breakout candle | Acceptance beyond a prior level or boundary | A breakout candle is judged against a level. A belt hold is judged first by candle anatomy and prior pressure. |
| Spinning top | Small body with indecision | A spinning top has limited body control. A belt hold requires a strong body and a close near the opposite extreme. |
Common Belt Hold Mistakes
- Calling any large candle a belt hold. A large body is not enough. The open must be near one extreme and the close must finish near the opposite extreme.
- Ignoring the opening-side shadow. A large opening-side shadow weakens the idea that one side controlled the candle from the start.
- Forgetting prior pressure. The pattern has a cleaner role after visible movement in the opposite direction.
- Treating the candle as a completed reversal. The candle can warn that pressure changed, but it does not confirm a full reversal by itself.
- Ignoring fast body overlap. If price quickly moves back through the body, the strong close is being erased rather than accepted.
Illustrative Scenario
A bullish belt hold can appear after several weak candles when price opens near the low, rejects further downside, and closes near the high. That candle shows that buyers controlled the period, but the reading remains incomplete until the body is tested. If later candles avoid deep overlap and continue to respect the upper part of the body, the pressure clue stays intact. If price immediately falls back through the body, the candle becomes a failed one-period pressure event.
FAQ
What does a belt hold candlestick mean?
A belt hold candlestick means price opened near one candle extreme and closed strongly toward the opposite extreme, showing one-sided control during that period. The reading still depends on prior pressure, body quality, and follow-up response.
Is a belt hold candlestick bullish or bearish?
It can be either bullish or bearish. A bullish belt hold opens near the low and closes near the high after bearish pressure. A bearish belt hold opens near the high and closes near the low after bullish pressure.
Is a belt hold a single-candle pattern?
Yes. The belt hold itself is a single-candle structure. The surrounding candles do not form the pattern, but they help decide whether the single candle appears in meaningful context or inside random overlap.
Is a belt hold the same as a marubozu?
No. The two can look similar because both may have strong bodies and small shadows. A marubozu is mainly a candle-shape classification, while a belt hold also depends on open-extreme behavior and prior pressure.
Does a belt hold need a gap?
A strict scanner may require the open to be beyond the previous candle extreme, which often creates a gap-style condition. A practical chart reading can still treat the candle as belt-hold-like when the open is near the range extreme, the body is strong, and the surrounding context supports the reading.
When does a belt hold reading become stronger?
The reading becomes stronger when the candle opens near one extreme, closes strongly toward the opposite extreme, and later candles avoid erasing the belt hold body.