A high wave candle is a wide-range indecision candlestick with long upper and lower shadows, a relatively small or uncertain real body, and a total range that stands out from nearby candles. Price travels meaningfully in both directions during the candle, but the close does not show clear control by buyers or sellers.
The important feature is not just the presence of long wicks. The candle covers a broad high-to-low area, which means both sides were active enough to stretch the range. The final close leaves the movement unresolved rather than confirming clean directional control.
A high wave candle is not inherently bullish or bearish. Its meaning depends on where it appears, how large the range is compared with nearby candles, and how later candles behave around that same range.
Key Points
- A high wave candle has a wide total range compared with nearby candles.
- It usually has long upper and lower shadows.
- The real body is relatively small, uncertain, or not dominant enough to resolve control.
- The candle gains stronger interpretive value only after the surrounding range is tested, accepted, rejected, or left unresolved.
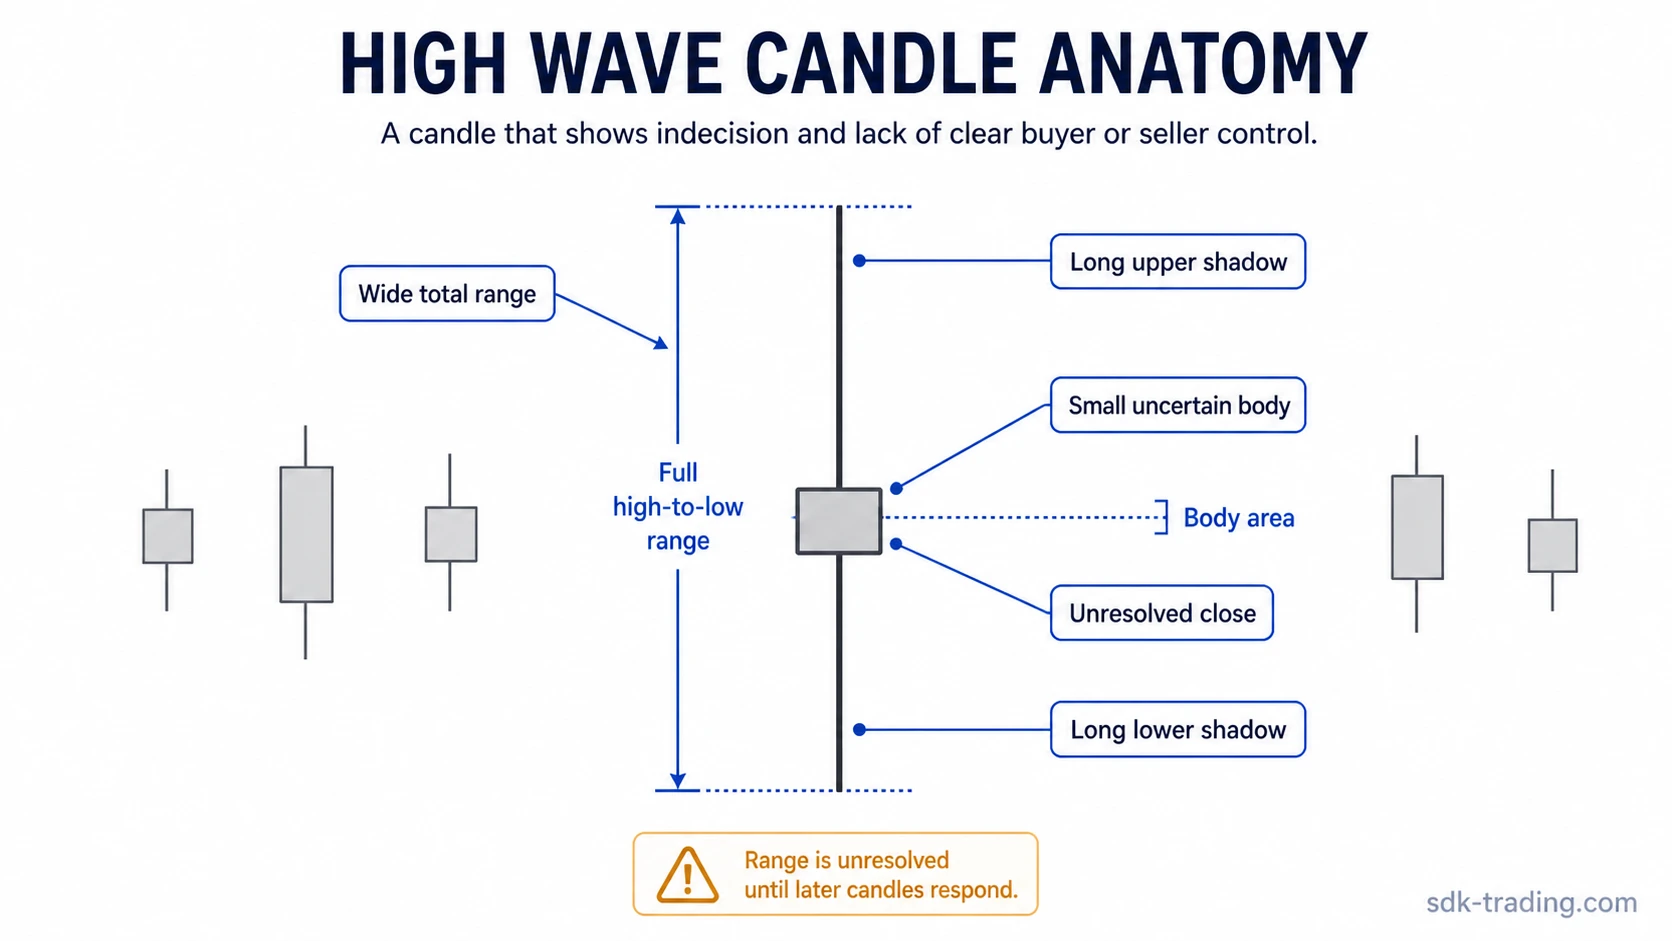
High Wave Candle Anatomy
The upper shadow shows that price moved above the body area but could not maintain that upper extension into the close. The lower shadow shows that price also moved below the body area and recovered from that lower extension before the candle closed.
The real body is usually small relative to the full candle range. It does not need to be a perfect doji, but the body should not dominate the candle. When the body is large and closes near one end of the range, the candle begins to behave more like directional pressure than unresolved two-sided movement.
The total high-to-low movement is the core filter. A small candle with modest shadows may still show hesitation, but it does not carry the same two-sided range expansion as a high wave candle. The full distance between the candle high and low is what separates high wave logic from smaller indecision candles.
Close location also matters. A close near the middle of the range keeps the candle highly unresolved. A close near the upper or lower side can tilt the interpretation slightly, but the next meaningful response around the range still carries more weight than the body color alone.
Why the Wide Range Matters
A high wave candle records conflict. Buyers were strong enough to push price toward the upper part of the range, while sellers were strong enough to push price toward the lower part of the range. The close shows that neither side finished with clean control.
That makes the high-wave range a reference area for subsequent price behavior. Acceptance above the range can resolve the earlier conflict upward. Acceptance below the range can resolve it downward. Continued movement inside the range keeps the conflict open.
Wide movement can appear near exhaustion, but a high wave candle does not prove that a move is ending. An exhaustion candle needs stronger evidence that one side has extended itself and failed to continue. A high wave candle only shows large two-sided movement with an uncertain close.
High Wave Candle vs Similar Candles
High wave candles are easy to confuse with other single-candle formations because several patterns use small bodies, shadows, or hesitation. The boundary is the wide two-sided range.
| Reading question | High wave candle answer | Common mistake |
|---|---|---|
| Is the candle mainly about open and close being nearly equal? | No. A doji focuses on the relationship between open and close, while a high wave candle focuses on wide two-sided movement plus uncertainty. | Calling every small-body candle a high wave candle. |
| Is the candle just a smaller hesitation candle? | No. A spinning top can show indecision, but a high wave candle emphasizes a broader total range and more aggressive movement in both directions. | Ignoring range size and treating all indecision candles the same. |
| Is one wick enough? | No. A long-wick candle can emphasize one-sided rejection, while a high wave candle usually has meaningful upper and lower shadows. | Using one large wick as the whole definition. |
| Does the candle reject one side clearly? | Not by itself. A rejection candle usually emphasizes failure at one side of the range, while a high wave candle leaves both sides more contested. | Reading unresolved two-sided pressure as clean rejection. |
How Later Candles Change the Reading
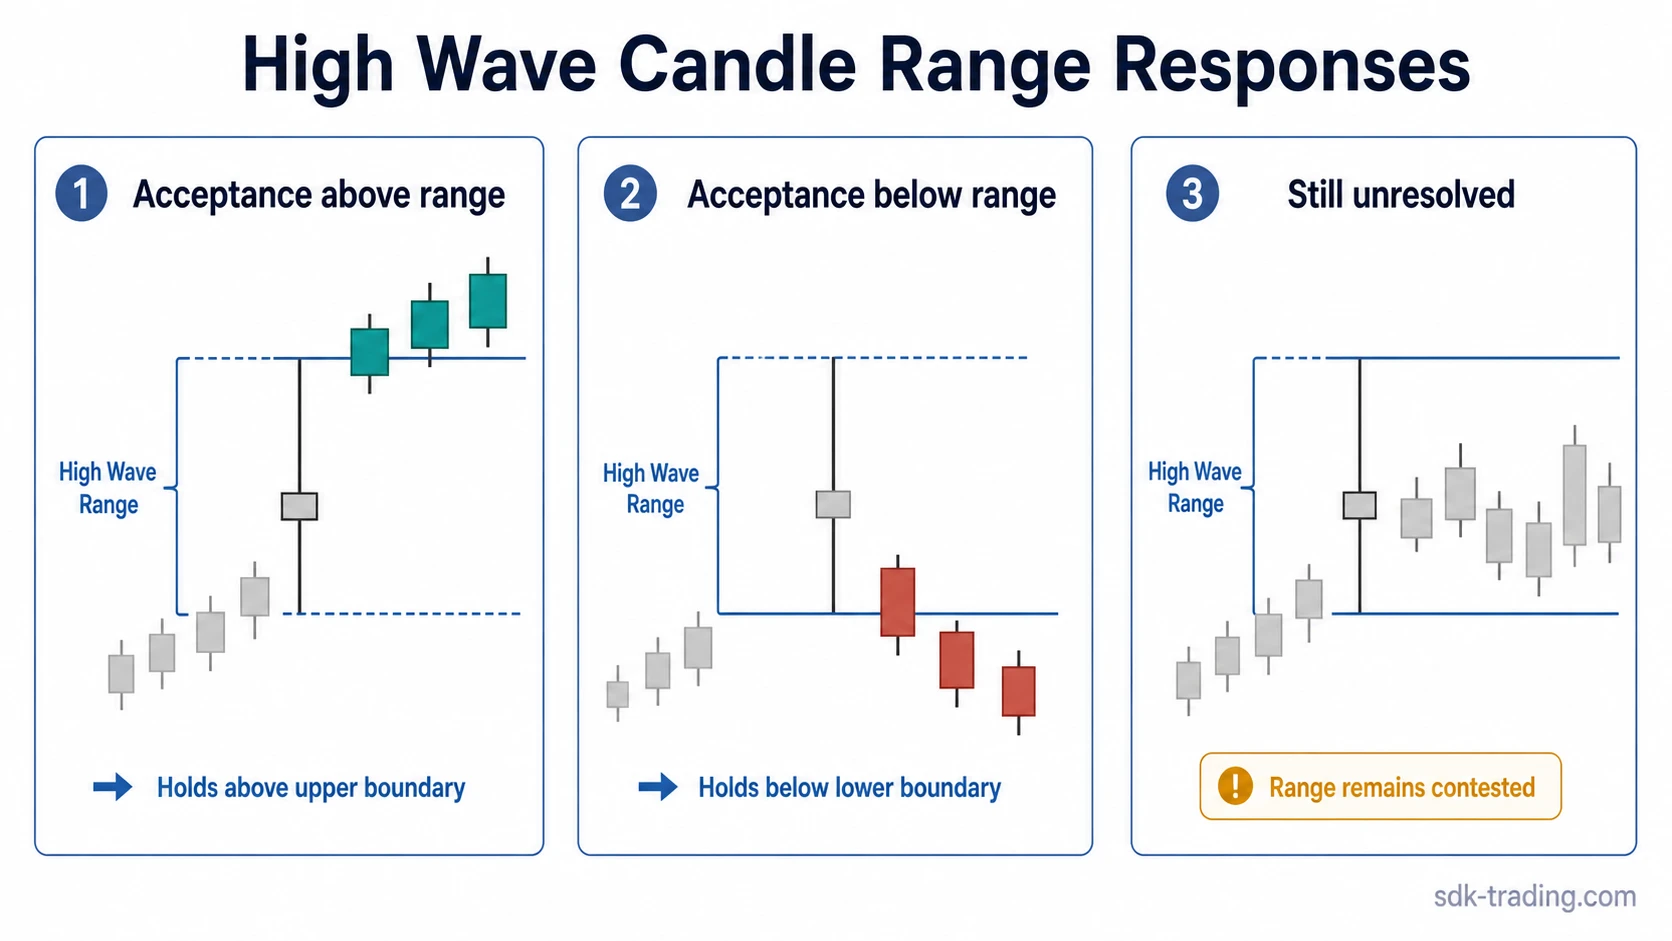
The high and low of the candle become important reference points. Later candles show whether the market accepts one side of that range, rejects it, or continues to rotate inside it.
Acceptance above the high-wave range can show that buyers absorbed the earlier conflict and extended price beyond it. Acceptance below the range can show that sellers resolved the conflict downward. Continued movement inside the range means the candle remains unresolved.
A wick beyond the high-wave range is not enough on its own. The stronger clue is whether price can hold outside the range or whether it quickly falls back inside it. The breakout candle concept helps separate a temporary range probe from a more meaningful outside close.
High Wave Candle Example in Context
Price advances into a prior reaction area after several directional candles. A high wave candle then forms with a much wider range than the surrounding candles, pushes above the prior area, falls below the body, and closes near the middle of the range.
That candle does not confirm a reversal. It shows that the prior move has met stronger two-sided activity. If the next candles hold above the high-wave range, the earlier conflict may resolve upward. If later candles lose the range and hold below it, the same candle becomes part of a weaker structure.
The useful reading comes from the sequence, not from the isolated candle. A high wave candle warns that price expanded in both directions without clean control; the next range response shows whether it becomes support, resistance, or congestion.
Common High Wave Candle Mistakes
- Reading it as a directional cue by itself: A high wave candle shows unresolved control, not a complete trade decision.
- Ignoring range size: Long shadows on a small candle do not always create the same meaning as a wide high-to-low range.
- Overweighting body color: The close color matters less than the full range and later response.
- Ignoring location: The candle means more near a prior reaction area, after an extended move, or around an important range boundary.
- Calling every indecision candle high wave: The pattern needs meaningful two-sided range expansion, not just hesitation.
Related Candlestick Concepts
High wave candles sit close to climax candle, rejection candle, exhaustion, and breakout logic, but the mechanism is different. Rejection focuses on one side failing, exhaustion asks whether continuation quality is fading, and breakout logic becomes relevant only when later candles accept beyond the high-wave range instead of briefly testing it.
FAQ
What does the high wave candle range show?
The high wave candle range shows that price traveled widely in both directions but did not finish with clean control. The high and low become reference points for later acceptance, rejection, or unresolved rotation.
Is a high wave candle the same as a spinning top?
No. Both can show indecision, but a high wave candle emphasizes a wider total range and stronger movement in both directions. A spinning top can be smaller and less range-driven.
When does a high wave candle become more meaningful?
A high wave candle becomes more meaningful when later candles accept above the range, accept below the range, or keep rotating inside it. The later range response decides whether the earlier conflict resolves or remains unresolved.