A rejection candle is a candlestick where price tests one side of a range, fails to hold that tested area, and closes back away from the extreme. The wick records the failed extension, while the body and close show that price did not accept the area cleanly.
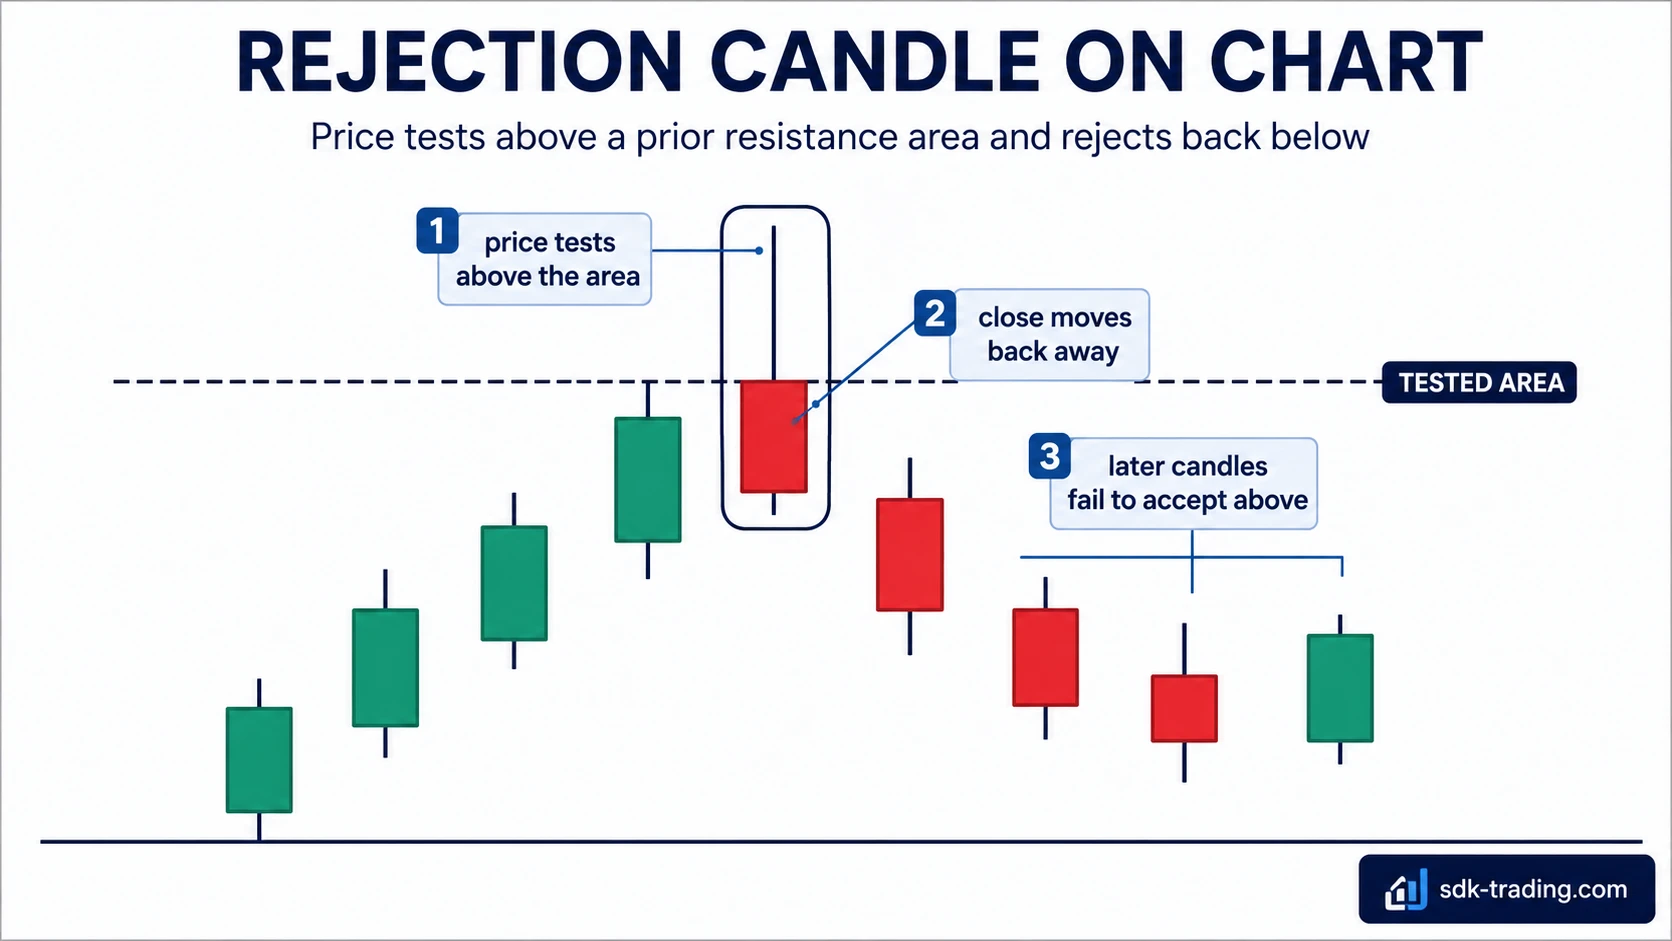
Safe interpretation: a rejection candle is not defined by wick length alone. The reading needs a tested area, a close away from the extreme, and later price behavior that does not quickly accept beyond the same area.
Key Points
- A rejection candle shows a failed attempt to hold one side of the candle range.
- An upper rejection candle tests higher prices and closes back away from the high.
- A lower rejection candle tests lower prices and closes back away from the low.
- The wick is the visible clue, but failed acceptance gives the candle its meaning.
- Later candles can confirm, weaken, or invalidate the rejection reading.
Rejection Candle Anatomy
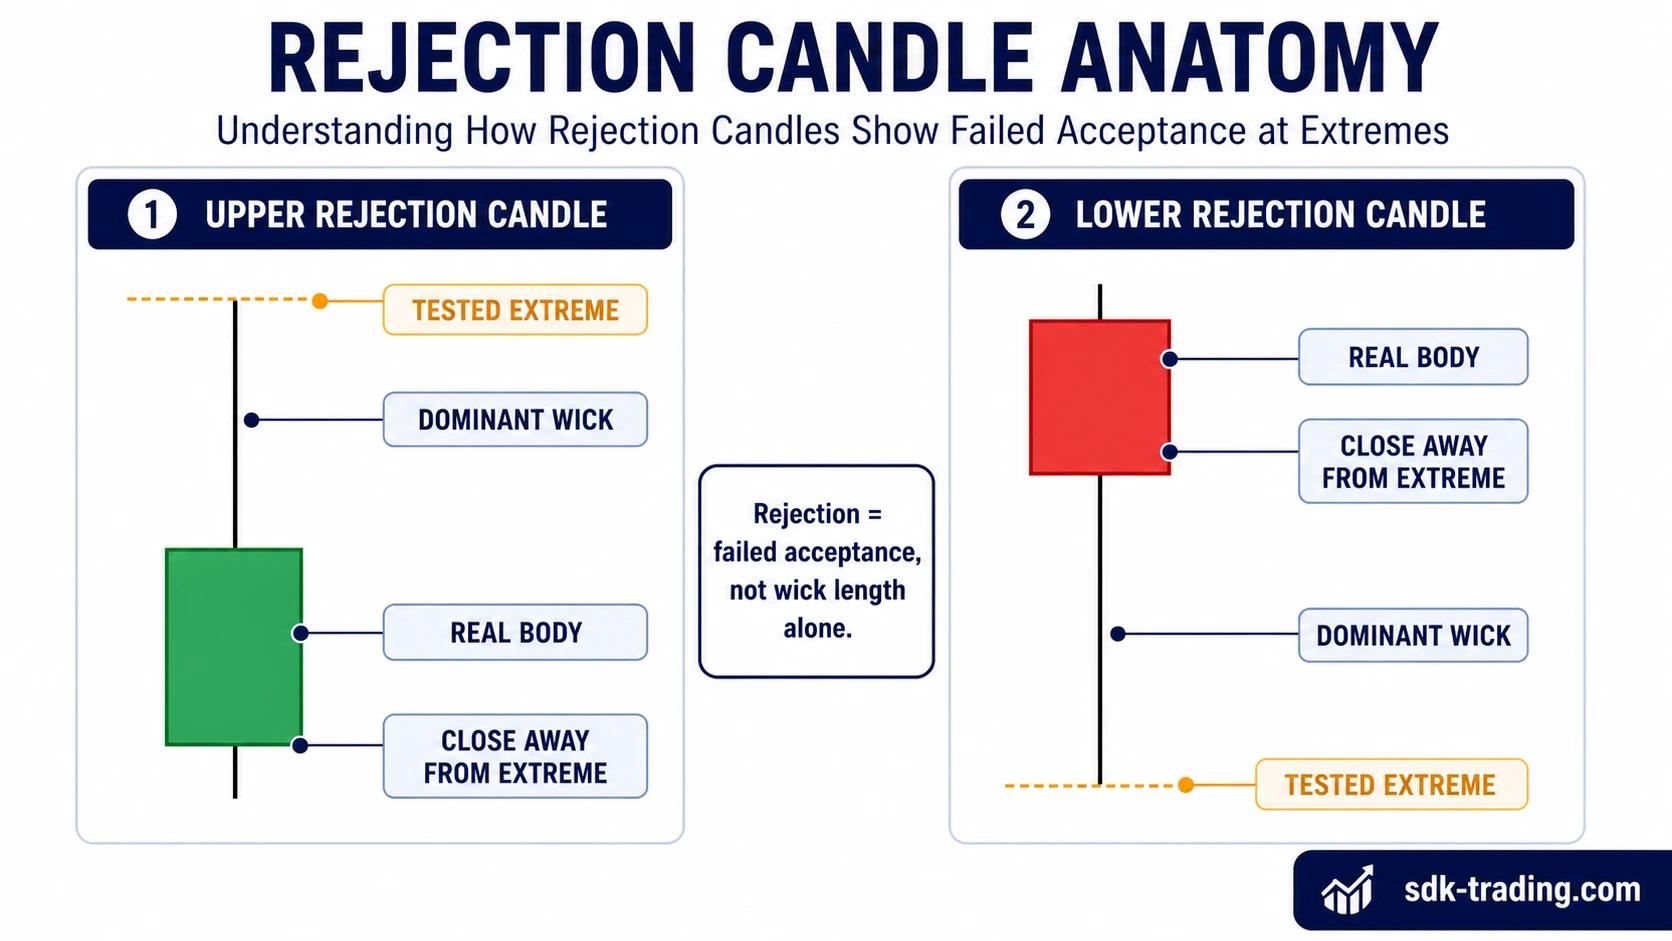
A rejection candle is easier to read when the tested extreme, dominant wick, real body, close location, and reference area are separated clearly. The candle can be bullish or bearish in color; the important question is whether price accepted the tested area or closed back away from it.
| Candle part | What it shows | Why it matters |
|---|---|---|
| Tested extreme | The high or low that price reached during the candle. | This is the area where acceptance failed or remains unproven. |
| Dominant wick | The extended shadow left on the tested side. | It shows that price traveled there but did not fully hold there by the close. |
| Real body | The distance between the open and the close. | It shows where the candle settled relative to the tested extreme. |
| Close location | Where the candle finished inside the range. | A close away from the extreme supports the failed-acceptance reading. |
| Reference area | A prior level, range edge, support area, resistance area, or structure zone. | Rejection carries more weight when the test happens at a meaningful area. |
Basic Rejection Candle Sequence
A rejection candle is best read as a sequence rather than as a single wick. Price first approaches a reference area, tests beyond it, fails to hold there, and closes back away from the tested side. The next candles then show whether that failed test still matters.
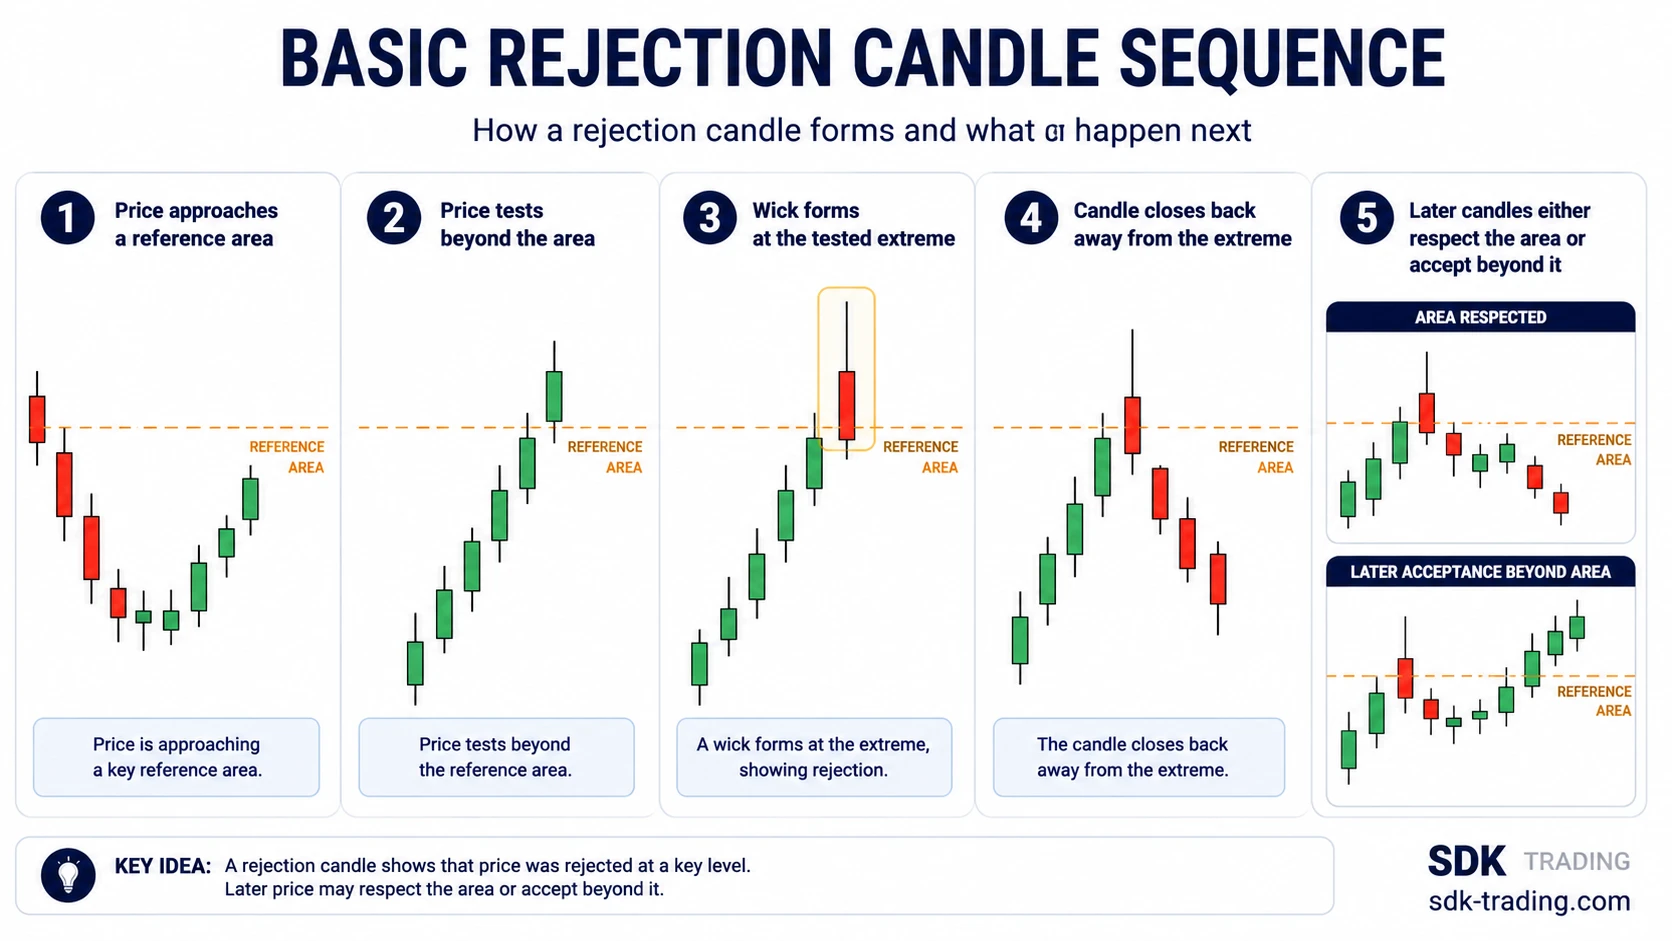
- Price approaches a reference area.
- Price tests beyond the area or into the edge of the range.
- A wick forms at the tested extreme.
- The candle closes back away from that extreme.
- Later candles either respect the rejected area or accept beyond it.
When a Candle Counts as a Rejection Candle
The boundary is failed acceptance. A candle with a large wick may show wide movement, but a rejection candle adds a clearer relationship between the tested area, the wick, the close, and the next price response.
| Reading condition | Supports a rejection reading | Weakens a rejection reading |
|---|---|---|
| Wick structure | The wick dominates the tested side of the candle. | The candle only has a long shadow without failed-extension context. |
| Tested area | Price tests a reference area, range edge, support zone, or resistance zone. | The wick forms in the middle of ordinary movement without a meaningful test. |
| Body and close | The body and close move back away from the tested extreme. | The close remains too close to the extreme to show a clean failure. |
| Later candles | Later candles do not accept beyond the rejected area. | Price later closes and holds beyond the same tested area. |
A breakout candle has a different read when price moves beyond an area and holds there. A rejection candle raises the opposite question: price moved beyond an area, but did it stay there?
Upper and Lower Rejection Candles
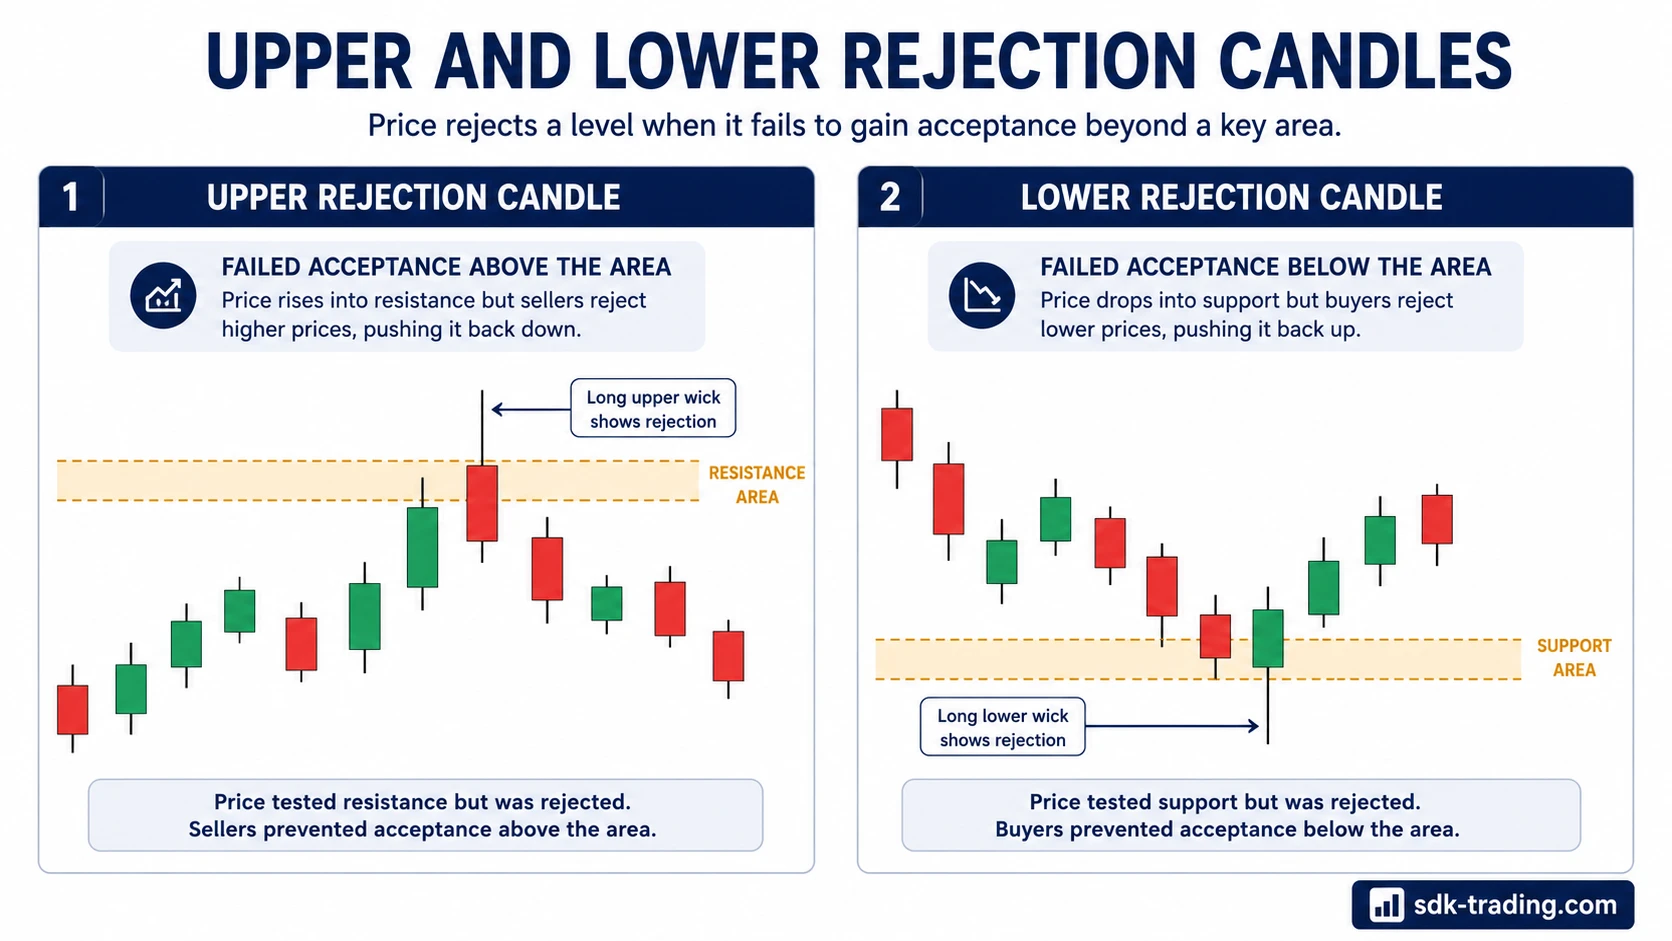
Rejection candles can form on either side of the candle range. An upper rejection candle tests higher prices and closes back away from the high. A lower rejection candle tests lower prices and closes back away from the low.
| Type | Visual clue | What failed | What still needs checking |
|---|---|---|---|
| Upper rejection candle | Long upper wick with the close away from the high. | Acceptance above the tested area. | Whether later candles remain below that tested area. |
| Lower rejection candle | Long lower wick with the close away from the low. | Acceptance below the tested area. | Whether later candles remain above that tested area. |
Rejection Candle vs Similar Candlesticks
A rejection candle is defined by failed acceptance at a tested area, not by wick size alone. This is why it can overlap visually with other candles while still having a different interpretation rule.
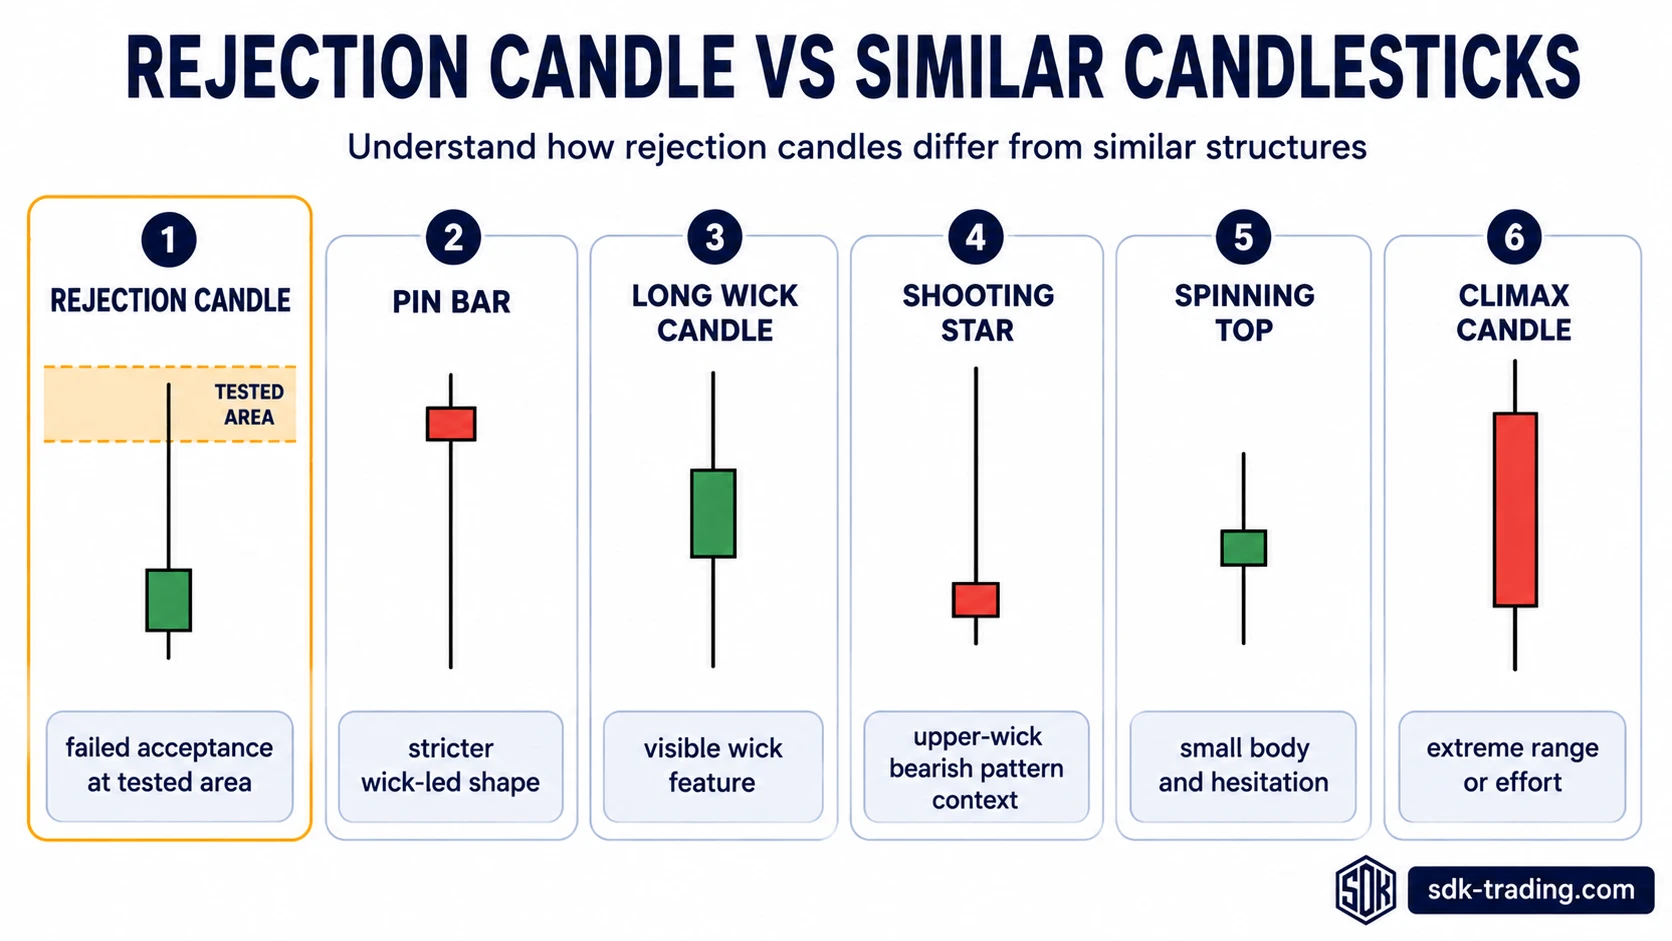
| Candlestick | Main idea | How it differs from a rejection candle |
|---|---|---|
| Rejection candle | Failed acceptance from a tested area. | The reading depends on the wick, body, close, location, and later response. |
| Pin bar | Stricter wick-led candle shape. | A pin bar has cleaner proportion requirements; a rejection candle can be broader. |
| Long wick candle | Visible wick feature. | A long wick shows price travel, but rejection requires failed acceptance at a tested area. |
| Shooting star | Upper-wick bearish pattern context. | A shooting star is narrower and context-specific; rejection candles can be upper or lower. |
| Spinning top | Small body with hesitation. | A spinning top highlights balance or indecision more than failed acceptance at one extreme. |
| Climax candle | Extreme range or effort. | A climax candle emphasizes intensity; a rejection candle emphasizes failure to hold the tested area. |
| Exhaustion candle | A move losing force after extension. | Exhaustion focuses on fading force; rejection focuses on failed acceptance at the tested area. |
Rejection Candle Example in Context
A rejection candle becomes more useful when it appears around a meaningful area rather than in the middle of random movement. The same candle shape can carry a different meaning depending on whether it forms near prior resistance, prior support, a range edge, or a weakly defined area.
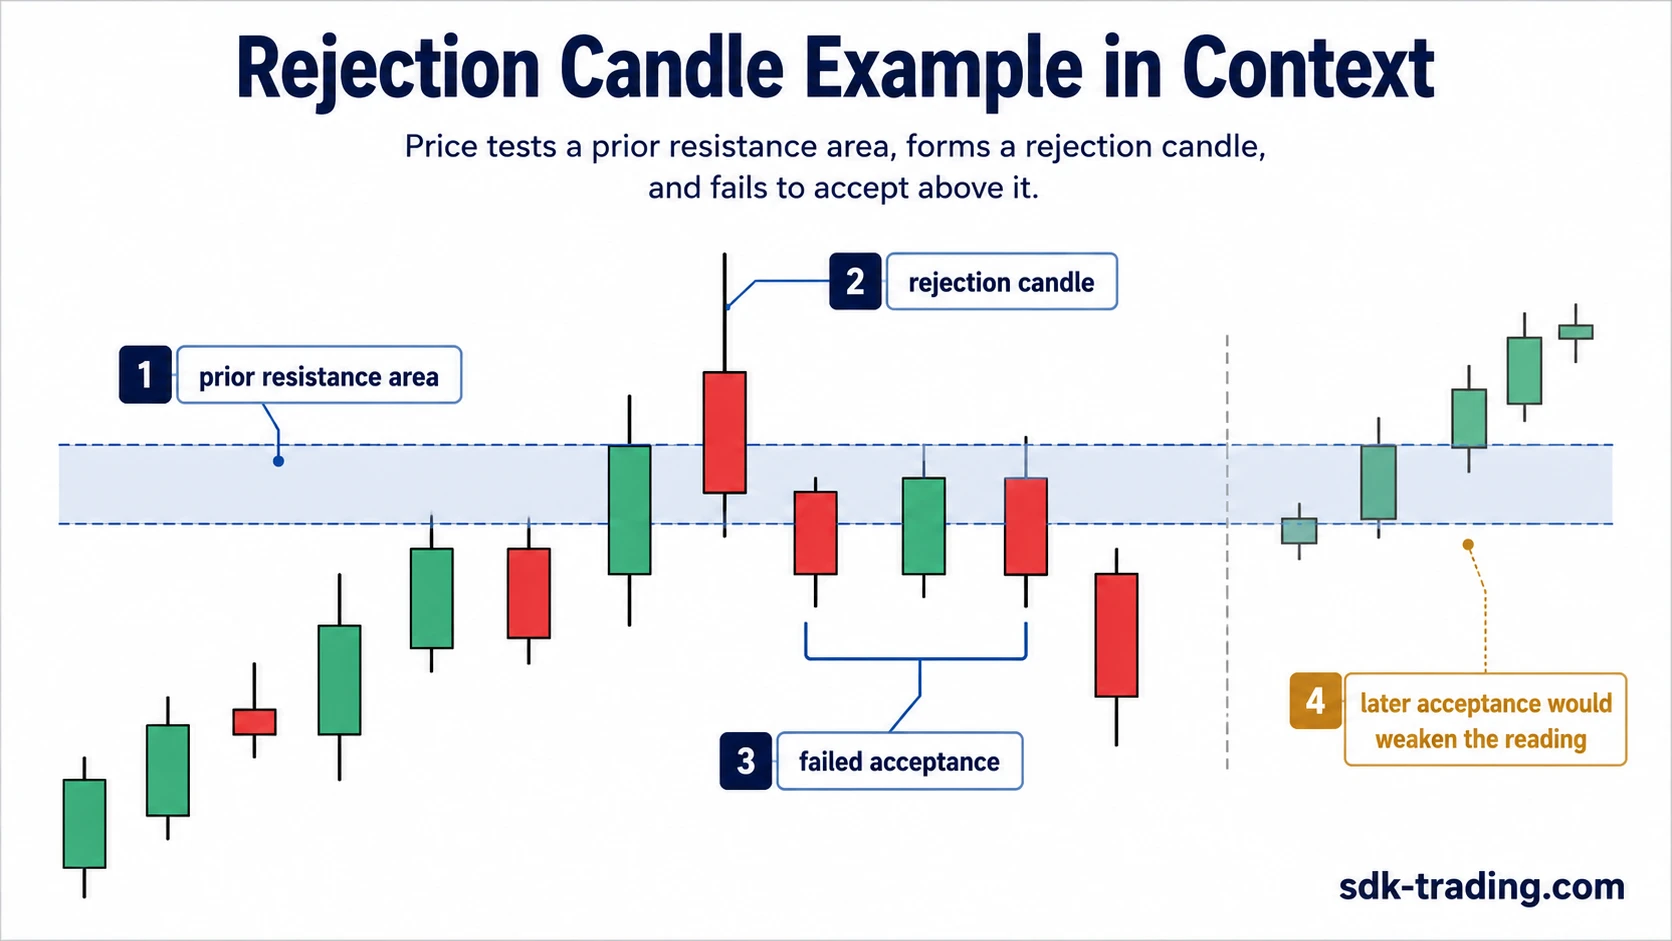
For example, price may advance into a prior resistance area, briefly trade above it, and then close back below the area with a long upper wick. That candle can support a bearish rejection reading only if later candles also fail to accept above the same zone.
If later candles reclaim the tested high and hold above the area, the earlier rejection reading weakens. The wick still records the earlier test, but the market has shown later acceptance beyond the area that was first rejected.
When the Rejection Reading Weakens
The cleanest rejection reading weakens when later candles accept beyond the tested extreme. In that case, the wick no longer marks a rejected area with the same strength. It may have been an early probe before price found acceptance beyond the range edge.
A weak reading can also appear when the candle closes too close to the tested extreme. If the close remains near the high after an upper test or near the low after a lower test, the candle may show pressure rather than clean rejection.
Useful boundary: rejection is a failed-acceptance reading. Without a meaningful tested area, close location, and later response, the candle is safer to describe by its visible structure instead of naming it as rejection.
Common Mistakes When Reading Rejection Candles
Most rejection candle mistakes come from naming the candle too early. The safer approach is to separate the visible wick from the tested area, close location, and later candle response.
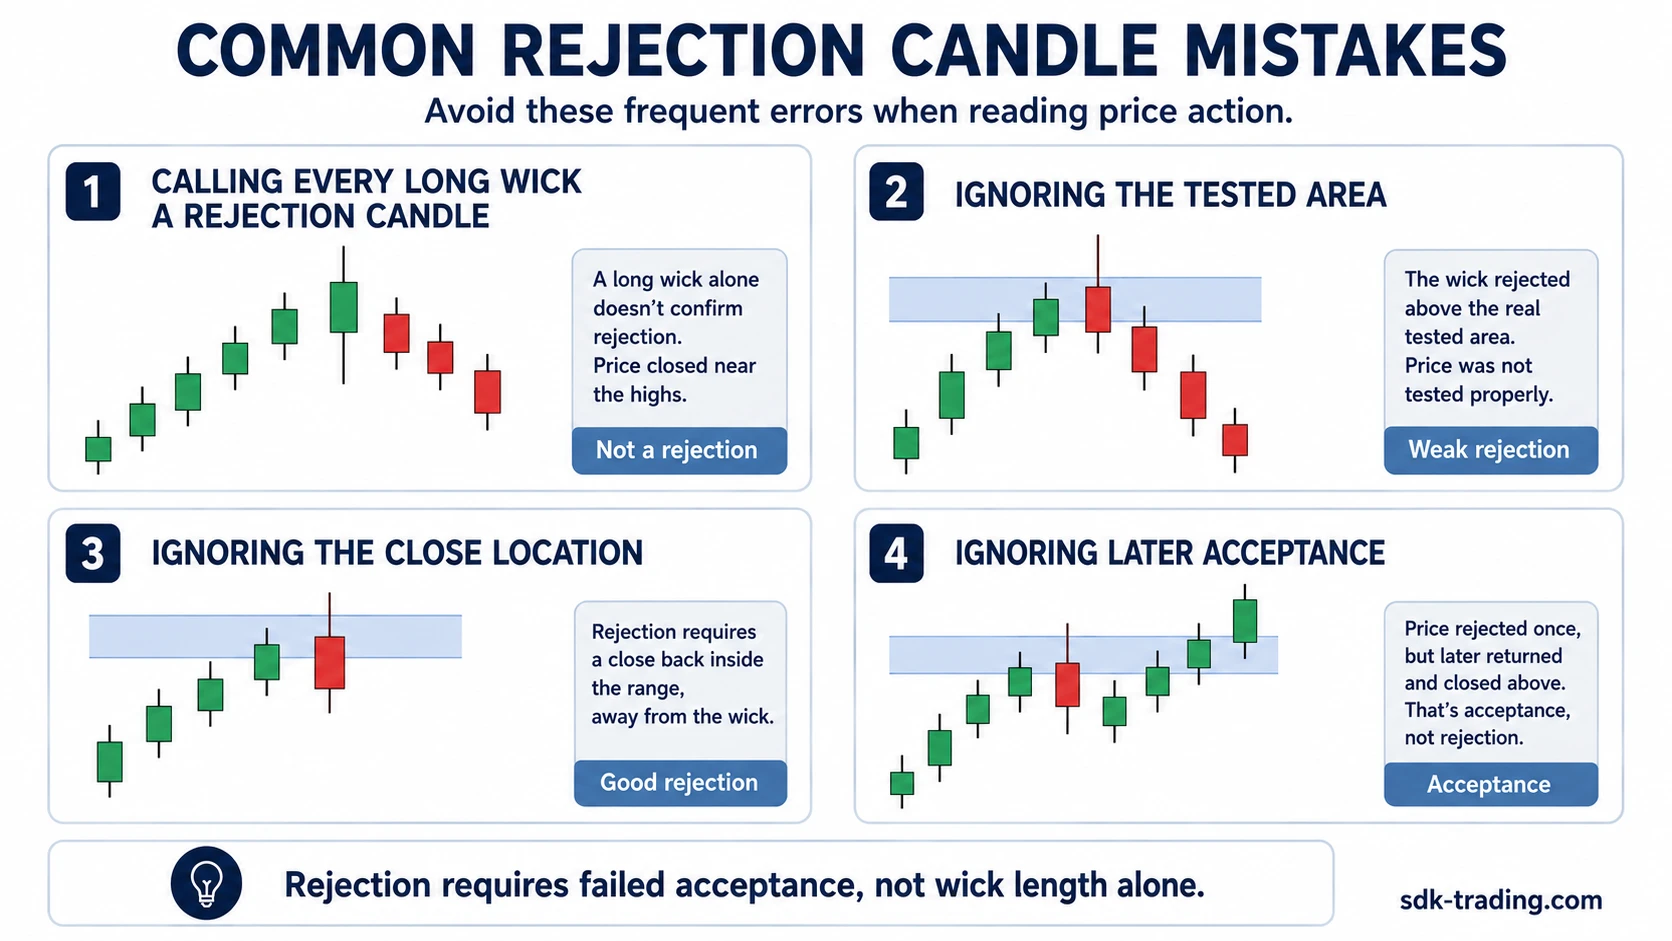
| Mistake | Safer reading |
|---|---|
| Calling every long wick a rejection candle | A long wick is only the visible structure; rejection needs failed acceptance at a tested area. |
| Ignoring the tested area | The reading is stronger when price tests a meaningful support, resistance, range edge, or reference zone. |
| Ignoring the close location | The close should move back away from the tested extreme to support a cleaner failed-hold reading. |
| Ignoring later acceptance | Later candles can weaken the rejection reading if they accept beyond the same tested area. |
| Treating the candle as a standalone signal | A rejection candle is a context clue, not a complete trading decision by itself. |
FAQ
What does a rejection candle mean in trading?
A rejection candle means price tested one side of the candle range and failed to hold there. The wick marks the tested extreme, while the body and close show that price moved back away from that area before the candle finished.
Is a rejection candle the same as a pin bar?
No. A pin bar is a stricter candlestick structure with more specific shape requirements. A rejection candle is broader and can include wick-led failed-extension candles that are not clean pin bars.
Is every long wick candle a rejection candle?
No. A long wick candle describes the visible candle shape. A rejection candle requires failed acceptance at the tested extreme, shown by the body, the close, and later price behavior.
When does a rejection candle reading become stronger?
The reading becomes stronger when later candles respect the rejected area and avoid accepting beyond the wick extreme. That follow-up behavior shows that the failed acceptance remained relevant after the candle closed.
What weakens a rejection candle reading?
The reading weakens when later candles accept beyond the tested extreme, when the close stays too close to the extreme, or when the candle is only a long wick without clear failed-extension context.