A Pin Bar is a single-candle rejection structure with one dominant wick, a small real body, and a close near the side opposite the wick. The long wick shows that price tested one side of the candle range but failed to hold that area by the close.
The candle is not a complete reversal reading by itself. A lower-wick Pin Bar can show rejection of lower prices. An upper-wick Pin Bar can show rejection of higher prices. In both cases, the reading depends on wick dominance, body placement, close location, surrounding structure, and the next candles’ response to the rejected area.
Key Points
- A Pin Bar is defined by one dominant wick, a small body, and a close away from the wick extreme.
- The wick marks the tested area; the body and close show whether price failed to stay there.
- Body color can add context, but it does not define the pattern by itself.
- A long wick alone is not enough if the body sits near the middle of the range or both wicks are large.
- The reading is cleaner when the wick protrudes beyond nearby candles and later price avoids immediate deep acceptance back through the rejected area.
What Is a Pin Bar?
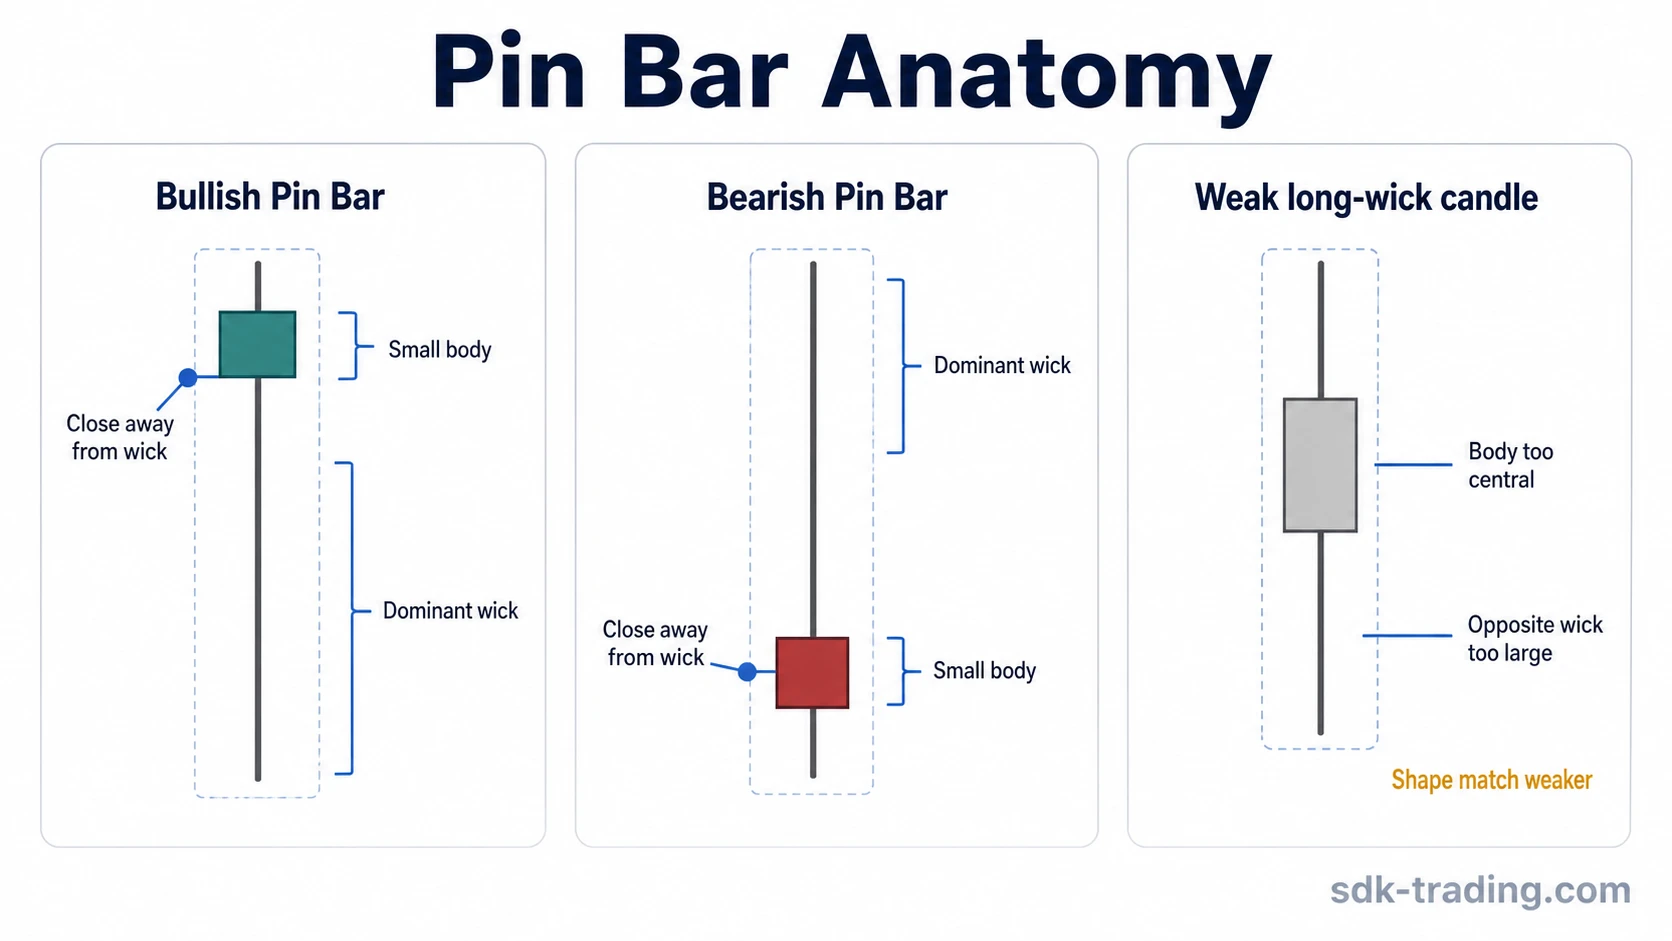
A Pin Bar is a wick-dominant candlestick where price moves toward one candle extreme, rejects that area, and closes back near the opposite side of the range. The candle has one long tail, a compressed real body, and little or no opposite-side wick.
The useful distinction is that the wick does not simply show volatility. It shows a tested extreme that did not hold into the close. If price closes near the middle of the candle, or if both sides of the candle have large shadows, the structure becomes a weaker Pin Bar reading and may be closer to a high-wave or general long-wick candle.
Pin Bars are often used in price-action analysis because they compress a test and rejection into one candle. That does not make the candle a complete trading method. Candlestick analysis works better as a timing and context layer than as a standalone decision rule.
Pin Bar Anatomy
A clean Pin Bar has three visible parts: a dominant wick, a small real body, and a close near the side opposite the wick. The body can close bullish or bearish, but the body color is secondary to where the body sits inside the full candle range.
| Feature | Cleaner Pin Bar Reading | Weaker Reading |
|---|---|---|
| Dominant wick | One wick clearly controls most of the candle range. | The wick is only slightly longer than the body or nearby shadows. |
| Small real body | The open and close stay close together near the side opposite the wick. | The body is wide enough that the candle looks more like a normal range candle. |
| Close location | The close finishes away from the rejected extreme. | The close sits near the middle of the candle and leaves rejection unclear. |
| Opposite wick | The opposite wick is short or visually minor. | Both sides show large shadows, which creates a high-wave or indecision reading. |
| Nearby candles | The long wick protrudes beyond nearby price action or tests a visible boundary. | The candle forms inside noisy congestion without a clear tested extreme. |
Bullish and Bearish Pin Bars
A lower-wick Pin Bar is usually read as a bullish rejection structure because price tested lower levels and closed back toward the upper side of the candle range. This reading is cleaner when the lower wick pushes into a prior low, support area, pullback zone, or failed downside probe.
An upper-wick Pin Bar is usually read as a bearish rejection structure because price tested higher levels and closed back toward the lower side of the candle range. This reading is cleaner when the upper wick pushes into a prior high, resistance area, supply zone, or failed upside probe.
Neither version guarantees reversal. A lower-wick Pin Bar can fail if later candles accept below the body or move back through the rejected wick area. An upper-wick Pin Bar can fail if later candles accept above the body or reclaim the wick area. The candle starts the rejection question; follow-through decides whether that question remains valid.
How to Identify a Pin Bar Without Overreading It
The safest way to identify a Pin Bar is to start with candle structure before assigning direction. First, check whether one wick dominates the candle. Second, check whether the real body is compressed near the opposite side of the range. Third, check whether the close supports rejection away from the wick extreme.
Only after the anatomy is clear should the location be interpreted. A Pin Bar in the middle of a range is usually weaker than a Pin Bar that tests a visible boundary. A long wick that appears after a sharp move can show a failed probe, but it can also be ordinary volatility if later candles immediately trade back through the body and accept inside the wick area.
| Question | Cleaner Answer | Risky Answer |
|---|---|---|
| Did one side of the candle clearly dominate? | Yes, one wick is visually larger than the body and opposite wick. | No, both sides have large shadows or the body is too large. |
| Did the close reject the tested extreme? | Yes, the close finished near the opposite side of the range. | No, the close stayed near the middle of the candle. |
| Did the wick test a meaningful area? | Yes, it pushed beyond nearby candles or into a visible boundary. | No, it formed inside random congestion. |
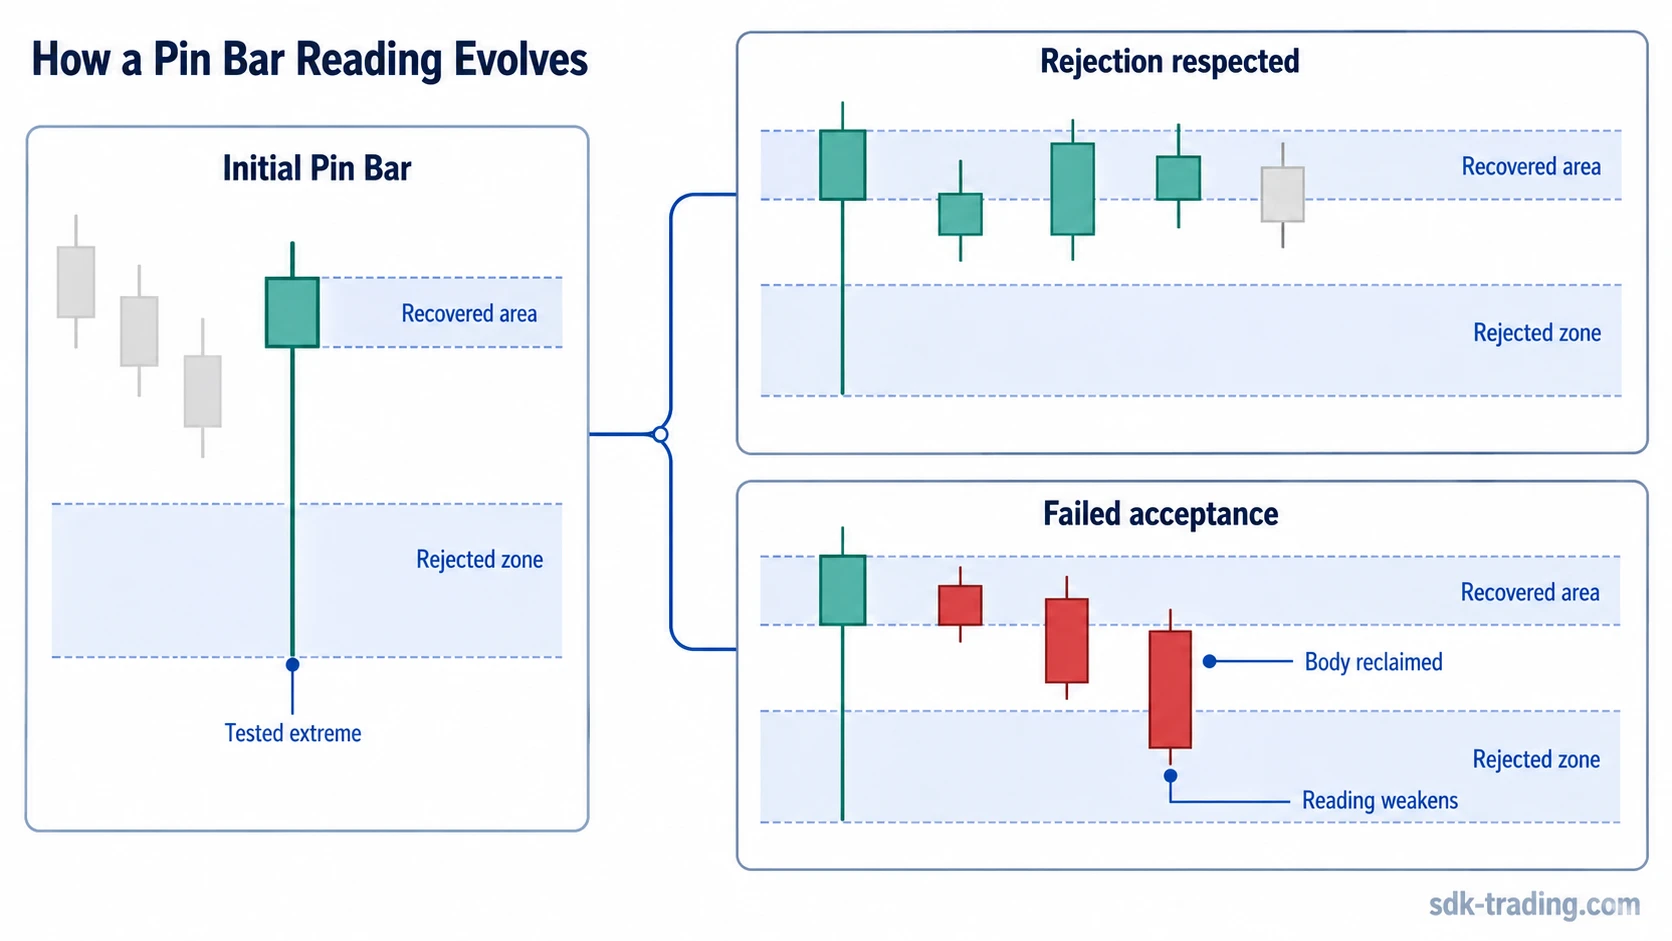
| Did later candles respect the rejection? | Yes, follow-up candles avoided deep acceptance through the body. | No, later candles quickly erased the rejected area. |
Clean, Weak and Invalid Pin Bar Readings
A clean Pin Bar has a dominant wick, a small body, a close away from the rejected extreme, and a location that makes the test meaningful. It does not need to be perfect, but the candle should make the tested side obvious without forcing the interpretation.
A weak Pin Bar has the general outline but lacks one of the main requirements. The wick may be long, but the body may sit too close to the middle. The candle may reject one side, but it may form inside a noisy range. The shape may be visible, but nearby candles may make the tested extreme less meaningful.
An invalid or failed Pin Bar reading happens when later candles quickly accept back through the body or through the rejected wick area. That does not mean the original candle was impossible to label as a Pin Bar. It means the rejection interpretation did not hold after new price information appeared.
| Reading | What It Looks Like | Interpretation Discipline |
|---|---|---|
| Clean | Dominant wick, small body, close away from the wick, visible tested extreme. | Rejection reading is defensible if later candles respect the area. |
| Weak | Long wick but mixed body placement, noisy location, or unclear surrounding structure. | Keep the label tentative and avoid treating the candle as decisive. |
| Invalid or failed | Later candles quickly trade through the body or accept back into the rejected area. | The initial rejection reading is no longer supported by follow-through. |

Pin Bar vs Similar Candlestick Labels
Pin Bar, hammer, shooting star, rejection candle, long-wick candle, and Marubozu structures can appear near each other in candlestick analysis, but they do not test the same thing. A Pin Bar is primarily a wick-dominant shape label. A rejection candle is a broader interpretation label focused on a failed price probe. A hammer is a lower-wick structure usually interpreted after downside pressure or near support.
The comparison with hammer vs pin bar matters because many lower-wick Pin Bars can look like hammers, but not every Pin Bar has the hammer’s contextual requirement. A Pin Bar can also appear as an upper-wick structure, while the hammer label normally points to lower-side rejection.
A Pin Bar is also different from Marubozu opening. A Pin Bar depends on a failed move away from one candle extreme. Marubozu opening depends on opening-side control and limited opening-side shadow. One is a rejection structure; the other is an open-control structure.
| Label | Main Test | How It Differs From Pin Bar |
|---|---|---|
| Pin Bar | One dominant wick and a close away from the tested extreme. | Shape-first rejection structure. |
| Hammer | Lower-wick rejection after downside pressure or near support. | More context-specific than the broader Pin Bar label. |
| Shooting star | Upper-wick rejection after upside pressure or near resistance. | Direction and location are more specific. |
| Long-wick candle | Large shadow on one or both sides. | May lack the small body and close position needed for a clean Pin Bar. |
| High-wave candle | Large shadows on both sides with uncertainty. | Shows two-sided volatility rather than one-sided rejection. |
| Marubozu | Body control with little or no shadow. | Opposite structural idea: control rather than rejection. |

Example Scenario: Tested Extreme, Recovered Area, Failed Acceptance
Consider a market that has been pulling back into a prior demand area. During one candle, price pushes below the nearby lows, forms a long lower wick, and then closes near the upper side of the candle range. The shape may qualify as a lower-wick Pin Bar because the candle tested lower prices and closed away from that probe.
The useful reading is not “the market must reverse.” The cleaner reading is that sellers tested lower prices and did not maintain acceptance there by the close. If the next candles hold above the body and avoid immediate movement back through the lower wick, the rejection reading remains more defensible. If the next candles push back through the body and accept below the wick area, the Pin Bar becomes a failed rejection attempt.
The same logic applies to an upper-wick Pin Bar. Price may push above a prior high, fail to hold there, and close back near the lower side of the range. The candle can warn that the upside probe failed, but the reading weakens if later candles reclaim the body and hold above the rejected area.
Common Mistakes When Reading Pin Bars
The most common mistake is treating every long wick as a Pin Bar. A long wick is only one part of the structure. The body must also be small, positioned near the opposite side of the range, and supported by a close that shows the tested extreme did not hold.
Another mistake is reading the candle without location. A Pin Bar at a visible boundary can show a failed probe. A similar candle in the middle of congestion may only show temporary volatility. The same candle shape can carry a different meaning depending on where it appears.
A third mistake is treating the candle as a prediction. Pin Bars can warn that one side of the market failed to hold control during one candle, but later candles decide whether that rejection becomes accepted, ignored, or fully erased.
Pin Bar FAQ
What does a Pin Bar candlestick mean in trading?
A Pin Bar means price tested one side of the candle range but closed back near the opposite side. It can support a rejection reading when the dominant wick, small body, close position, and market location point to the same interpretation.
Is a Pin Bar bullish or bearish?
A Pin Bar can be bullish or bearish. A lower-wick Pin Bar is usually read as bullish rejection when it appears near a meaningful lower area. An upper-wick Pin Bar is usually read as bearish rejection when it appears near a meaningful upper area.
Is a Pin Bar the same as a hammer?
Not always. A hammer is usually a lower-wick candle interpreted in a downside or support context. A Pin Bar is the broader wick-dominant shape label and can appear in different locations.
When does a Pin Bar reading become stronger?
The reading becomes stronger when the dominant wick tests a meaningful area, the close rejects that area, and later candles avoid accepting beyond the wick extreme.