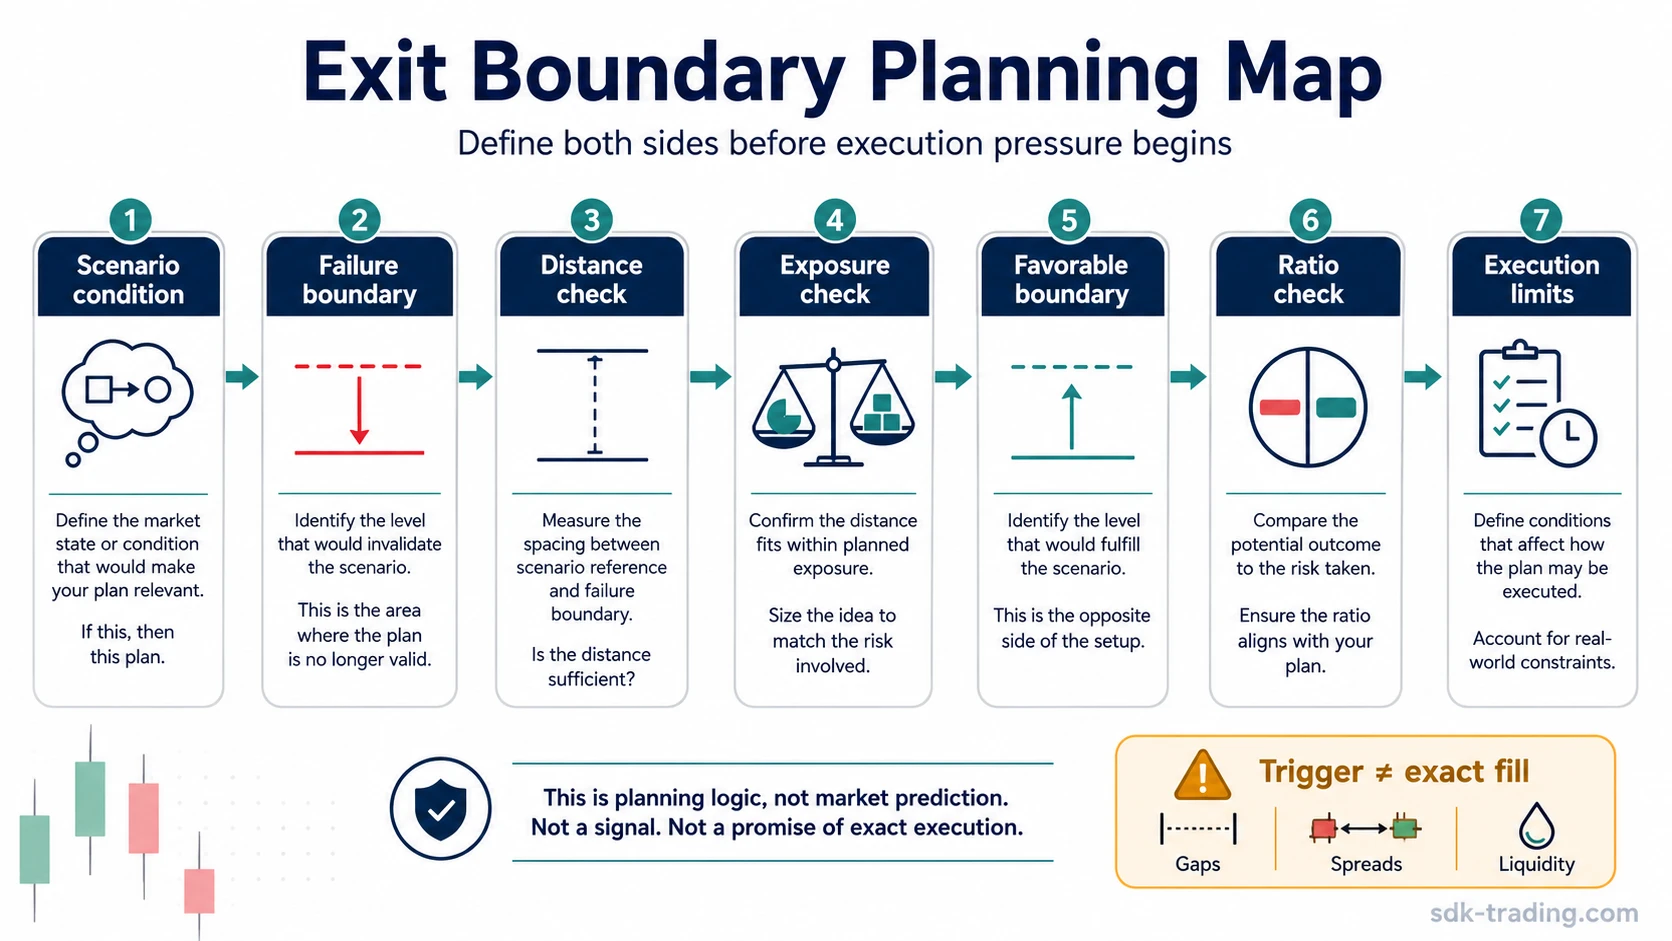
Setting stop loss and take profit means defining both exit boundaries before the trade depends on emotion. The stop-loss side marks where the scenario is invalid, unclear, or no longer acceptable; the take-profit side marks where favorable movement is enough to reduce or close exposure.
The useful sequence is simple: invalidation -> stop distance -> position exposure -> target condition -> reward/risk -> execution limits. That sequence does not predict the next price move. It gives the trade a planned boundary before uncertainty begins to affect decisions.
Key Points
- A stop loss and a take profit work best as a paired exit plan, not as separate afterthoughts.
- The stop should relate to invalidation or unacceptable risk, not only to the nearest convenient price.
- The take-profit level should relate to a target condition, such as structure, prior supply, reduced reward/risk, or a planned exposure reduction.
- Stop distance and target distance must be checked together because they affect reward/risk and position exposure.
- Exit orders control planned response, but they do not guarantee profit, exact fills, or correct market direction.
Stop Loss and Take Profit Work as Paired Exit Boundaries
A stop loss defines the downside boundary of the trade plan. It answers the question: where is the original scenario wrong, too damaged, or no longer worth the remaining exposure?
A take profit defines the favorable exit boundary. It answers a different question: where has the market moved far enough that keeping the same exposure no longer offers the same quality of reward relative to risk?
Core idea: stop loss and take profit are paired boundaries. One limits continued exposure when the scenario fails or risk becomes unacceptable. The other defines where favorable movement is sufficient to realize, reduce, or reassess exposure.
Planning only the stop can leave the trade without a realistic profit condition. Planning only the target can leave the downside undefined. The two levels need to be evaluated together because a target that looks attractive may not justify the stop distance, and a stop that looks small may be too tight for normal market movement.
Start With Invalidation Before Choosing the Stop
The stop-loss decision should begin with invalidation. Invalidation is the condition that makes the trade scenario no longer reasonable. It may come from a broken structure area, failed acceptance, a loss of confirmation, or a level where the original reason for participation no longer applies.
A common mistake is placing the stop where the loss feels comfortable before checking whether that level has any structural meaning. A tight stop can reduce the planned loss on paper, but it can also sit inside ordinary market noise. In that case, the stop may be triggered before the scenario has truly failed.
| Stop question | Stronger planning logic | Common weak version |
|---|---|---|
| What invalidates the scenario? | The trade idea no longer makes sense if price accepts beyond the chosen boundary. | The stop is placed at a round number or a fixed small distance. |
| Is the stop outside normal noise? | The level allows room for expected fluctuation while still defining failure. | The stop is so close that ordinary movement can trigger it. |
| What does the distance do to exposure? | Position size is adjusted if the stop distance creates too much account risk. | The same position size is kept even after the stop is moved wider. |
A wider stop is not automatically safer. A tighter stop is not automatically more disciplined. The quality of the stop depends on whether it connects invalidation, noise, distance, and position exposure.
Set the Take Profit Around a Target Condition
The take-profit decision should begin with the condition that makes continued exposure less attractive. That condition may be a prior resistance area, a supply zone, a measured movement objective, a volatility boundary, or a point where the remaining upside no longer justifies the downside being carried.
A target is weak when it exists only because the trader wants a certain reward/risk number. Reward/risk matters, but the target still needs a market-based reason. If the take-profit level is far beyond any realistic structure, the ratio may look clean while the exit plan remains unrealistic.
Practical distinction: the stop is usually tied to failure or unacceptable risk. The take profit is tied to a favorable condition where reducing exposure becomes reasonable. Both should be planned before the exit plan is being revised under pressure.
Targets can also be too close. Closing exposure too early may remove the trade before the original scenario has enough room to develop. The stronger question is not whether the target is near or far, but whether it matches the trade idea, the surrounding structure, and the risk being carried.
Check Reward/Risk Before Placing the Orders
Stop distance and target distance must be checked together. A trade with a wide stop and a nearby target may offer poor reward relative to the risk being accepted. A trade with a distant target and a narrow stop may look attractive, but only if the stop is not sitting inside normal market noise.
Reward/risk should not be treated as a universal formula that makes a trade good by itself. A clean ratio can still fail if the stop is arbitrary, the target is unrealistic, or the position size is too large for the distance to the stop.
| Decision | Stop-loss side | Take-profit side | What can go wrong |
|---|---|---|---|
| Boundary purpose | Defines failure, unacceptable risk, or loss of scenario quality. | Defines a favorable area to reduce or close exposure. | Both levels are placed after entry without a clear plan. |
| Placement basis | Uses invalidation, structure, volatility, and account risk. | Uses structure, target realism, supply or demand, and reward/risk. | Levels are chosen only because they create a desired ratio. |
| Distance check | A wider stop increases risk unless size is reduced. | A farther target may be less realistic if structure does not support it. | The trader checks the chart but ignores position exposure. |
| Adjustment risk | Moving the stop farther after entry can increase unplanned risk. | Moving the target farther can turn a planned exit into hope. | Orders are adjusted emotionally rather than because conditions changed. |
| Execution caveat | A stop trigger does not always mean the exact expected fill. | A take-profit order may not fill if price does not trade there with enough execution. | The plan assumes perfect fills in imperfect market conditions. |
If the stop distance makes the position too large for the account boundary, the position size should be reduced or the trade should be skipped before the order is placed. Moving the stop closer only to preserve size can damage the logic of the exit plan.
Account for Execution Limits, Slippage, and Gaps
Exit levels are planning tools, but execution still depends on market conditions and order behavior. A stop can be triggered at one price and filled at another if the market moves quickly, spreads widen, liquidity thins, or price gaps through the level.
A take-profit order can also create false confidence. Price may approach the target and reverse before filling, or trade through the area too quickly for the expected execution. The planned target is not the same as guaranteed profit capture.
Execution limitation: stop loss and take profit orders control planned exit logic. They do not guarantee exact fills, remove slippage, prevent gaps, or prove that the trade idea was correct.
Some platforms allow exits to be attached at entry, added after entry, or linked through bracket or OCO logic. The important planning point is that linked orders can help avoid leaving an unwanted order active after the opposite exit has already filled. The exact implementation depends on the broker, platform, instrument, and order type.
Common Mistakes When Setting Stop Loss and Take Profit
| Mistake | Why it weakens the plan | Safer interpretation |
|---|---|---|
| Setting the stop too tight | Normal market noise can trigger the exit before the scenario is invalidated. | Check whether the stop sits beyond the failure condition, not merely close to entry. |
| Setting the target too far | The reward/risk may look attractive while the target condition is unrealistic. | Connect the target to structure, prior levels, or a clear exposure-reduction condition. |
| Setting the target too close | The trade may be exited before the planned scenario has enough room to develop. | Check whether the target compensates for the stop distance and the uncertainty carried. |
| Ignoring position size | A logical stop can still create excessive account risk if size is too large. | Adjust size when stop distance changes instead of forcing the stop closer. |
| Moving orders emotionally | The original plan is replaced by reaction after price starts moving. | Change orders only when the trade condition changes, not because discomfort increases. |
| Leaving opposing orders active | An old exit order may remain after the other side has already filled. | Use platform controls carefully and understand whether exits are linked, cancelled, or independent. |
A Simple Exit-Planning Sequence
A clean stop-loss and take-profit process begins before execution. The purpose is to define the boundary first, then decide whether the trade still deserves participation after the full exit plan is visible.
- Define the trade scenario: state what condition must remain true for the idea to make sense.
- Mark invalidation: identify where the scenario is wrong, unclear, or no longer acceptable.
- Measure stop distance: check the distance between entry area and invalidation boundary.
- Adjust position exposure: reduce size if the stop distance creates more risk than the account boundary allows.
- Define the target condition: choose where favorable movement is enough to reduce or close exposure.
- Check reward/risk: compare stop distance and target distance without treating the ratio as proof of quality.
- Place or attach exits carefully: understand whether orders are independent, bracketed, linked, or manually managed.
- Respect execution limits: account for gaps, spreads, liquidity, slippage, and the difference between trigger and fill.
Illustrative scenario: a trader defines a long scenario only while price remains above a structure area. The stop is planned beyond the point where that scenario no longer makes sense, not merely at the nearest round number. The take-profit condition is planned near the next area where supply, prior resistance, or weaker reward/risk may appear. If the stop distance makes the position too large for the account boundary, the position size should be reduced before execution or the trade should be skipped.
What Stop Loss and Take Profit Can and Cannot Control
Stop loss and take profit planning can control the intended response to adverse and favorable movement. It can define when risk should be cut, when exposure should be reduced, and when the original trade plan no longer deserves the same commitment.
It cannot control market direction, guarantee exact execution, or turn an unrealistic setup into a strong one. The exit plan improves discipline only when the levels are tied to invalidation, target conditions, position exposure, and execution reality.
Boundary rule: stop loss and take profit levels organize risk and exit behavior. They are not predictions, guarantees, or proof that a trade should be taken.
FAQ
Should stop loss and take profit always be set together?
They should usually be planned together because the stop defines adverse boundary and the take profit defines favorable boundary. Whether both orders are placed at the same time depends on the platform, instrument, order type, and execution plan.
Is a stop loss based on risk or invalidation?
A stronger stop-loss plan considers both. Invalidation explains where the trade idea no longer makes sense, while risk defines how much exposure the account can accept if that boundary is reached.
Is take profit based on reward/risk or price structure?
Both matter, but structure should not be ignored. A target needs a realistic market condition, and reward/risk helps decide whether the distance to that target justifies the distance to the stop.
Why do stop losses get hit before price moves?
This can happen when the stop is placed inside normal market noise, when volatility is underestimated, or when the level is chosen for comfort rather than invalidation. It can also happen because the original scenario was simply wrong.
Can a stop loss fail to exit at the expected price?
Yes. In fast markets, thin liquidity, wide spreads, or gaps, the trigger price and the final fill price can differ. The exact behavior depends on the order type, broker, platform, and market conditions.
Can take profit guarantee that profit will be captured?
No. A take-profit level defines a planned favorable exit, but price may not reach the level, may reverse before execution, or may not fill as expected under real market conditions.