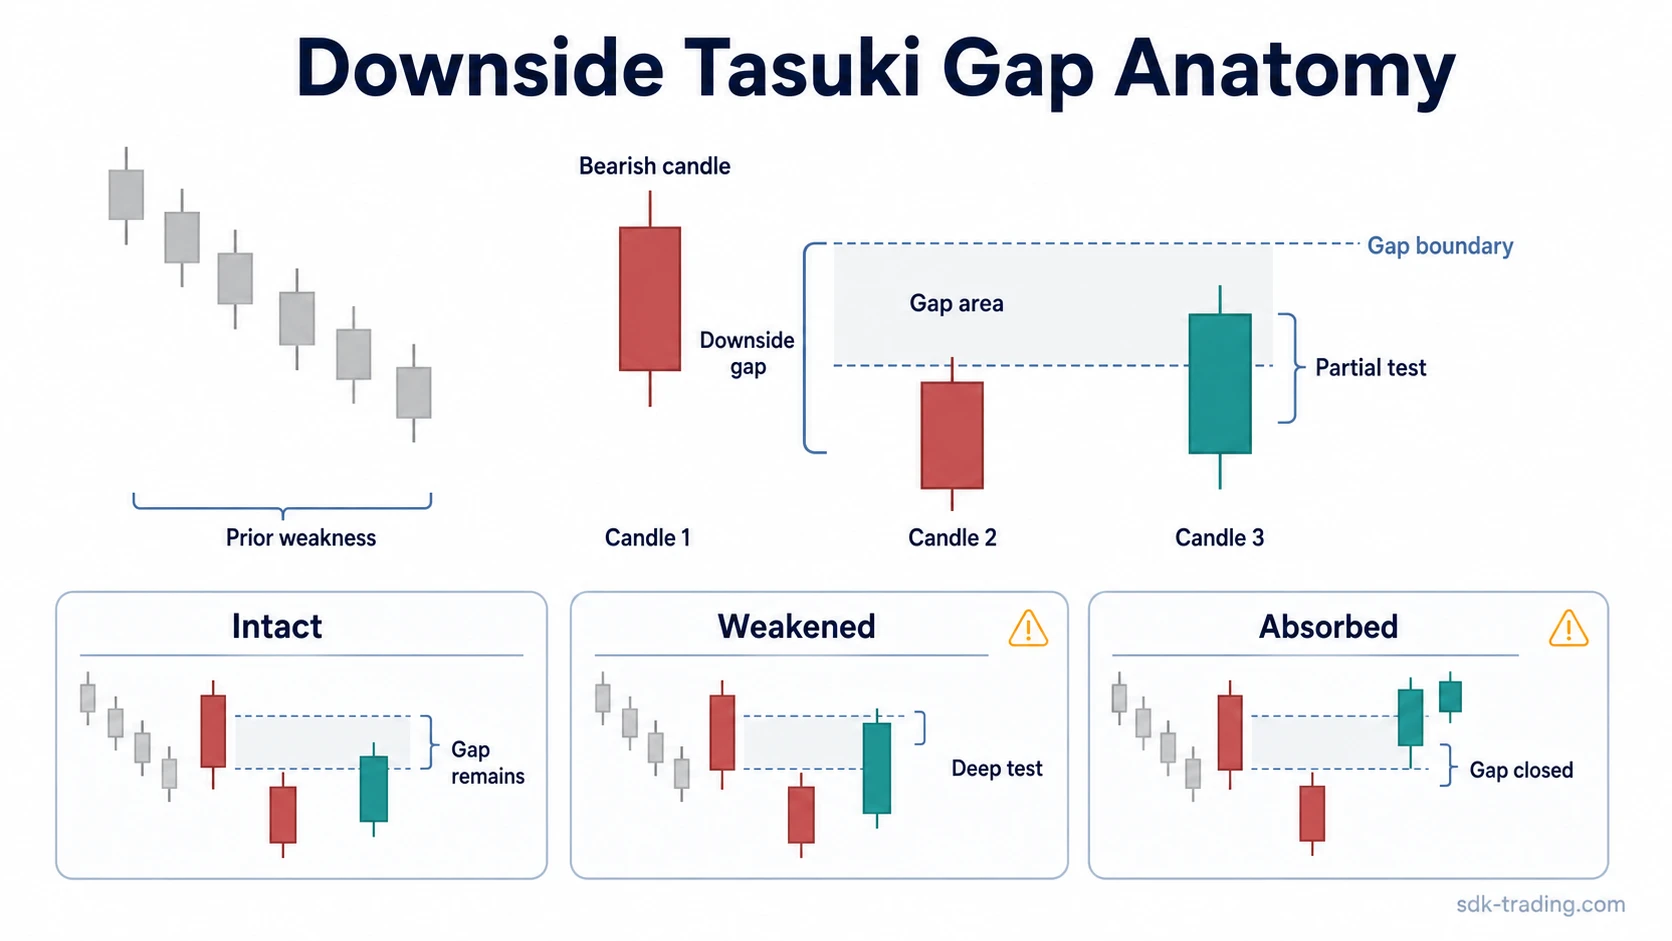
A downside tasuki gap is a three-candle bearish continuation candlestick pattern that appears after downward price movement. The pattern depends on a downside gap that remains partly open after the third candle; if that gap is fully absorbed, the reading changes.
Definition: A Downside Tasuki Gap forms when a bearish candle is followed by another bearish candle that opens lower with a visible gap, then a bullish candle moves back into the gap without fully closing it.
The tension inside the pattern comes from the third candle. It looks constructive because it is bullish, but its meaning depends on whether buyers only test the gap or reclaim it completely. A partial retracement can leave the downside gap as a visible boundary; a full gap closure removes the main structure that gives the pattern its bearish continuation reading.
What Is a Downside Tasuki Gap?
A Downside Tasuki Gap is a bearish continuation pattern in candlestick analysis. It belongs to the Tasuki gap family, where the market gaps in the direction of the existing move and then produces a counter-candle that tests part of that gap.
The bearish version appears after weakness rather than strength. The first two candles show selling pressure and a downside gap. The third candle shows a recovery attempt, but the pattern remains intact only if that recovery does not fully erase the gap.
This makes the remaining gap area more important than the candle colors alone. Three candles can resemble the pattern visually, but the reading is weaker when the third candle closes too deeply into the prior gap area.
How the Downside Tasuki Gap Forms
The structure starts with bearish pressure already visible on the chart. A bearish candle continues the decline, and the next bearish candle opens lower, creating a downside gap between the prior candle and the new candle. The third candle is bullish and moves back upward into that gap.
The third candle should not fully close the gap. If buyers reclaim the entire gap area, the market is no longer preserving the downside separation that defines the pattern. The result becomes a failed or absorbed gap reading rather than a clean Downside Tasuki Gap.
| Candle | Requirement | Why it matters |
|---|---|---|
| Background | Price is already moving lower or showing bearish pressure. | The pattern is read as continuation only when it follows existing downside movement. |
| First candle | A bearish candle extends the prior weakness. | It provides the immediate reference point before the gap. |
| Second candle | Another bearish candle opens below the first candle, leaving a downside gap. | The visible gap creates the area that later candles test. |
| Third candle | A bullish candle moves into the gap but does not fully close it. | The partial recovery tests the gap without fully absorbing the downside separation. |
Downside Tasuki Gap Anatomy
The most important structural feature is not simply that the third candle is bullish. The key feature is the relationship between the bullish candle and the open gap left by the second candle.
A clean anatomy has three visible parts: prior downside pressure, a downside gap, and a bullish test that remains incomplete. If the chart loses one of those parts, the pattern name may still be tempting, but it becomes less useful as a Downside Tasuki Gap reading.
Reading note: Gap closure is a change in evidence, not an obligation. A gap can act as a reference area, but price does not have to fill it, and a full fill can change the pattern rather than confirm it.
Clean, Weak, and Invalid Readings
The Downside Tasuki Gap is best read through the condition of the gap after the third candle. The cleaner the remaining gap area, the more intact the bearish continuation structure remains. The more the gap is absorbed, the less useful the pattern name becomes.
| Reading | What the chart shows | Interpretation boundary |
|---|---|---|
| Clean reading | The third candle enters the downside gap but leaves part of the gap open. | The downside separation remains visible, so the bearish continuation structure is still intact. |
| Weak reading | The third candle pushes deeply into the gap and closes near the upper edge of the gap area. | Buyers have challenged the separation strongly, so later acceptance or rejection becomes more important than the pattern label. |
| Invalid reading | The third candle fully closes the gap or price quickly accepts back above the gap area. | The downside gap has been absorbed, so the core Downside Tasuki Gap structure is no longer intact. |
This boundary keeps the pattern from being reduced to a three-candle checklist. The candles need to preserve the downside gap relationship, not just appear in the correct color sequence.
Common Downside Tasuki Gap Misreads
| Misread | Why it weakens the label | Better diagnostic check |
|---|---|---|
| The bullish third candle is treated as reversal evidence | A recovery candle can be only a gap test when it fails to fully reclaim the open gap. | Check whether the third candle tests the gap without fully closing it. |
| The downside gap alone is treated as enough evidence | The pattern needs more than the first gap because the third candle defines whether the gap is tested or absorbed. | Use the third candle to judge whether bearish separation remains intact. |
| Full gap closure is ignored | Once the gap is fully closed, the pattern loses the separation that distinguishes continuation from failed gap behavior. | Separate partial gap testing from full gap absorption. |
Candlestick patterns are most useful when they are read as part of chart structure. A Downside Tasuki Gap can warn that bearish pressure remains active, but later price behavior still decides whether the gap is respected, weakened, or absorbed.
Downside Tasuki Gap vs Related Patterns
The broader Tasuki Gap family includes both bullish and bearish gap-continuation variants. The downside version is the bearish form, where the gap opens lower after existing weakness.
The Upside Tasuki Gap is the opposite version. It appears after upward movement, uses an upside gap, and has a bearish third candle that tests the gap without fully closing it.
Other continuation patterns can include pullbacks or pauses, but the Downside Tasuki Gap depends on a downside gap that is tested without being fully absorbed. Patterns built around contained pullbacks or shared opens do not use that same gap-preservation test.
Downside Tasuki Gap Example in Context
Price has been moving lower and prints a bearish candle near the lower part of the recent range. The next candle opens below the prior candle, leaving a visible downside gap, and closes bearish again. A third candle then recovers into the gap but stalls before closing it completely.
The cleaner reading is that sellers have allowed a test of the gap without losing the full gap boundary. The weaker reading appears if the recovery candle closes near the top of the gap, because buyers have challenged the separation more aggressively. The pattern is no longer intact if price fully absorbs the gap and later candles accept above it.
If later candles fail to accept above the gap area, the gap remains a visible reference point. If later candles hold above that area instead, the original downside-gap structure has been absorbed rather than preserved.
The useful comparison is between gap preservation and gap absorption. The same bullish third candle can mean a controlled test, a weakened continuation reading, or a failed pattern depending on how much of the gap remains visible afterward.
FAQ
Is the Downside Tasuki Gap bullish or bearish?
The Downside Tasuki Gap is usually read as a bearish continuation candlestick pattern because it appears after downside movement and depends on a downside gap that remains partly open.
What invalidates a Downside Tasuki Gap reading?
A Downside Tasuki Gap reading is invalidated when the third candle fully closes the downside gap or later price action accepts back above the gap area.
Why is the third candle bullish in a bearish pattern?
The bullish third candle represents a recovery attempt into the gap. The bearish continuation reading remains intact only if that recovery does not fully absorb the downside gap.