A Tasuki Gap is a three-candle continuation-family candlestick pattern where price gaps in the direction of the existing trend, then an opposite-color candle tests the gap without fully erasing it. The gap remaining partly open is the central classification point: if the gap is fully closed too early, the reading usually shifts away from a clean Tasuki Gap interpretation.
Definition: A Tasuki Gap is a gap-based candlestick pattern built from an existing trend candle, a second candle that gaps in the trend direction, and a third candle that moves back toward the gap but leaves at least part of it open.
Key Points
- A Tasuki Gap belongs to the continuation candlestick pattern family, but the reading remains conditional.
- The pattern can appear as an upside version after upward pressure or a downside version after downward pressure.
- The third candle tests the gap area, but a clean reading requires the gap to remain partly open.
- If the third candle or immediate follow-through fully removes the gap, the pattern becomes weaker or invalid as a Tasuki Gap.
What Is a Tasuki Gap?
A Tasuki Gap is a candlestick pattern that describes a pause after price has already moved strongly enough to create a gap. The first two candles continue the existing direction. The third candle moves against that direction, but it does not completely close the space created by the gap.
The pattern is best understood as a classification of gap behavior, not as a forecast. A clean Tasuki Gap shows that price tested the gap area without fully accepting the move back through it. Later candles still decide whether the market respects that area, absorbs the test, or erases the structure entirely.
How the Tasuki Gap Candle Sequence Works
The Tasuki Gap sequence has three required parts. Each part changes the interpretation, so the pattern should not be reduced to the word “gap” alone.
- Existing trend candle: price is already moving in one direction before the gap appears.
- Gap continuation candle: the next candle opens beyond the prior candle in the same direction as the trend and continues that movement.
- Opposite-color test candle: the third candle moves back toward the gap, but does not fully close it.
The third candle is the diagnostic candle. If it only tests part of the open gap, the structure can still fit the Tasuki Gap family. If it closes the gap completely and price fails to recover the original direction, the pattern loses the main feature that separates it from nearby gap patterns.
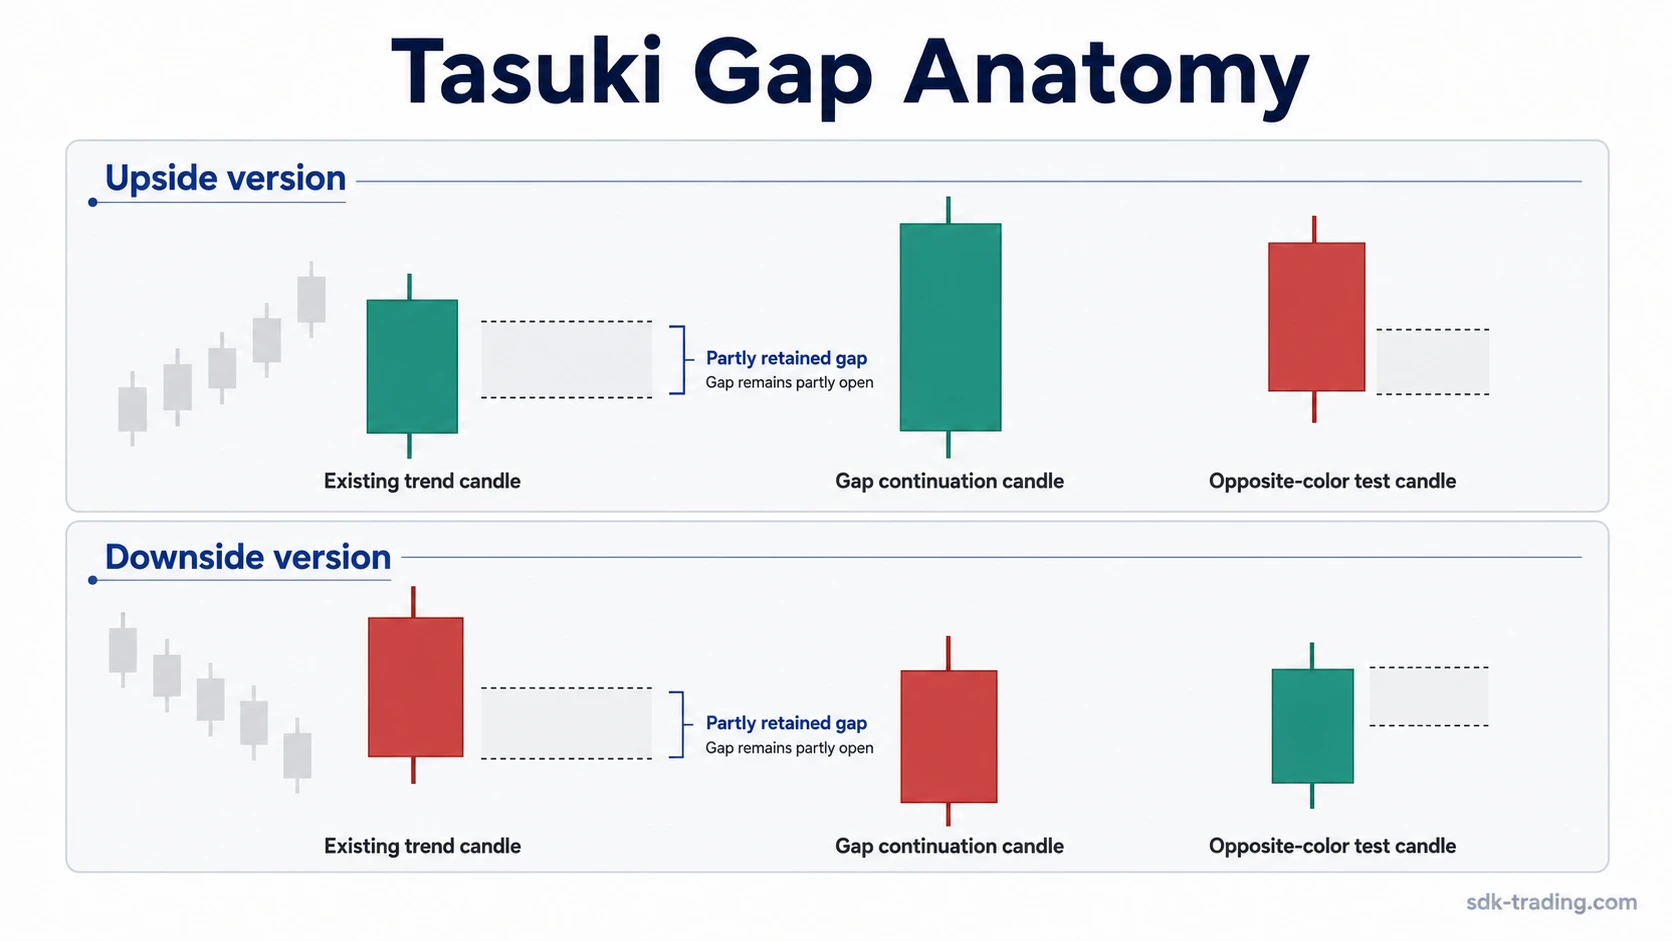
Upside vs Downside Tasuki Gap
The same three-candle logic can appear in bullish or bearish continuation context. The difference is the prior trend direction and the direction of the gap.
| Variant | Context | Sequence | Boundary to preserve |
|---|---|---|---|
| Upside tasuki gap | Upward continuation context | A bullish candle gaps higher, followed by a bearish candle that tests downward | The downside test does not fully close the bullish gap |
| Downside version of the Tasuki Gap | Downward continuation context | A bearish candle gaps lower, followed by a bullish candle that tests upward | The upside test does not fully close the bearish gap |
The family concept is the same in both versions: the market creates a gap in the trend direction, then tests that gap without fully accepting a move back through it.
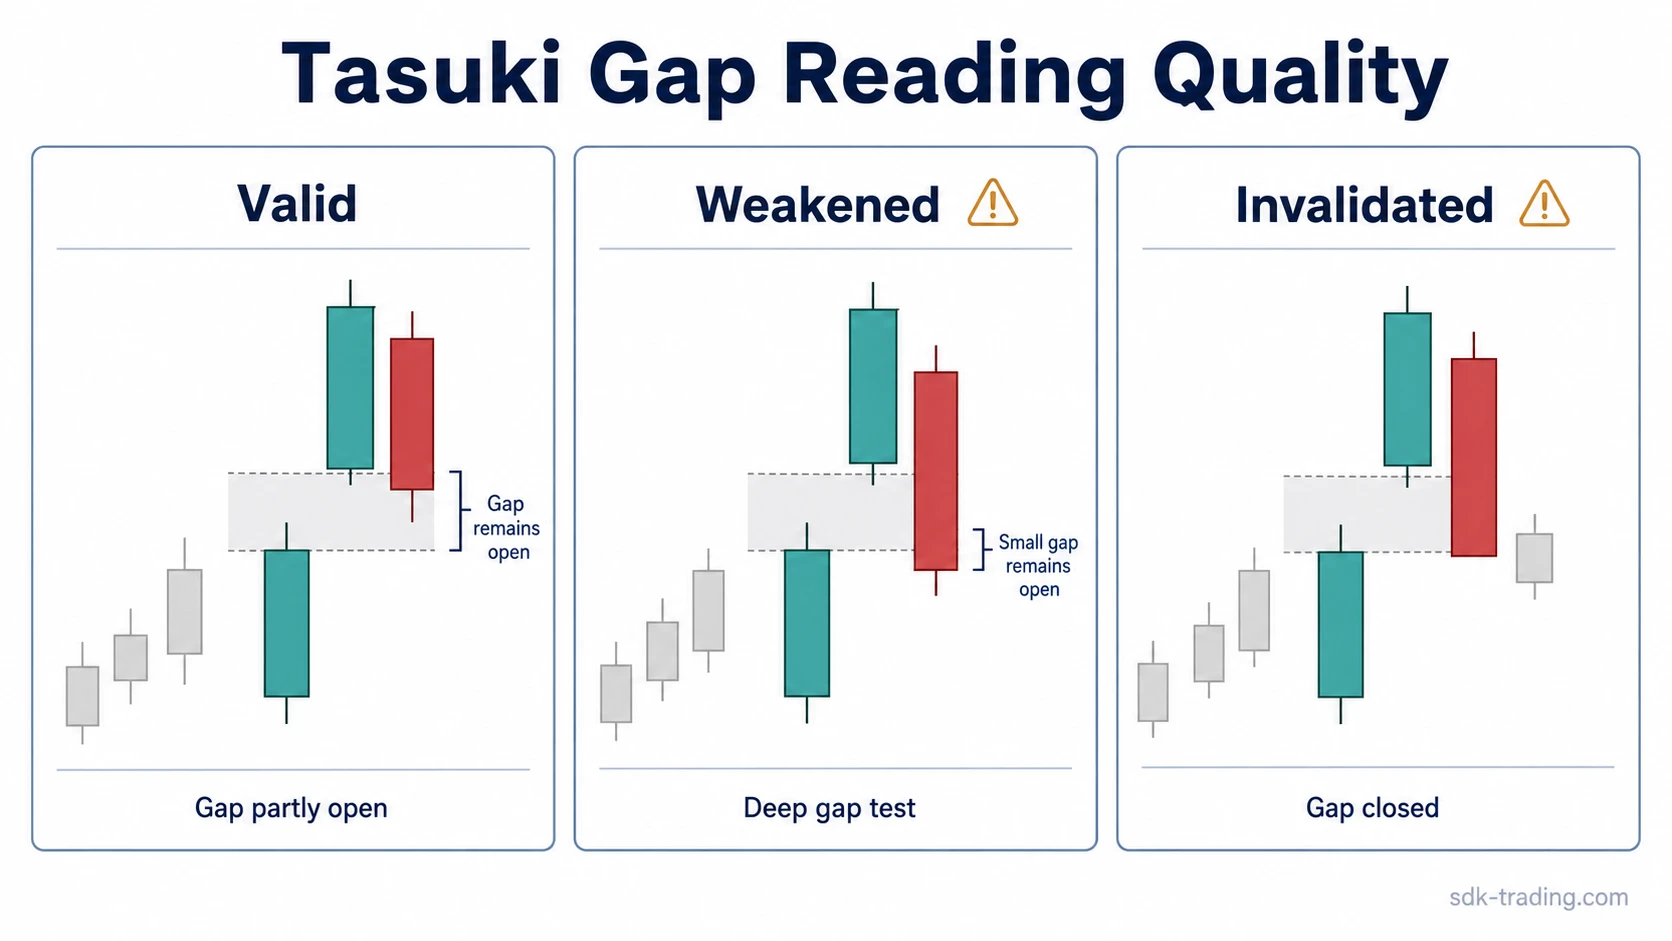
Clean, Weak, and Invalid Tasuki Gap Readings
The quality of a Tasuki Gap reading depends on how the gap behaves after the third candle appears. A clean shape is only the starting classification. The next question is whether the gap area remains respected, partially challenged, or erased.
The most useful observation is the third candle’s close relative to the open gap, followed by whether the next candles accept prices back through that space or reject the test.
| Reading quality | What is visible | Interpretation | What weakens it |
|---|---|---|---|
| Clean | The first two candles continue the trend, the second candle gaps, and the third candle tests only part of the gap. | The structure still fits the Tasuki Gap family because the gap remains partly open. | Immediate follow-through that closes the gap and rejects the original direction. |
| Weak | The third candle pushes deeply into the gap, leaving only a small part open. | The classification may still be possible, but the tested zone is under pressure and the structure is less clean. | A later candle closing fully through the gap or failing to restore the trend-side response. |
| Invalid | The third candle closes the gap completely, or the next movement removes the gap and holds beyond it. | The key Tasuki Gap boundary is lost because the gap is no longer preserved. | Continued acceptance beyond the gap in the opposite direction. |
Tasuki Gap vs Similar Continuation Patterns
The Tasuki Gap is easiest to separate from similar patterns by watching what happens to the gap. Some nearby continuation patterns also use strong candles, pauses, or opposite-color reactions, but they do not always use the same gap-retention test.
| Pattern or structure | Main similarity | Main difference |
|---|---|---|
| Tasuki Gap | Uses a trend-side gap followed by an opposite-color test candle | The third candle should leave at least part of the gap open |
| Gap Three Methods | Also uses a gap and a three-candle structure | The gap is more fully closed, so the classification is different |
| Separating Lines | Can also appear in continuation context | The focus is on a shared opening level and directional continuation, not a retained gap test |
| Rising or Falling Three Methods | Also describes continuation after a pause | The structure usually uses a longer contained pause rather than a three-candle gap test |
Common Misreadings
Common mistake: treating the third candle as automatic proof that the trend will continue. The third candle is a test of the gap area, not a complete resolution by itself.
Another frequent error is calling any gap-and-reaction sequence a Tasuki Gap. The candle order matters, the prior trend matters, and the gap status matters. Without an existing directional context and a partly retained gap, the structure may belong to another pattern family or may not be a useful pattern reading at all.
The classification stays cleaner when the gap remains visible and later candles do not accept prices back through it. The distinction is especially important on charts where gaps are small, overlapping, or quickly retraced.
Short Tasuki Gap Example in Context
Price has been rising. The first pattern candle continues that upward pressure, and the next candle opens above it, leaving a visible gap before closing higher. The third candle then pulls back toward the gap, but its close remains above the lower edge of the open space. That is the cleaner version: the gap has been tested, but not erased.
The reading becomes weaker if the third candle closes almost all of the gap and the next candle cannot recover upward pressure. It becomes invalid as a clean Tasuki Gap if price closes fully through the gap and holds there. The useful distinction is not whether a pullback appears, but whether the pullback accepts or rejects the gap area.
FAQ
Is a Tasuki Gap bullish or bearish?
A Tasuki Gap can be bullish or bearish. The upside version appears after upward pressure, while the downside version appears after downward pressure. The shared feature is the gap in the trend direction followed by an opposite-color test candle.
What weakens a Tasuki Gap reading?
A Tasuki Gap reading weakens when the third candle closes too much of the gap, when later candles fully erase the gap, or when price accepts the move back through the gap instead of respecting it.
How is a Tasuki Gap different from Gap Three Methods?
The main difference is gap retention. A Tasuki Gap keeps at least part of the gap open after the third candle, while Gap Three Methods involves a fuller gap closure or fill structure.