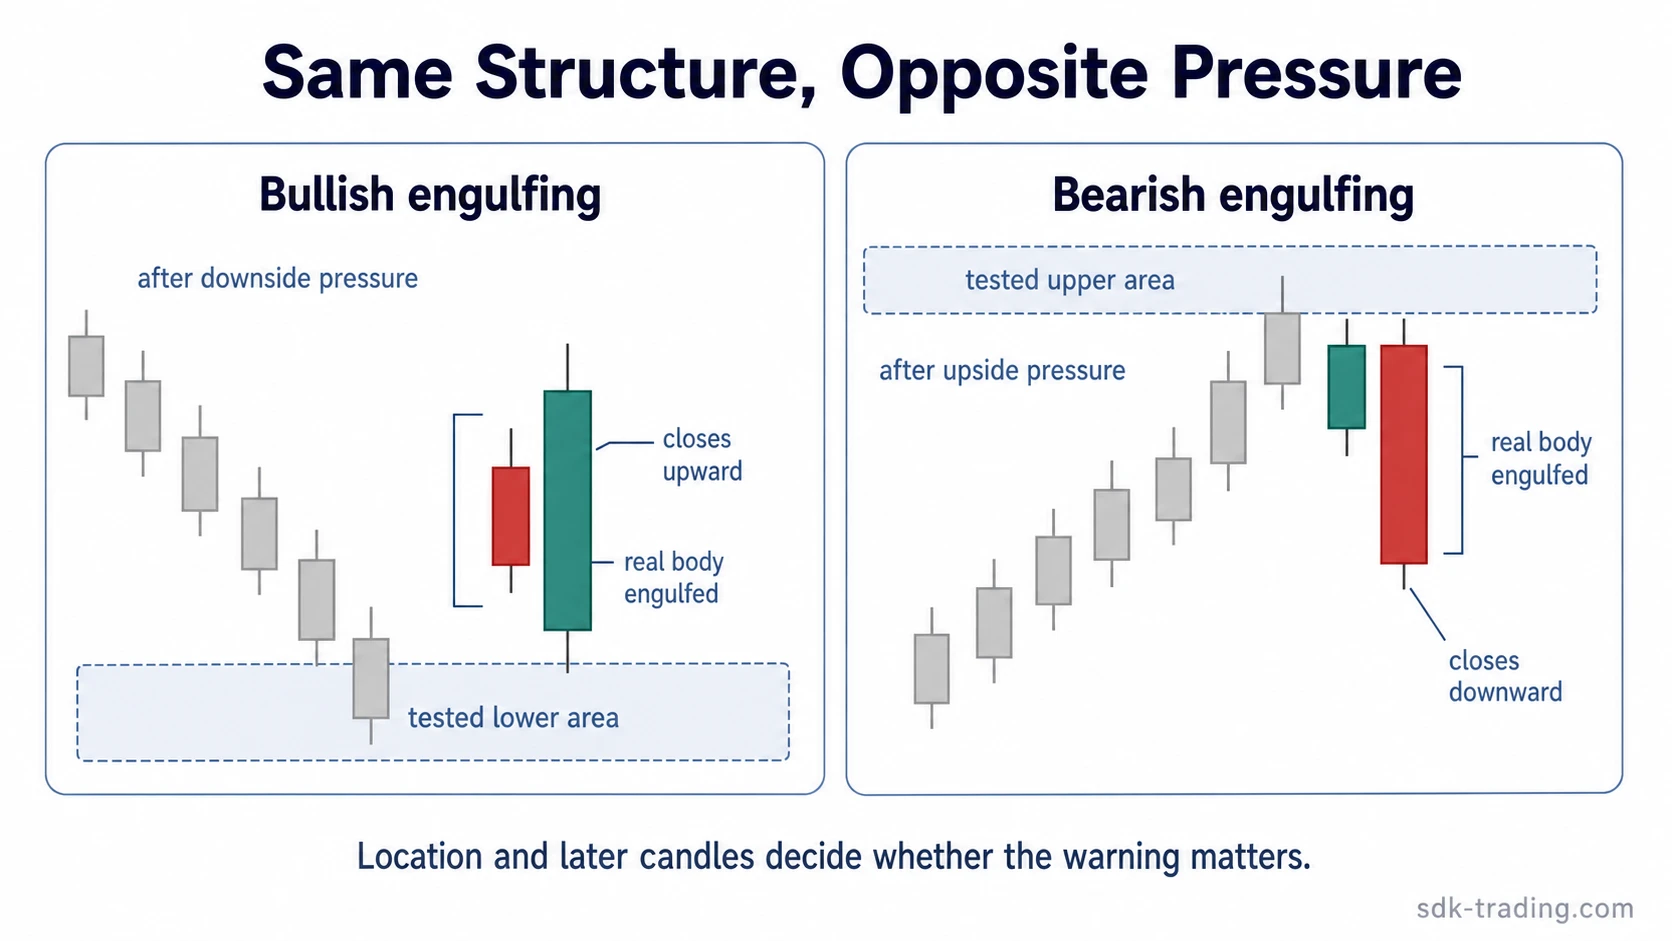
Bullish engulfing and bearish engulfing patterns use the same two-candle real-body comparison, but they point to opposite pressure shifts. A bullish engulfing reading starts after downside pressure, when the second candle closes upward through the prior real body.
A bearish engulfing reading starts after upside pressure, when the second candle closes downward through the prior real body. The candle shape alone is not enough. Direction, prior pressure, swing location, and follow-through decide whether the engulfing candle is a useful warning, a possible pressure shift, or noise inside an active move.
Key Points
- Both patterns use a two-candle real-body engulfing structure.
- Bullish engulfing fits better after downside pressure or near a tested lower area.
- Bearish engulfing fits better after upside pressure or near a tested upper area.
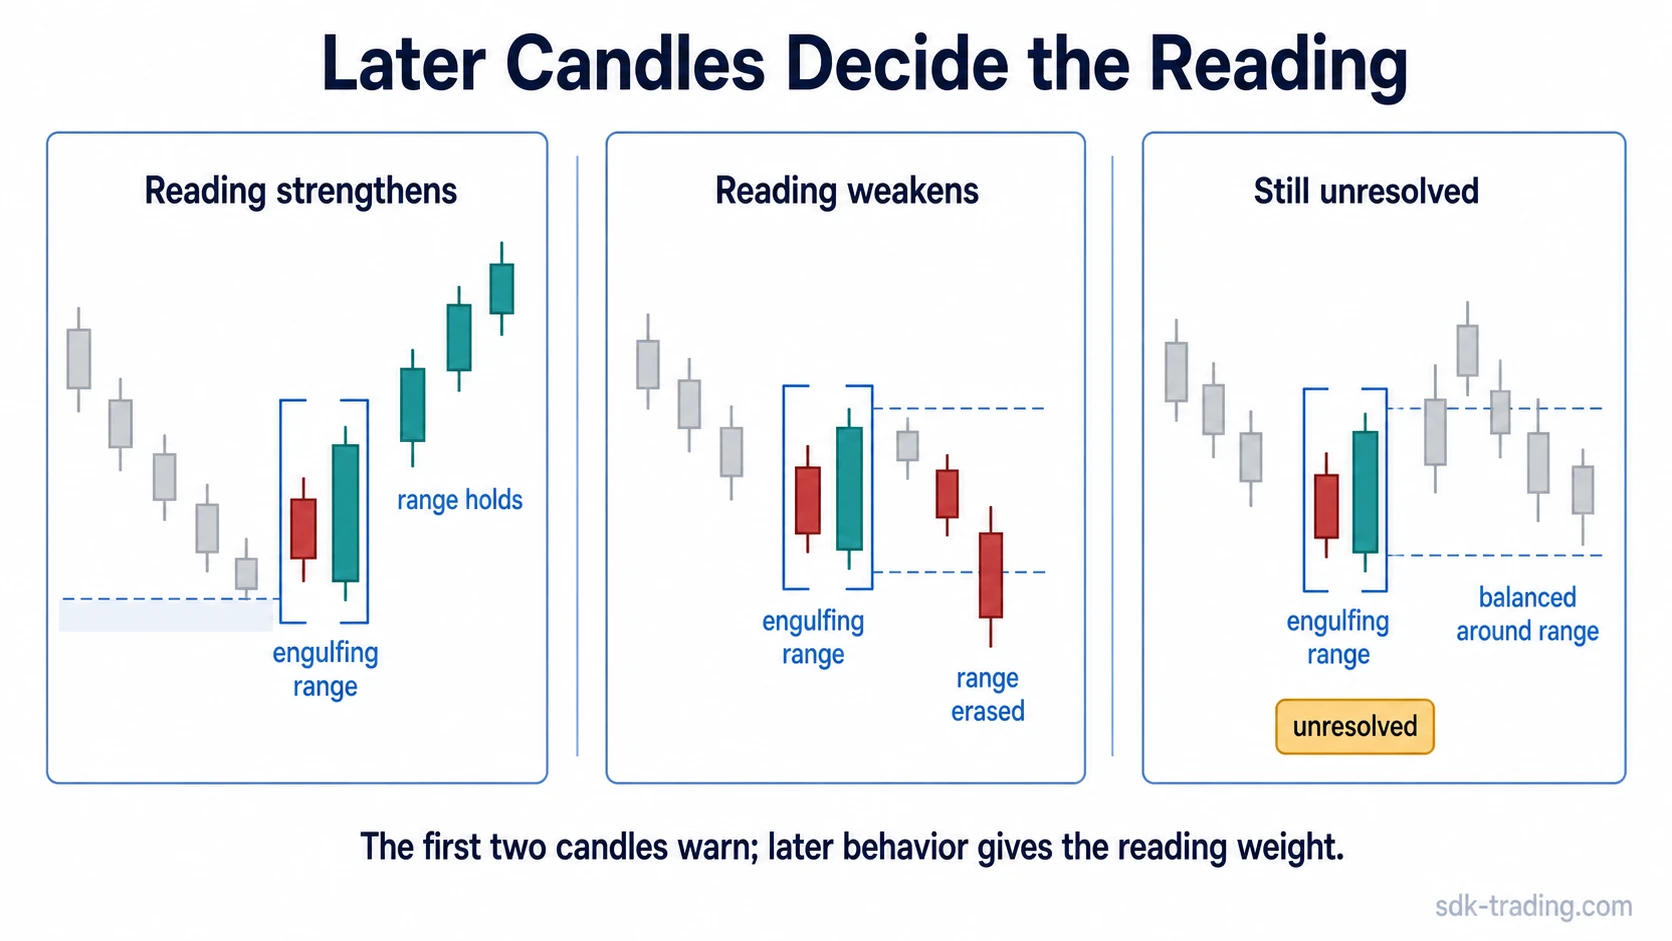
- Later candles decide whether the engulfing candle gains meaning or fades into continuation.
Quick Comparison
| Criteria | Bullish engulfing | Bearish engulfing |
|---|---|---|
| Prior pressure | Usually appears after selling pressure, a pullback, or a test near a swing low. | Usually appears after buying pressure, an advance, or a test near a swing high. |
| Second candle close | The second candle closes upward and its real body covers the prior real body. | The second candle closes downward and its real body covers the prior real body. |
| Location | More useful near an area where downside pressure has already been tested. | More useful near an area where upside pressure has already been tested. |
| Pressure read | Buyers may be absorbing sellers after a lower test or pullback. | Sellers may be absorbing buyers after an upper test or rally. |
| Stronger reading | Later candles hold above the engulfing range or reclaim a nearby swing boundary. | Later candles hold below the engulfing range or reject a nearby swing boundary. |
| Weaker reading | Price quickly loses the engulfing range or remains trapped in choppy movement. | Price quickly reclaims the engulfing range or remains balanced around the candle. |
When Each Reading Fits Better
| Market behavior | Better lens | Why the distinction matters |
|---|---|---|
| Price has been falling or pulling back into a previously tested lower area. | The bullish engulfing lens fits better. | The engulfing body may show that sellers failed to keep control after the lower test. |
| Price has been rising or stretching into a previously tested upper area. | The bearish engulfing lens fits better. | The engulfing body may show that buyers failed to keep control after the upper test. |
| The candle appears in the middle of a range without a clear prior push. | Be cautious. | The body engulfment may only reflect short-term volatility rather than a meaningful pressure shift. |
| The next candles erase the engulfing candle quickly. | The reading weakens. | Later behavior did not confirm that the engulfing candle changed control. |
Same Body Rule, Opposite Pressure Context
Price has been pressing lower and then tests a prior swing-low area. The next candle opens near the prior candle, pushes upward, and closes with a real body that covers the prior body. A weak read treats the large body alone as bullish. The stronger read is narrower: sellers tested lower prices, but buyers were able to close through the prior body. The bullish case needs later candles to avoid falling back through that same range.
Now place the same body-engulfing mechanic after a rising move into a prior swing-high area. A large second candle covers the prior body, but this time it closes downward. The shape still shows body engulfment, yet the pressure reading changes. Buyers tested the upper area first, then sellers closed through the prior body. The bearish case needs later candles to show that buyers cannot easily reclaim the range.
The same two-candle mechanic can therefore mean very different things. Body overlap matters less than the pressure that existed before the engulfing candle appeared.
Why Both Patterns Can Fail
Both engulfing readings can fail when the broader swing is still in control. A bullish engulfing candle inside a strong downtrend may only mark a pause before sellers return. A bearish engulfing candle inside a strong uptrend may only mark a pullback before buyers reclaim the range.
Range-bound movement can also weaken both patterns. When price is rotating back and forth through the same area, body engulfment may happen often without showing a durable shift in control. The candle is more useful when it appears at a meaningful test, not when it forms in the middle of repeated chop.
The common mistake is treating engulfment as a complete decision. Candlestick patterns work better as a timing and context layer. The body tells you that pressure changed during those two candles; later behavior shows whether that pressure actually mattered.
How Bullish and Bearish Engulfing Differ From Nearby Concepts
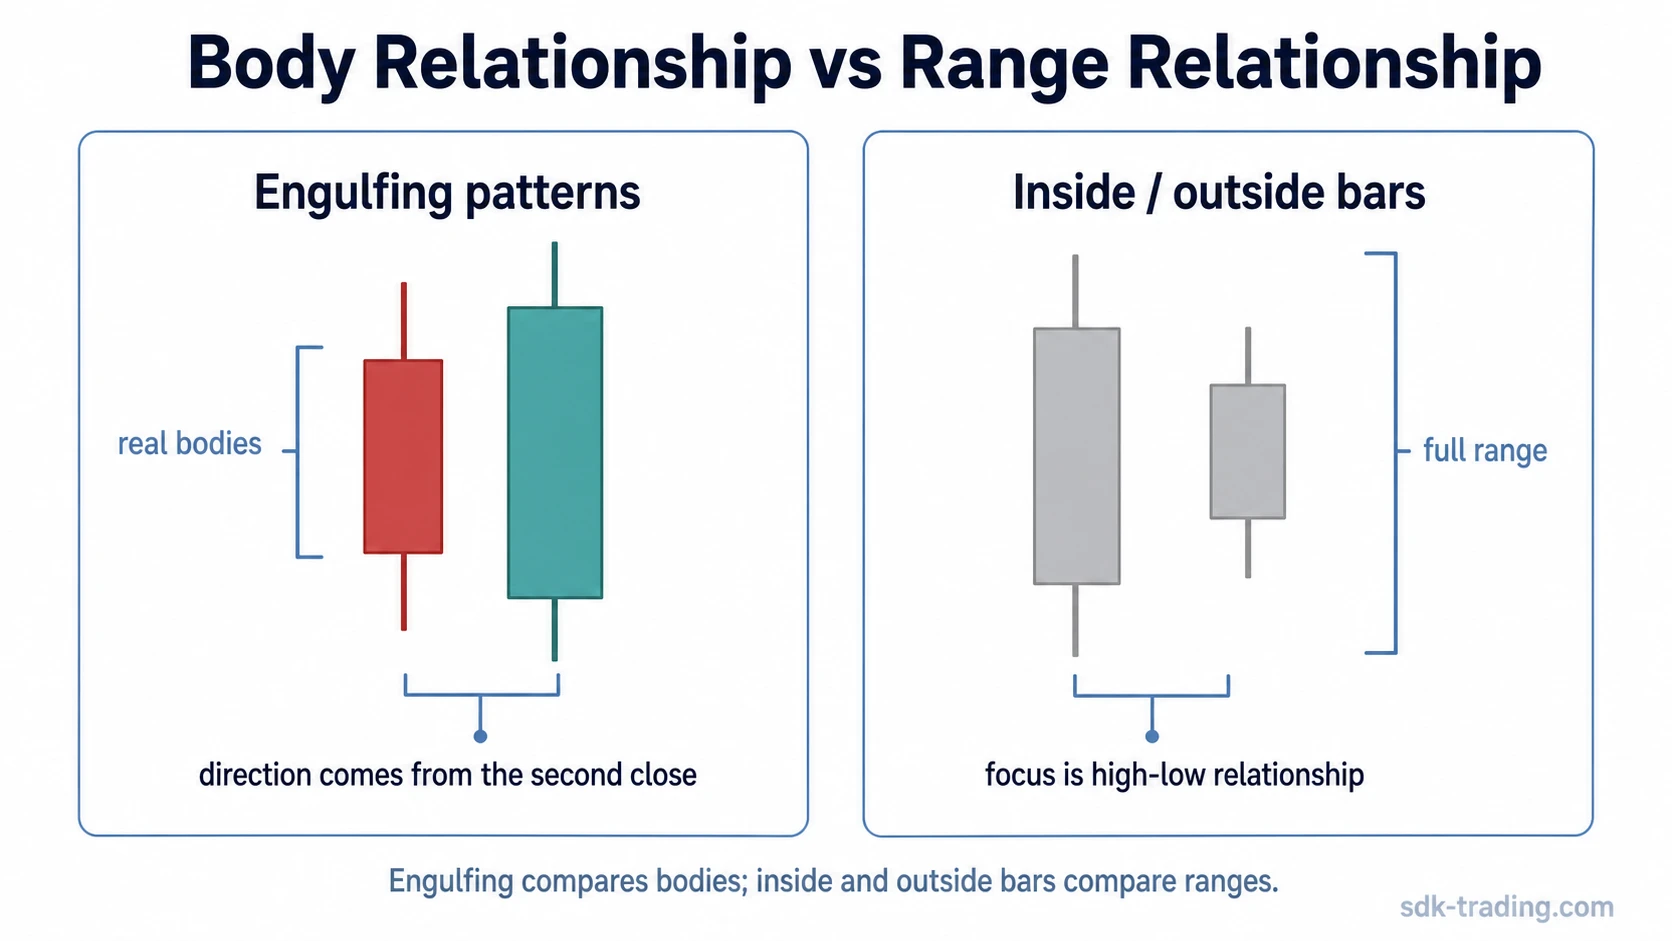
An engulfing candle pattern is the broader family: a second candle’s real body covers the prior real body. Bullish and bearish engulfing readings are the directional versions of that family, separated by prior pressure and close direction.
Double candlestick structures include many two-candle patterns, not only engulfing formations. Harami, piercing patterns, dark cloud cover, tweezer structures, inside bars, and outside bars all use two candles, but they do not all describe the same pressure shift.
Inside bars and outside bars can create confusion because they also compare one candle with another. The difference is that inside and outside bars focus on total range relationships, while engulfing patterns focus mainly on the real bodies and the direction of the second close.
FAQ
What is the main difference between bullish and bearish engulfing?
The main difference is direction after prior pressure. Bullish engulfing appears after downside pressure and closes upward through the prior body, while bearish engulfing appears after upside pressure and closes downward through the prior body.
What does follow-through add to the comparison?
Follow-through shows whether the engulfing body area remains accepted. Bullish engulfing becomes stronger when price holds the recovered body area, while bearish engulfing becomes stronger when price fails to reclaim the engulfed body area.
Can a bullish engulfing pattern fail?
Yes. It can fail if price quickly falls back through the engulfing range, appears in weak location, or forms inside a broader downtrend that continues to control the move.
Can a bearish engulfing pattern appear in an uptrend?
Yes. A bearish engulfing candle can appear during an uptrend, but it is only a warning unless later candles show that buyers failed to reclaim the range or hold the upper area.