A bullish engulfing candlestick is a two-candle structure where a bullish real body takes over the prior bearish real body after selling pressure. The diagnostic rule is body recovery, not wick overlap or a generic bullish candle.
The pattern can show that buyers reclaimed an area sellers previously controlled. That reading remains conditional until later candles show whether the covered body zone is accepted, defended, or quickly lost.
Key Points
- A bullish engulfing candlestick has two candles: a prior bearish candle and a later bullish candle.
- The second candle’s real body must cover the prior bearish real body.
- Wicks can add context, but wick overlap is not the defining rule.
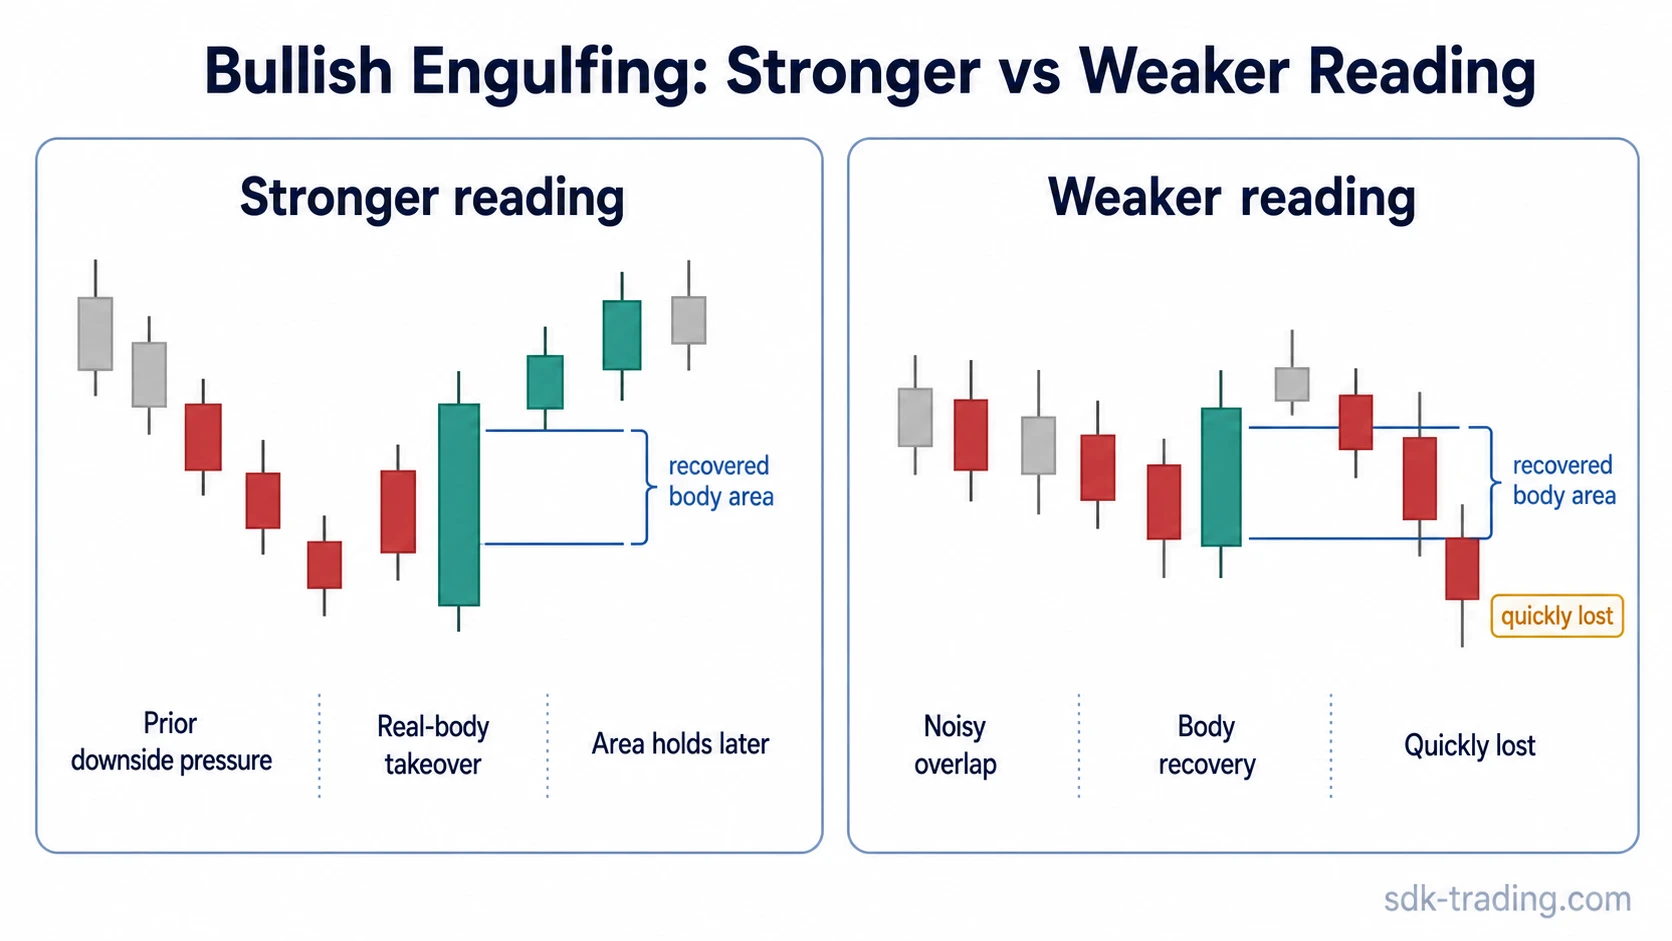
- The pattern is cleaner when it appears after downside pressure and the recovered body zone holds.
- The pattern weakens or fails when price quickly falls back through the bullish candle body.
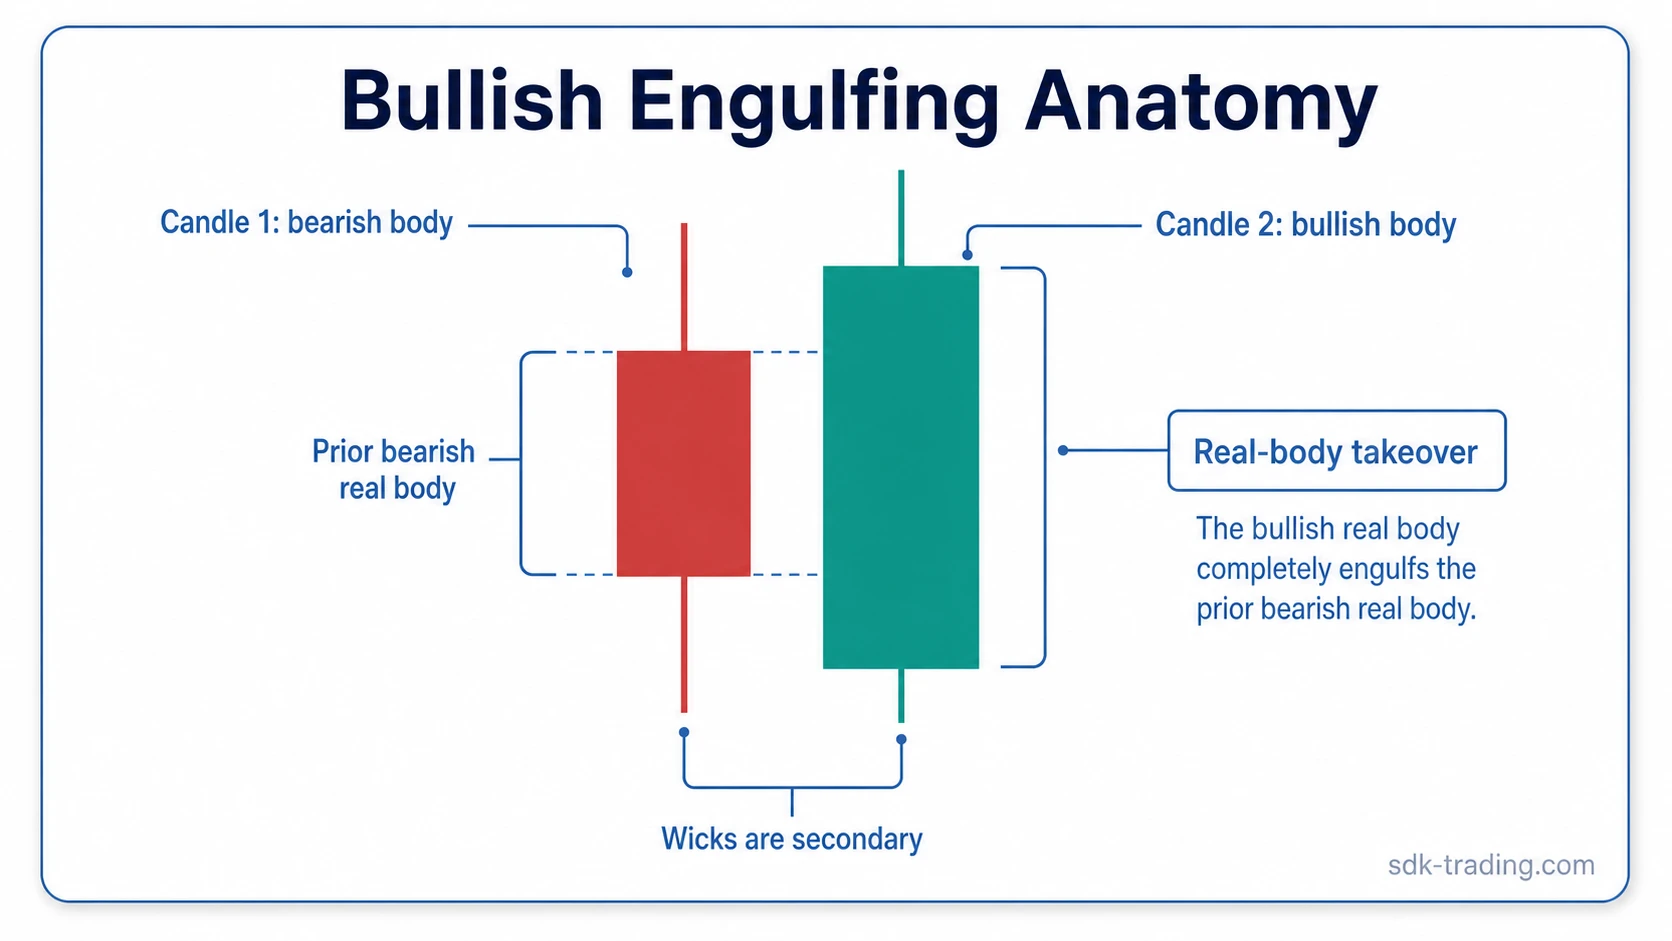
Bullish Engulfing Anatomy: Real-Body Takeover
A bullish engulfing pattern forms when a bearish candle is followed by a bullish candle whose real body fully covers the previous candle’s real body. In candlestick terms, the real body is the distance between the open and close, not the full high-low range.
The first candle shows that sellers controlled the prior close. The second candle shows that buyers recovered that body area and closed beyond it. The change is not simply that the second candle is bullish. The second candle has to expand over the prior bearish real body.
Definition: A bullish engulfing candlestick is a two-candle bullish candlestick pattern in which the second bullish real body covers the first bearish real body after downside pressure.
How to Identify a Bullish Engulfing Candle
The recognition process starts with the bodies. A prior bearish body creates the area that must be recovered. The next bullish body should cover that prior body and close beyond the prior bearish open, so the second real body takes over the first real body.
The wicks do not need to engulf each other. A candle can have a lower wick, upper wick, or wider high-low range without changing the core rule. If the second candle only exceeds the prior high or low but does not cover the prior real body, the structure is closer to an outside-bar reading than a clean bullish engulfing pattern.
| Diagnostic point | What to check | Why it matters |
|---|---|---|
| Prior candle | Bearish real body or clear downside pressure | Creates the body area that the next candle must recover. |
| Second candle | Bullish real body | Shows a close that moved against the prior bearish body. |
| Engulfing rule | Second real body covers the prior real body | Separates true body engulfing from a simple bullish candle. |
| Wicks | Useful, but secondary | Wick overlap can add range context, but it is not required for the pattern. |
What a Bullish Engulfing Candlestick Means
A bullish engulfing candlestick means that the second candle recovered the prior bearish body and closed with stronger bullish control than the previous candle showed bearish control. In the broader group of bullish candlestick patterns, its value comes from body-area takeover after selling pressure, not from prediction.
The same candle pair is more useful after a visible decline, pullback, or failed lower push. It is less useful inside random overlap, where one candle covering another may only reflect normal range noise.
The Reclaimed Body Boundary
The main boundary is expansion versus containment. A bullish engulfing candle expands over the prior bearish body. A bullish harami does the opposite: the second body contracts inside the prior body. That difference changes the visual message even when both patterns include one bearish candle and one bullish candle.
| Reading | Fits bullish engulfing? | Reason |
|---|---|---|
| Bearish candle followed by a bullish body that covers the prior body | Yes | The second real body takes over the first real body. |
| Bullish candle with only a larger wick range | No | Range expansion alone is not the same as real-body engulfing. |
| Small bullish body inside the prior bearish body | No | That is containment, not engulfing expansion. |
| Bullish real-body takeover followed by holding above the covered body area | Stronger | Later candles show that the recovery was not immediately rejected. |
| Bullish real-body takeover followed by an immediate drop back through the body | Weaker | The market rejects the recovery instead of accepting it. |
Clean, Weak, and Invalid Bullish Engulfing Readings
The candle pair should be graded by structure and later response. A clean reading shows body takeover after pressure and does not immediately lose the recovered body zone. A weak reading has the shape but appears in poor context or inside noisy overlap. An invalid or failed reading loses the recovered area quickly.
| Reading quality | Typical structure | Safer interpretation |
|---|---|---|
| Clean | Prior bearish body, larger bullish body, clear body takeover after downside pressure | Possible pressure shift, still dependent on later acceptance. |
| Weak | Small body takeover, messy overlap, unclear prior pressure, or immediate hesitation | Structure is visible, but the reading is not strong enough on its own. |
| Invalid or failed | Price quickly falls back through the engulfing body and cannot hold the recovered area | The market rejected the recovery instead of accepting it. |
When the Covered Body Area Holds
A bullish engulfing candlestick carries more diagnostic value when it appears after a visible decline, pullback, or failed lower push. The pattern is less informative when it forms in the middle of a random, overlapping range where each candle already overlaps the previous one.
The cleaner version is not just a large bullish candle. It is a bullish body that recovers the prior bearish body and then avoids giving that recovery back immediately. Later candles do not need to move in a straight line, but holding the covered area makes the pattern more defensible than a single candle that is rejected at once.
Volume, support, trend structure, and nearby swing areas can add context, but none of them changes the body rule. The candle pair has to satisfy the real-body takeover first.
When a Bullish Engulfing Pattern Weakens
The pattern weakens when the bullish candle closes strongly but the next candles fall back through its real body. That behavior suggests that the body recovery was not accepted. A clean engulfing structure can still fail if the market cannot hold the area it just recovered.
A noisy range is another weak setting. If candle bodies have been overlapping for many bars, one body covering the previous body may not represent a meaningful change in pressure. The same structure is more useful when it interrupts a prior decline or appears around a clear reaction area.
Limitation: A bullish engulfing candlestick does not prove that a reversal has started. It marks a possible pressure shift. The reading becomes fragile if price immediately loses the recovered body area or if the pattern appears inside random range noise.
Body Reclaim After Selling Pressure
A market declines into a prior reaction area and prints a bearish candle near the lower part of that move. The next candle opens near the prior body, pushes through the prior bearish open, and closes with a bullish real body that covers the earlier bearish real body.
The body recovery is only the first clue. If price keeps holding above the covered area, the engulfing candle becomes more useful as evidence of demand returning. If price quickly falls back through the engulfing body, the reading weakens.
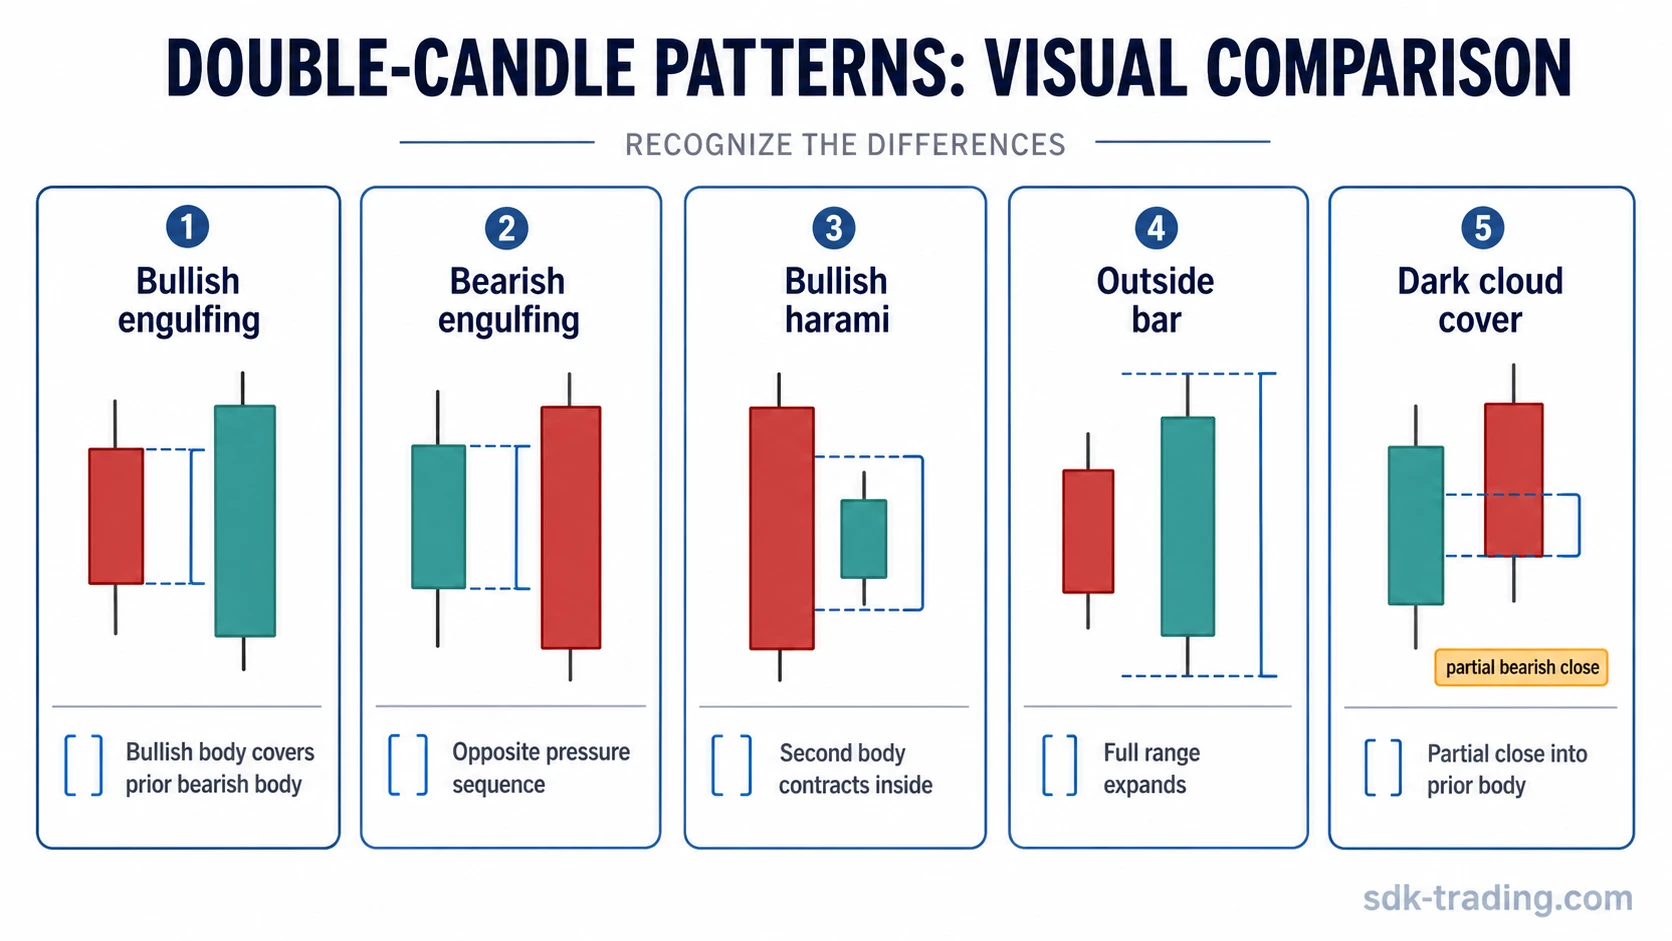
Bullish Engulfing vs Similar Candle Patterns
A bullish engulfing pattern is the bullish version of an engulfing structure. A bearish engulfing pattern uses the opposite pressure sequence: a bearish real body covers a prior bullish real body.
The difference from bullish harami is containment. Bullish engulfing expands over the prior bearish body; bullish harami contracts inside the prior body. The difference from an outside bar is also important. Outside-bar logic uses the full high-low range, while bullish engulfing is defined by real-body takeover.
Dark cloud cover is different because it is a bearish partial-close structure after a bullish candle. Bullish engulfing requires the opposite pressure direction: a bullish real body that takes over the prior bearish real body.
The wider engulfing candle pattern family separates bullish and bearish real-body takeover from nearby double-candle structures that rely on containment, range expansion, or partial-close logic.
Common Recognition Mistakes
- Using the wick as the main rule: wick overlap is secondary. The real-body relationship is the diagnostic core.
- Calling any large bullish candle engulfing: the candle must cover the previous bearish real body.
- Ignoring the prior candle: the pattern needs a prior bearish body or clear downside pressure to recover.
- Treating the candle pair as complete proof: later behavior must show whether the recovered area is accepted or rejected.
- Confusing expansion with containment: a small candle inside the prior body is a harami-style structure, not an engulfing structure.
FAQ
Does a bullish engulfing pattern need to engulf the wicks?
No. The defining rule is real-body engulfing. Wick overlap can add context, but the second candle does not need to cover the full high-low range of the prior candle.
Does bullish engulfing require a downtrend?
It is most meaningful after downside pressure, a pullback, or a failed lower push. In a noisy sideways range, the same body structure can carry less diagnostic value.
What is the difference between bullish engulfing and bullish harami?
Bullish engulfing expands over the prior bearish real body. Bullish harami contracts inside the prior real body, so the second candle is contained rather than expansive.
What makes a bullish engulfing pattern fail?
The pattern weakens when price quickly falls back through the bullish candle body or cannot hold the area that the second candle recovered.
Is bullish engulfing the opposite of bearish engulfing?
Yes. Bullish engulfing uses a bullish real body to cover a prior bearish real body. Bearish engulfing uses a bearish real body to cover a prior bullish real body.