A bearish engulfing candlestick pattern forms when a bearish real body takes over the prior bullish real body after buying pressure. The pattern can show that sellers have taken back the previous candle’s body progress, but the reading remains only a pressure clue unless location, follow-up behavior, and recovery attempts support the bearish interpretation.
Key Points
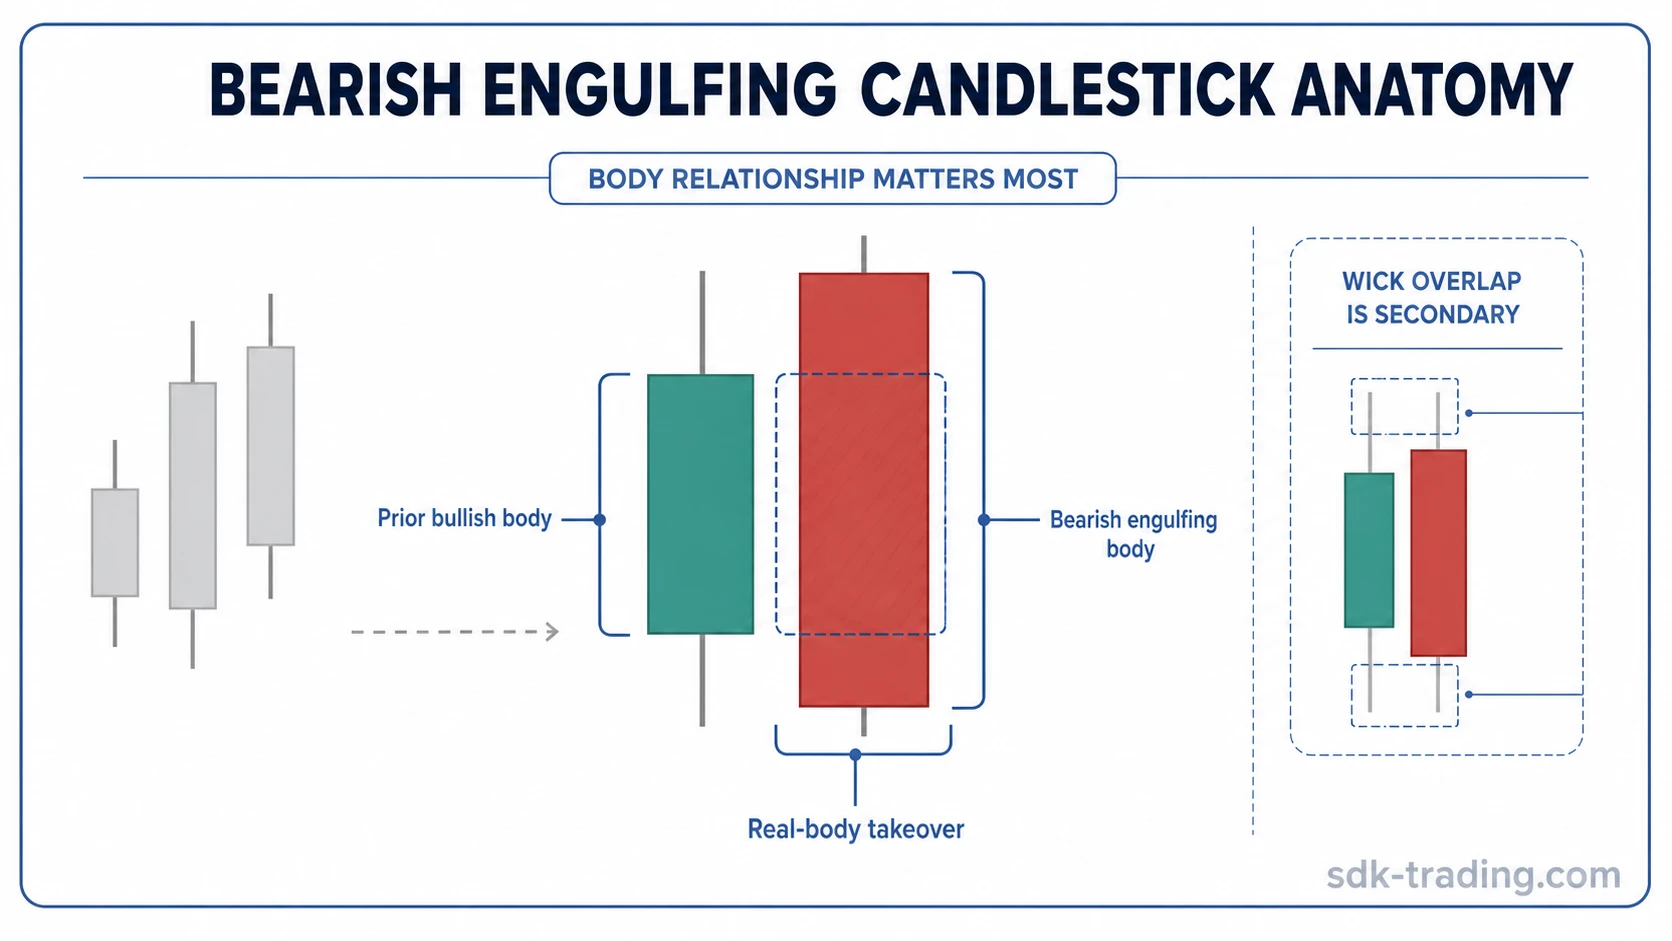
- A bearish engulfing pattern is defined by the second bearish real body engulfing the prior bullish real body.
- The real-body relationship matters more than full wick overlap.
- A cleaner reading usually needs prior upward pressure, a decisive bearish close, and weak recovery afterward.
- A failed reading appears when price quickly recovers the engulfed body area.
- The pattern is body-control evidence, while structure and follow-up decide whether the reading has weight.
What Is a Bearish Engulfing Candlestick Pattern?
A bearish engulfing candlestick pattern belongs to the double-candle pattern family because its meaning comes from the relationship between two consecutive candles. The first candle is usually bullish and reflects upward closing progress. The second candle is bearish and its real body covers the real body of the first candle.
Definition: A bearish engulfing pattern forms when a bearish candle’s real body covers the prior bullish real body, usually by opening near or above the prior close and closing below the prior open.
The real body is the area between the open and close. Shadows can add useful context, but the core pattern does not require the second candle’s full high-to-low range to engulf the entire previous candle. A wick-only overlap can still matter, but it is not the cleanest bearish engulfing structure.
The bearish interpretation becomes more useful after an advance, a bounce, or a test of an area where upside progress begins to fail. In a noisy range, the same candle pair may show short-term volatility rather than a meaningful shift in control.
How to Identify a Bearish Engulfing Pattern
The cleanest structure starts with a bullish candle, followed by a bearish candle whose real body covers the prior real body. The second candle does not need to be extreme, but it should show enough downside progress to change the body relationship from upward close to bearish takeover.
| Criterion | Cleaner bearish engulfing structure | Weaker or incomplete structure |
|---|---|---|
| First candle | Usually bullish, often after upward pressure or a bounce | Small or unclear candle with little directional setup |
| Second candle | Bearish candle with a real body that closes below the prior real body | Bearish candle appears, but body overlap is partial |
| Engulfing area | Real body engulfs the prior real body | Only the wick overlaps, or only a small part of the body is covered |
| Location | Appears after prior buying pressure, a rally, or an upper test | Appears inside a noisy range with no clear pressure sequence |
| Follow-up | Recovery attempts fail near the engulfed body area | Price quickly reclaims the bearish candle body |
The key diagnostic point is not simply that the second candle is red or bearish. The pattern needs a body relationship that changes control from the first candle’s bullish close to the second candle’s bearish close.
The Engulfed Body Boundary
The engulfed body creates a useful boundary for interpretation. If the bearish candle closes through the prior real body and later recovery attempts cannot reclaim that area, the bearish reading is cleaner. If price quickly closes back above the engulfed body area, the original pressure shift becomes weaker.
This is why the candle pair should be read as body-control evidence rather than as a complete decision framework. It identifies a visible shift in control, but the surrounding structure and later response still decide whether the reading has weight.
A narrow support angle is covered separately in bearish engulfing in an uptrend, where the same structure is evaluated specifically after sustained upside pressure.
What a Bearish Engulfing Pattern Can Indicate
A bearish engulfing pattern can indicate that buyers failed to maintain control through the second candle. The first candle closes upward, but the second candle reverses that body progress and finishes below the prior body area.
The message is stronger when the pattern appears near a prior supply area, after an extended advance, or after repeated failed attempts to continue higher. The message is weaker when the candle pair forms in the middle of a choppy range, during low participation, or without any meaningful prior buying pressure.
Candlestick analysis works best as a timing and pressure layer. The pattern is the surface; the surrounding structure is the reason it may or may not matter.

Stronger vs Weaker Bearish Engulfing Readings
Not every bearish engulfing candle has the same diagnostic quality. A cleaner version combines prior buying pressure, full real-body takeover, and weak recovery afterward. A weaker version may still be visible, but the surrounding structure gives less support to the bearish interpretation.
| Reading quality | What it shows | Why it matters |
|---|---|---|
| Cleaner reading | Bearish body fully takes over the prior bullish body after upside pressure | Sellers have visibly reversed the prior candle’s body progress |
| Weaker reading | The bearish candle overlaps the prior body but does not show decisive body control | The pattern may reflect noise instead of a meaningful pressure change |
| Invalid or failed reading | Price quickly recovers the bearish candle body or reclaims the engulfed area | The market rejected the bearish pressure rather than accepting it |
Bearish Engulfing vs Similar Double-Candle Patterns
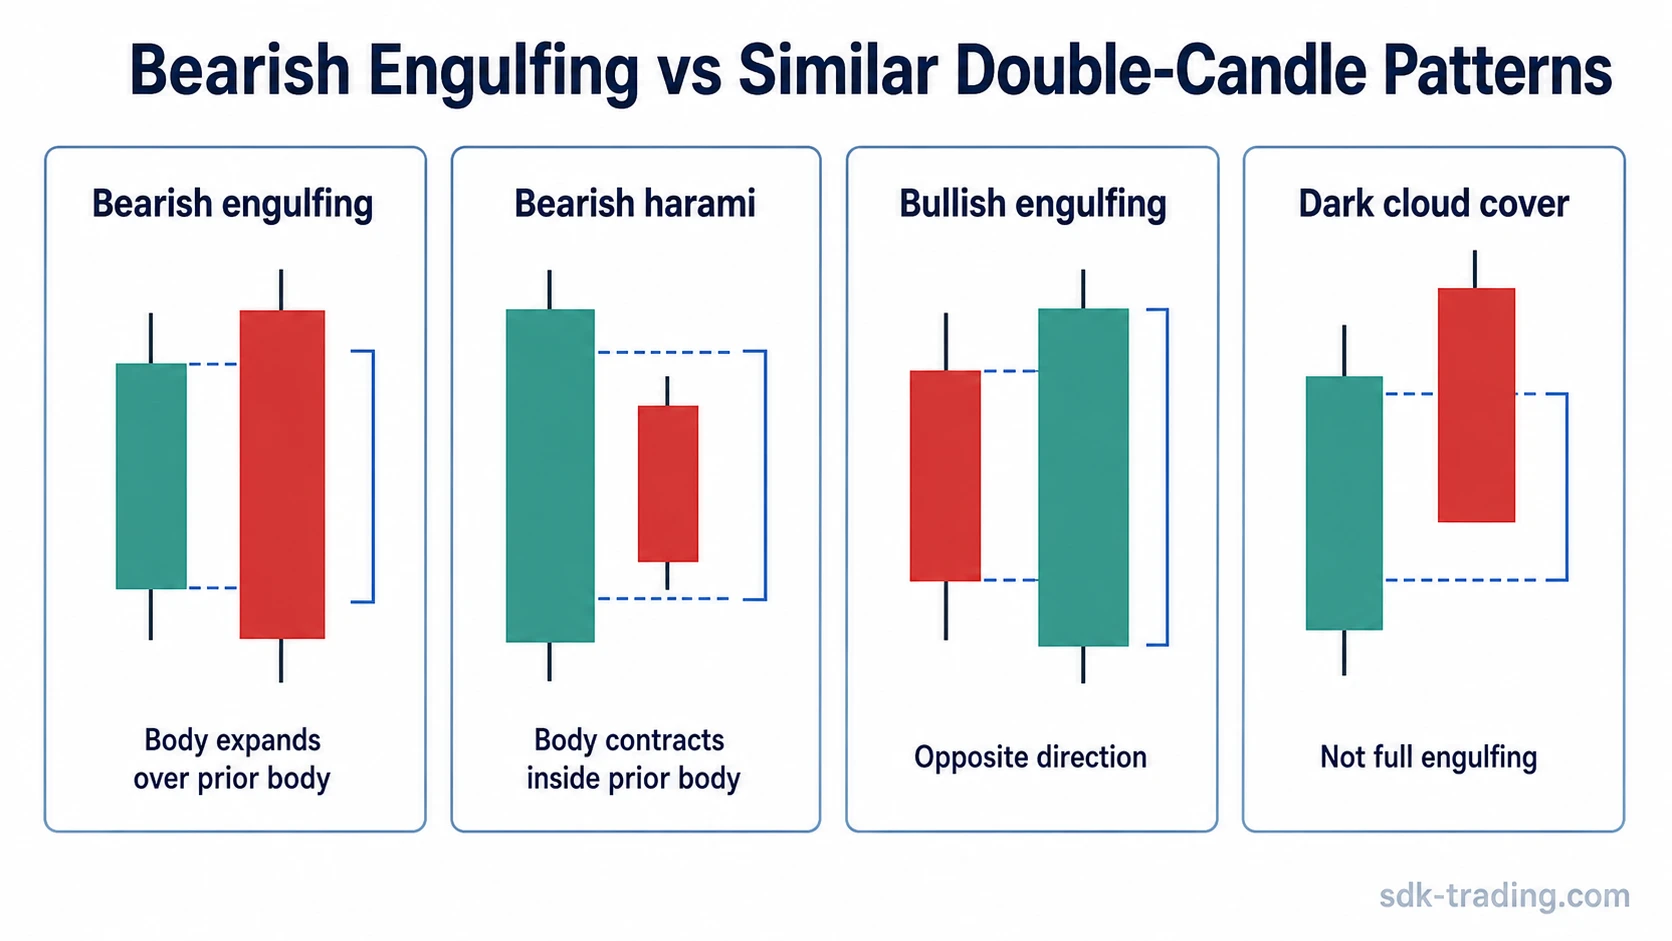
Bearish engulfing can be confused with nearby double-candle patterns because several structures involve two candles, body overlap, or a change in direction. The distinction is the full bearish real-body takeover of the prior bullish real body.
| Pattern | Core structure | Main difference from bearish engulfing |
|---|---|---|
| Bearish harami | Second body is contained inside the prior real body | Harami shows contraction, while bearish engulfing shows body expansion and takeover |
| Bullish engulfing | Bullish real body takes over the prior bearish real body | The direction of body takeover is opposite |
| Dark cloud cover | Bearish candle closes into the prior bullish body | Dark cloud cover usually penetrates part of the prior body rather than engulfing the full real body |
Common Mistakes When Reading Bearish Engulfing Candles
A common mistake is treating any large red candle after a green candle as bearish engulfing. The body relationship matters. If the second real body does not cover the prior real body, the structure is weaker or belongs to a different pattern family.
Another mistake is treating wick overlap as the main requirement. Wicks can show rejection, but bearish engulfing is mainly a real-body pattern. A long wick without body takeover may still be useful, but it is not the same diagnostic structure.
Confusing recognition with a trading plan: Pattern recognition identifies a possible shift in pressure. It does not define risk, timing, position size, or trade management. Related bearish candlestick patterns can create similar warnings, but each still needs structure and follow-up evidence.
Failed Recovery After Bearish Body Takeover
Price advances for several candles into a prior reaction area. The last bullish candle closes near its upper body area, which makes continuation look possible. The next candle opens near that area, sells down, and closes below the prior candle’s real body, creating a bearish engulfing structure.
The first reading is tempting because the second candle has taken back the prior body progress. The reading remains incomplete because the market has only shown rejection inside one candle pair. A cleaner bearish case develops if the next recovery attempt stalls near the engulfed body area and price cannot regain acceptance above it.
The failed case appears when the next candles quickly close back above the bearish candle’s body area. That recovery means sellers created visible pressure, but the market did not continue accepting lower prices. The useful diagnostic question is whether follow-up price behavior accepts or rejects the area created by the engulfing candle.
FAQ
Does a bearish engulfing pattern require wick engulfment?
No. The core requirement is real-body engulfing. Wick overlap can add context, but wick engulfment alone is not enough for the cleanest bearish engulfing definition.
When does a bearish engulfing reading become stronger?
The reading becomes stronger when the bearish real body takes over the prior bullish body and later candles fail to recover the engulfed body area.
How is bearish engulfing different from bearish harami?
Bearish engulfing expands over the prior real body. Bearish harami is contained inside the prior real body. One shows body takeover, while the other shows contraction.