A bearish harami candlestick pattern forms when a small bearish real body is contained inside the prior bullish real body after upward pressure. The pattern does not show a full bearish takeover. It shows range compression, open-close hesitation, and a pause in buyer control that needs later price behavior before it can be treated as meaningful.
Key Points
- A bearish harami is a two-candle compression pattern that appears after prior buying pressure.
- The first candle is bullish and relatively large; the second candle is bearish and smaller.
- The second candle’s real body should sit inside the first candle’s real body.
- Wicks can add context, but the real-body relationship is the main diagnostic boundary.
- The reading is weaker if the second candle is not clearly contained, appears in random chop, or is quickly absorbed by later buying.
What Is a Bearish Harami?
A bearish harami is a double candlestick pattern built around body containment. It appears when a larger bullish candle is followed by a smaller bearish candle whose open and close remain inside the prior candle’s real body.
The structure shows that the market stopped expanding upward with the same force. The first candle reflects prior demand or upward pressure. The second candle shows that the next session could not extend that pressure and instead compressed inside the earlier body area.
Definition: A bearish harami is a two-candle structure where a smaller bearish real body forms inside the real body of a prior larger bullish candle, usually after an upward move or bullish pressure.
The useful point is not that the pattern predicts an immediate decline. The useful point is that expansion has slowed into unresolved balance. That makes the next candles important because they show whether the contained body becomes accepted as hesitation or disappears inside continued buying.
Bearish Harami Anatomy
The bearish harami has two main candles. The first candle is bullish and has a larger real body. The second candle is bearish and has a smaller real body that stays inside the open-close area of the first candle.
| Component | What to check | Why it matters |
|---|---|---|
| Prior context | There should be recent upward pressure, a rally, or a bullish push. | Without prior buying pressure, the pattern loses its bearish-harami context. |
| First candle | The first candle should be bullish and visibly larger than the second candle. | It defines the body range that the second candle must contract inside. |
| Second candle | The second candle should be bearish and smaller. | It shows that upward expansion has paused rather than continued cleanly. |
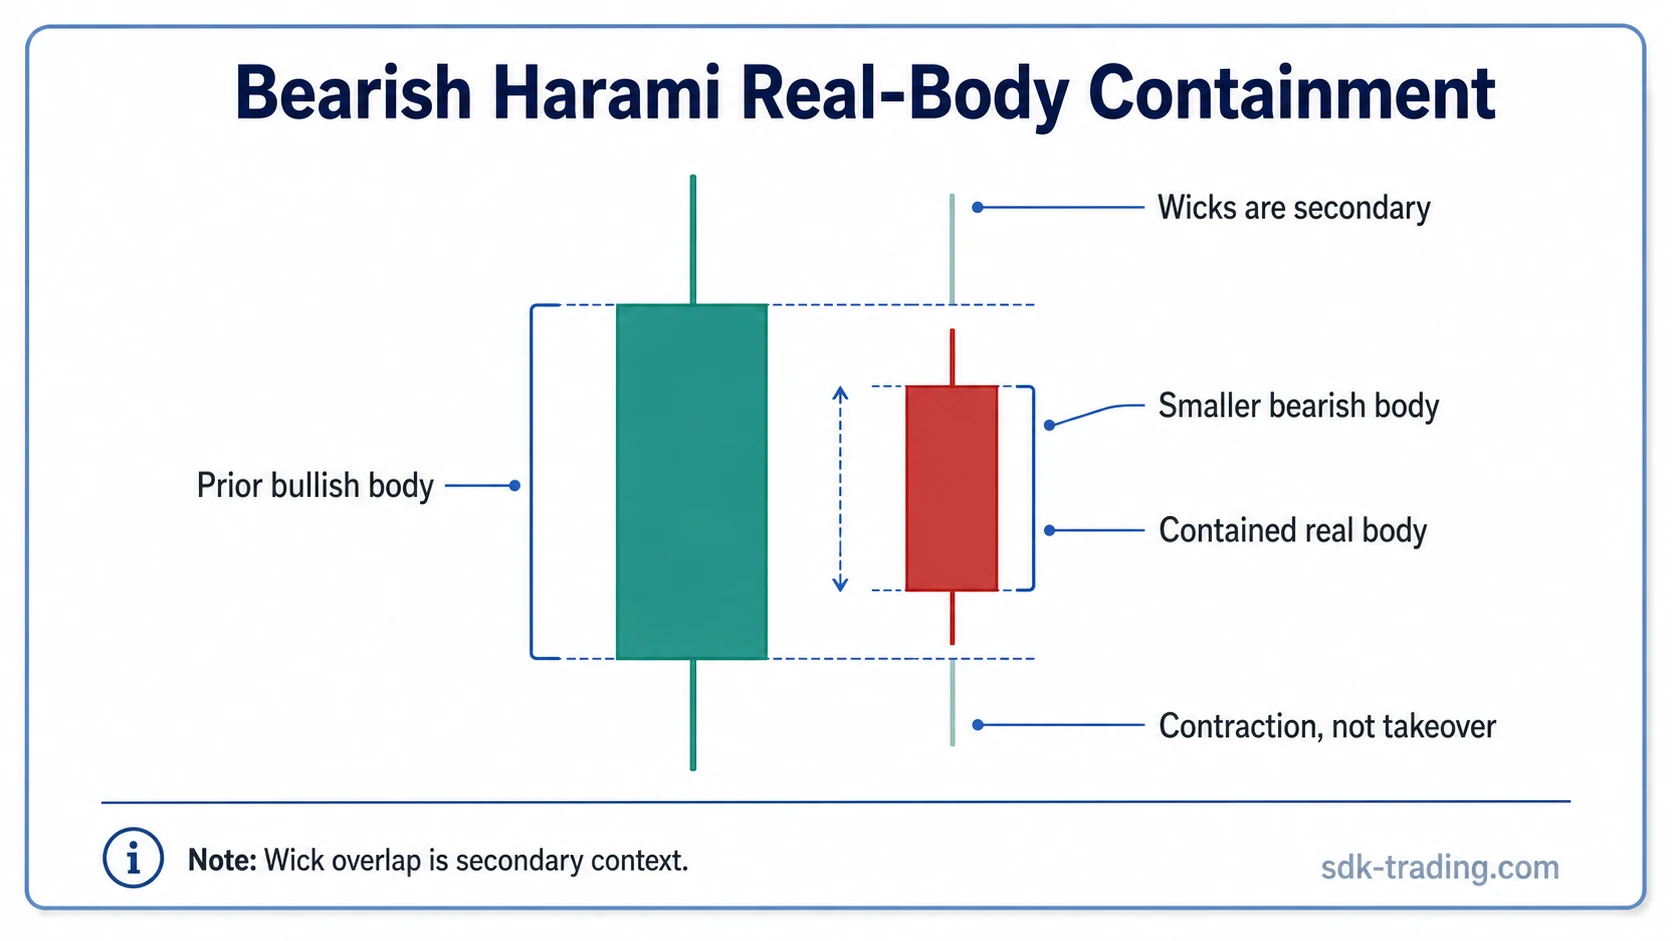
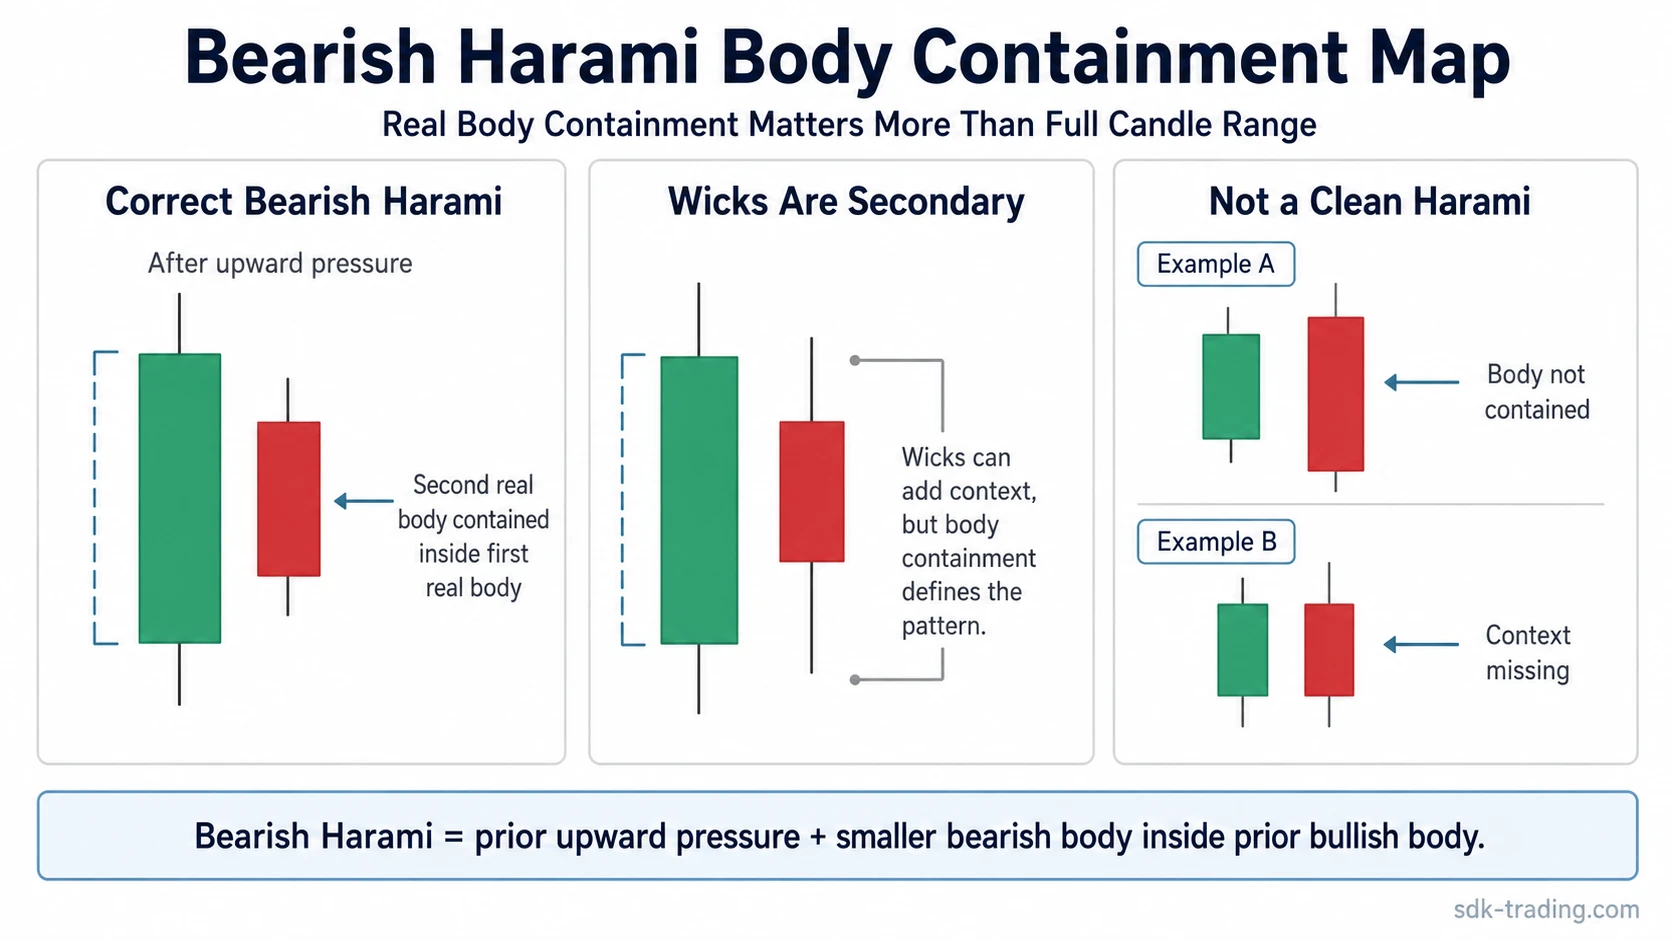
| Body containment | The second candle’s open and close should sit inside the first candle’s real body. | This is the main diagnostic feature of the pattern. |
| Later behavior | Following candles should reveal whether the contained body is respected or absorbed. | The pattern is only an unresolved compression point until later behavior clarifies it. |
Real Body Containment vs Full-Range Containment
The bearish harami is mainly about the real bodies, not about the full candle ranges. The second candle may have wicks that extend beyond the first candle’s body, but its open and close should remain inside that prior body.
This is different from a full inside-bar reading, where traders often focus on the entire high-low range of the second candle relative to the first. A bearish harami can resemble an inside bar, but the bearish-harami identity comes from the smaller bearish body appearing inside a prior bullish body after upward pressure.
A common mistake is treating any small candle after a green candle as a bearish harami. If the second candle is not clearly contained, if the first candle is not meaningfully bullish, or if there was no prior upward pressure, the structure becomes a generic pause rather than a useful harami reading.
How Body Containment Changes the Reading
Body containment changes the reading because it shows a shift from expansion to compression. The first candle shows that buyers were able to move price upward through the open-close range. The second candle shows that the next attempt did not create another strong bullish body.
That does not prove that sellers have taken control. It only shows that the previous bullish rhythm has stopped expanding for the moment. The second candle is smaller, more compressed, and unable to close beyond the prior body. The market has moved from directional push to unresolved balance.
| Reading | Structure | Interpretation |
|---|---|---|
| Cleaner bearish harami | Clear upward pressure, large bullish first body, small bearish second body contained inside it. | Buying pressure has paused in a visible and structured way. |
| Weaker bearish harami | Containment exists, but the prior move is choppy, the first candle is not dominant, or the second body is not meaningfully smaller. | The pattern may show hesitation, but the diagnostic quality is limited. |
| Invalid or false-positive reading | The second body is not contained, the pattern appears without prior buying pressure, or later candles quickly reclaim the compression area. | The structure should not be treated as a useful bearish-harami reading. |
Clean, Weak, and Invalid Bearish Harami Readings
A clean bearish harami has visible sequence: upward pressure first, a larger bullish body, then a smaller bearish body contained inside it. The second candle should not look like a new expansion candle. It should look like hesitation inside the prior bullish open-close range.
A weak bearish harami has the same rough shape but less diagnostic value. The prior move may be sideways rather than upward. The first candle may not be large enough to define a meaningful body range. The second candle may be only slightly smaller, or its wicks may make the structure look more like general noise than controlled compression.
An invalid reading appears when the required relationship is missing. If the second candle’s body is not inside the first candle’s body, the pattern is not a bearish harami. If later candles immediately expand upward and accept above the contained area, the harami becomes a failed hesitation rather than a useful warning structure.
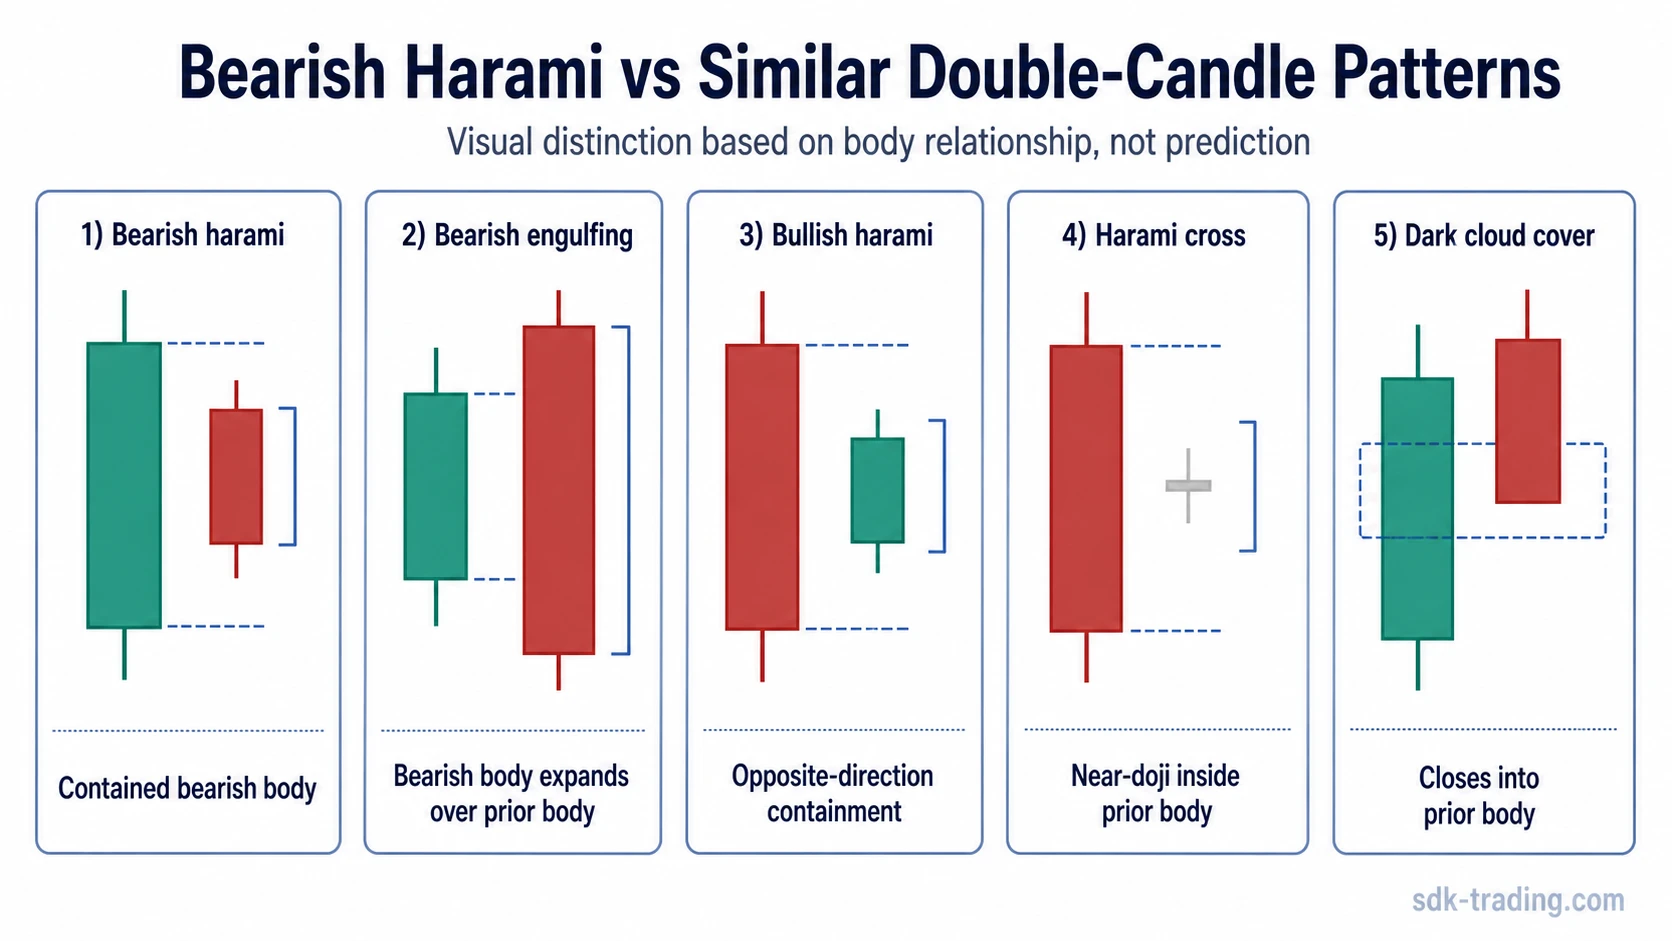
Bearish Harami vs Similar Double-Candle Patterns
The bearish harami needs a narrow diagnostic boundary because several two-candle structures can look similar at a glance. The main difference is whether the second candle compresses inside the first body, expands beyond it, turns into a doji variant, or closes deeply into the prior candle.
| Pattern | Main structure | How it differs from bearish harami |
|---|---|---|
| Bearish engulfing | A larger bearish second candle overwhelms the prior bullish body. | Bearish engulfing shows expansion by the second candle; bearish harami shows compression by the second candle. |
| Bullish harami | A smaller bullish body forms inside a prior bearish body after downside pressure. | It is the opposite-side version: prior pressure is down, and the contained candle is bullish rather than bearish. |
| Harami cross | The second candle is a doji or near-doji inside the prior real body. | The second candle shows stronger open-close compression than a normal small bearish body. |
| Dark cloud cover | A bearish candle opens higher and closes deeply into the prior bullish candle. | Dark cloud cover has a stronger bearish close into the prior body; bearish harami remains contained and compressed. |
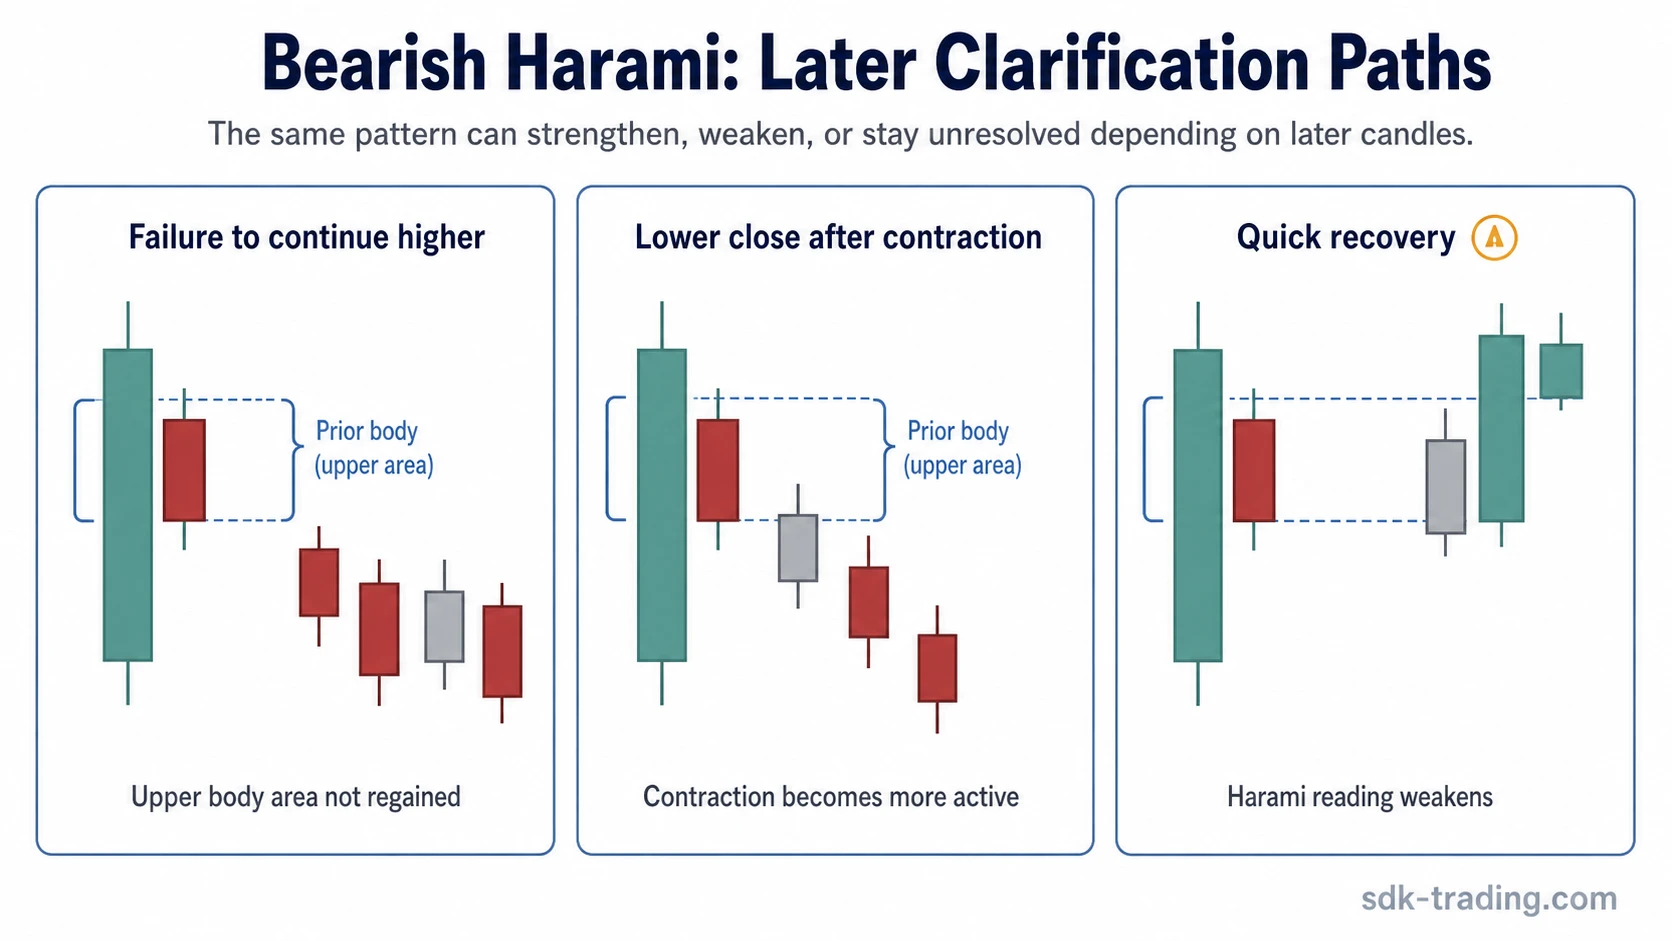
When the Contained Body Holds or Fails
The bearish harami becomes more useful when later candles respect the contained body area and fail to rebuild clean upside acceptance. In that case, the small second candle marks a real pause in the prior bullish rhythm.
The reading becomes weaker when the next candles reclaim the contained area and continue accepting higher prices. That behavior suggests the small bearish candle was only a pause inside an ongoing advance rather than a meaningful change in pressure.
The comparison with bearish engulfing in uptrend depends on second-candle behavior after prior buying pressure. A bearish engulfing structure shows stronger second-candle expansion. A bearish harami stays more tentative because the second candle remains compressed inside the prior real body.
Reliability and Limitations
The bearish harami should not be read as a complete trade decision by itself. Its structure is narrower than many stronger two-candle patterns because the second candle does not overpower the first. It only shows that the prior bullish body was followed by a smaller bearish body inside the same open-close area.
That limitation is also its main diagnostic value. The pattern warns about compression, not collapse. It can appear before a pullback, before a sideways pause, or before continued upward movement if buyers quickly recover the contained area.
The reading is more defensible when it appears after an extended advance, near a prior supply area, after an exhaustion-like push, or where other market structure already suggests that upside progress is becoming harder. It is less useful in random mid-range candles, low-quality chop, or markets where small contained candles appear frequently without follow-through.
Common Mistakes
- Reading any small red candle as bearish harami: the second real body must be contained inside the prior bullish real body.
- Ignoring prior pressure: without prior buying pressure, the pattern loses its bearish-harami context.
- Treating the pattern as a standalone decision: the structure shows compression, not a completed directional outcome.
- Confusing containment with engulfing: bearish harami contracts inside the prior body, while bearish engulfing expands beyond the prior body.
- Overweighting wicks: wick behavior may add context, but the real-body relationship defines the pattern.
FAQ
What does a bearish harami mean?
A bearish harami means that a smaller bearish real body has formed inside a prior larger bullish real body after upward pressure. It shows compression and hesitation after a bullish push, so the main test is whether later candles rebuild upside acceptance or fail inside the contained area.
Is a bearish harami reliable?
A bearish harami is more reliable when the body containment appears after clear upward pressure and later candles fail to rebuild upside acceptance. It is weaker when it appears in choppy price action or is quickly absorbed by continued buying.
What is the difference between bearish harami and bearish engulfing?
Bearish harami uses a smaller bearish second body contained inside the prior bullish body. Bearish engulfing uses a larger bearish second body that overwhelms the prior bullish body. The first is compression; the second is expansion.
Can a bearish harami appear in a downtrend?
It can appear during a temporary upward retracement inside a broader downtrend, but the diagnostic idea is still the same: a bullish push is followed by a smaller bearish body contained inside the prior bullish body.