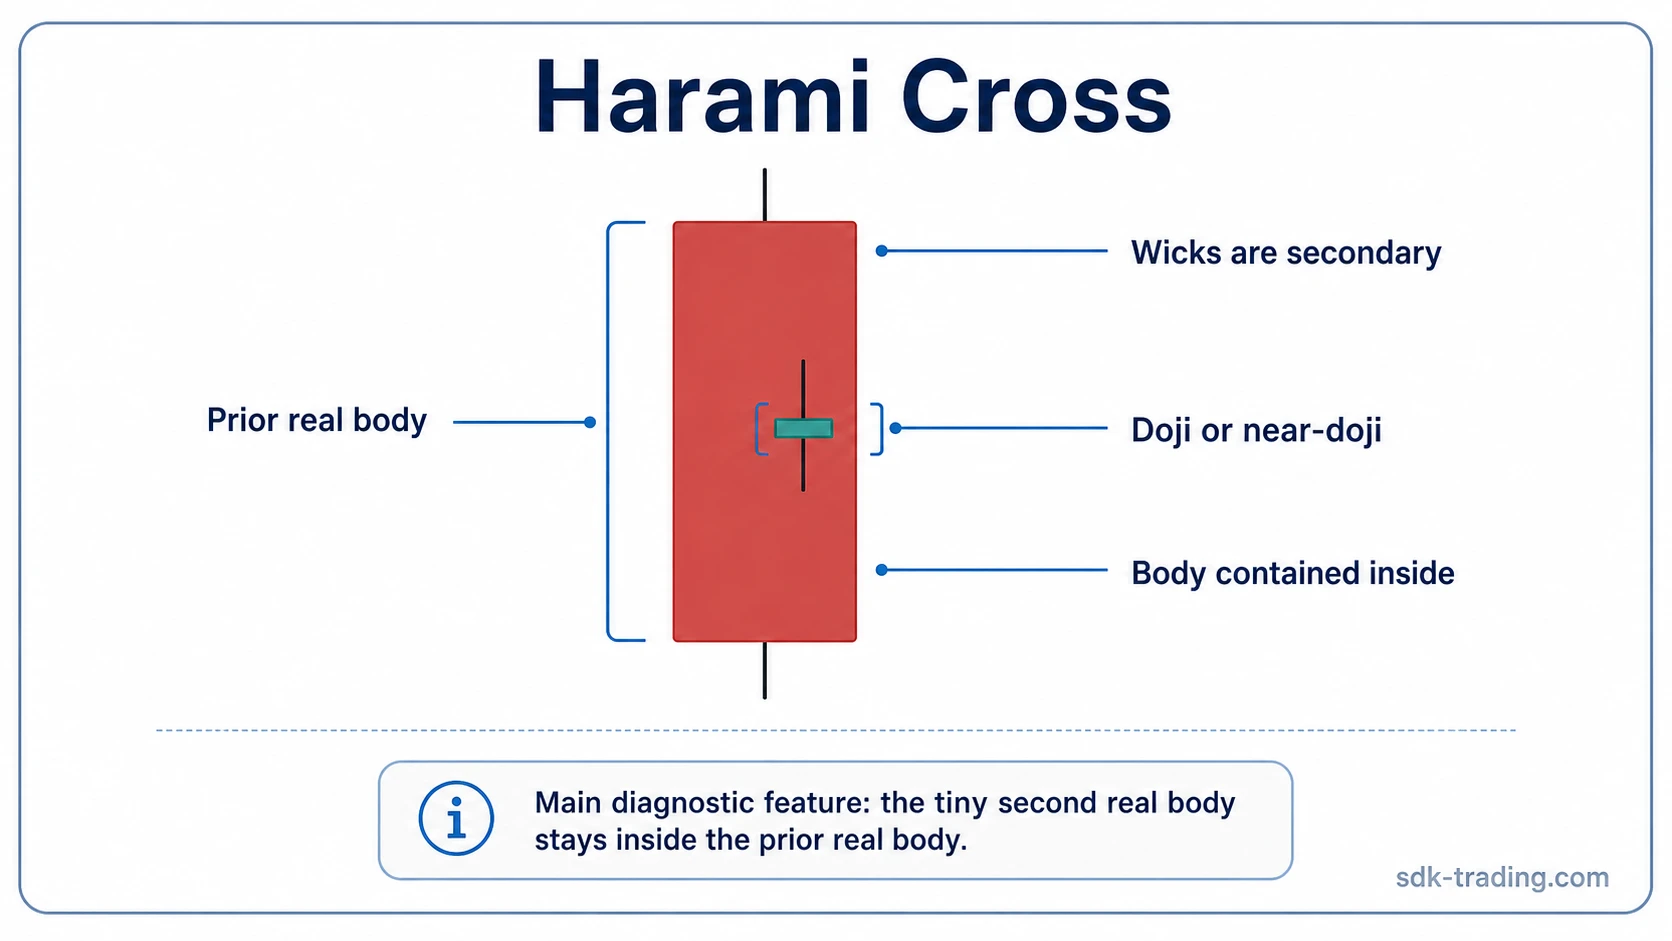
A harami cross candlestick pattern is a two-candle trading pattern where the second candle is a doji or near-doji contained inside the real body of the prior candle.
The structure reflects hesitation after a directional candle. The first candle shows prior pressure; the second candle shows that the next session or bar failed to extend that pressure with a meaningful real body. The contained doji is the surface clue, but surrounding structure and later candles decide whether that hesitation matters.
Definition: A harami cross is a harami-style candlestick structure in which the second candle has a doji or near-doji real body, and that small body sits inside the real body of the previous candle.
Key Points
- Harami cross is a two-candle structure, not a single doji.
- The second candle should be a doji or near-doji inside the prior real body.
- The pattern reflects compression or hesitation after a directional candle.
- Wicks can add context, but the real-body relationship is the main diagnostic test.
- Later candles decide whether the hesitation develops, fails, or remains unresolved.
What Is a Harami Cross Candlestick Pattern?
A harami cross belongs to the harami family of double candlestick patterns. The key difference is the second candle: ordinary harami patterns use a small real body, while harami cross patterns use a doji or near-doji real body.
The first candle usually has a larger real body that reflects directional pressure. The second candle opens and closes near the same price, creating a very small body inside the prior real body. That contraction suggests that the prior push has paused, but it does not prove that control has changed.
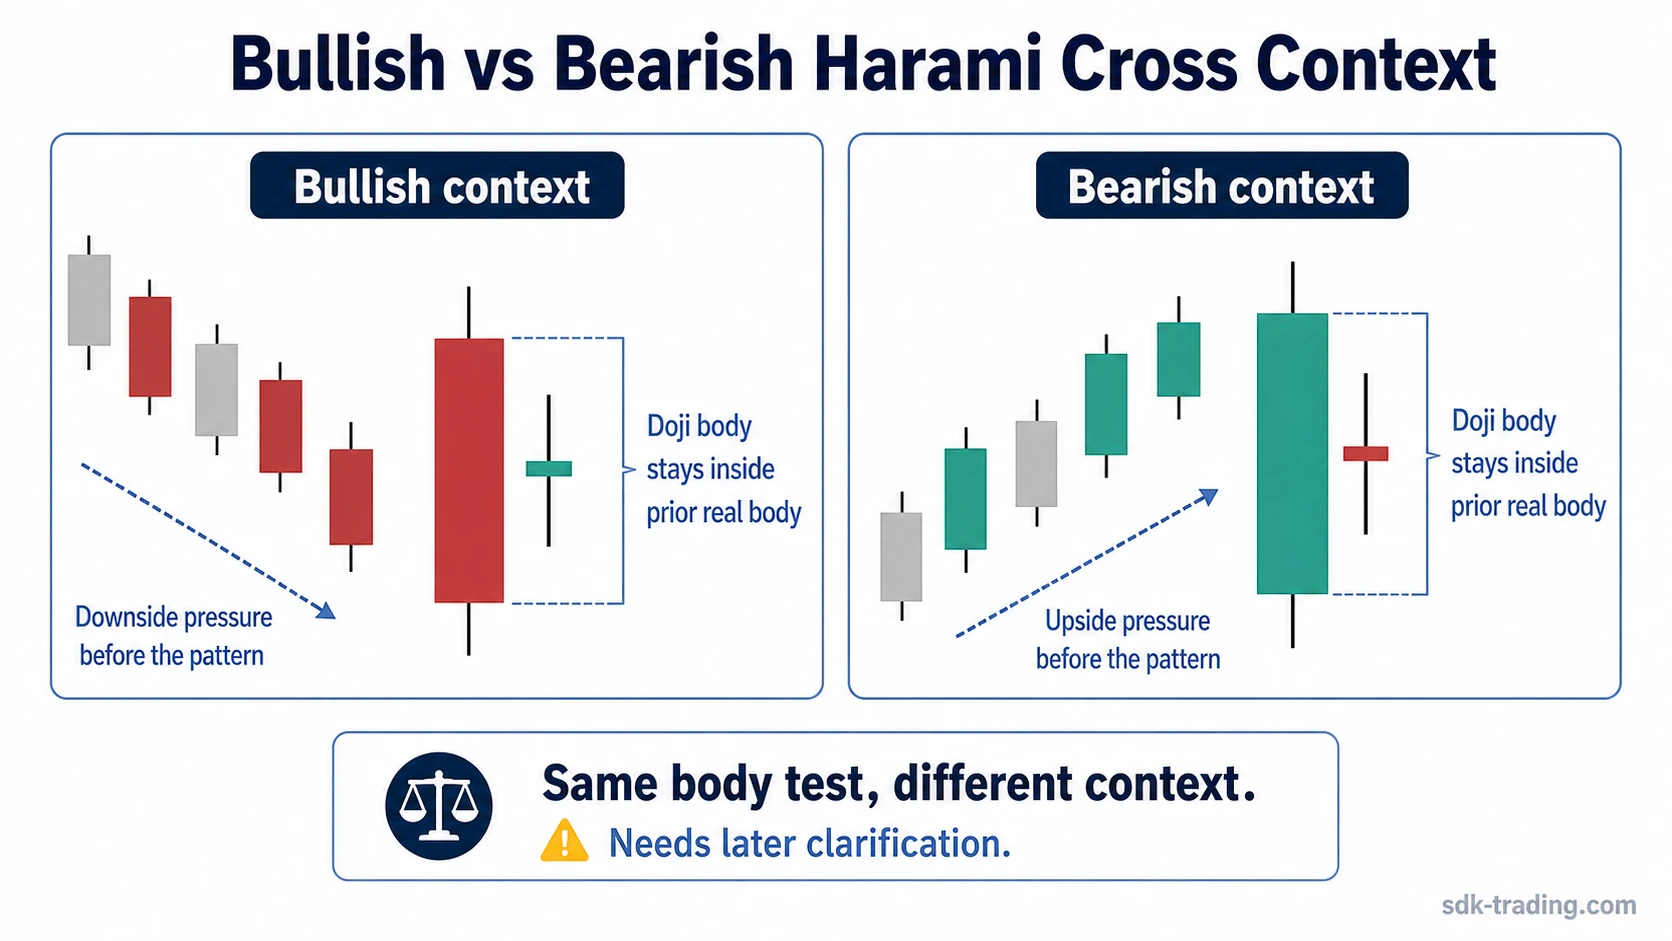
The trading interpretation depends on the location of the pattern. A harami cross after an extended decline can carry a different meaning from the same structure inside a choppy range. A clean structure in the wrong location can still be weak.
Doji Inside the Prior Real Body
The pattern starts with a directional candle. The second candle forms as a doji or near-doji inside the prior real body. In a bearish reading, the doji is contained inside a prior bullish body. In a bullish reading, the doji is contained inside a prior bearish body.
The second candle is the diagnostic point. Its real body should be very small, and that body should remain within the prior candle’s real body. The doji does not need to sit exactly in the middle of the prior body, but it should not break outside it with a meaningful body displacement.
Wicks are secondary unless they change the reading of the structure. A long wick can show rejection or testing, but the pattern is still defined by the doji or near-doji body being contained inside the prior real body. Full high-low containment belongs more to inside bar analysis than to harami cross identification.
Harami Cross Diagnostic Boundary
A clean reading starts with three checks: the second candle must be doji-like, its body must stay inside the prior real body, and later price behavior must show whether the prior body area is accepted, rejected, or ignored.
| Diagnostic area | Harami cross reading |
|---|---|
| What it is | A two-candle pattern where a doji or near-doji body forms inside the prior candle’s real body. |
| What it is not | It is not any doji after a large candle, and it is not defined by full high-low range containment alone. |
| What strengthens the reading | Clear prior directional pressure, clean real-body containment, and later candles that clarify acceptance, rejection, or failure around the prior body. |
| What weakens or invalidates the reading | A second candle with a meaningful real body, weak containment, noisy range context, or immediate continuation that ignores the contained doji area. |
Limitation: A harami cross can remain unresolved. If later candles stay inside the prior body without accepting higher prices, rejecting lower prices, or continuing through the structure, the doji remains hesitation rather than completed evidence.
Bullish and Bearish Harami Cross Readings
A bullish harami cross appears after downside pressure when a doji or near-doji forms inside the prior bearish real body. The structure can suggest that selling pressure has paused, but that hesitation becomes more meaningful only when price stops accepting lower levels or begins reclaiming part of the prior bearish body.
A bearish harami cross appears after upside pressure when a doji or near-doji forms inside the prior bullish real body. The structure can suggest that buying pressure has stalled, but that hesitation loses importance if price quickly accepts higher levels again or if the next candles treat the doji as ordinary pause behavior inside a trend.
The broader harami family uses body containment as its starting point. Bearish harami focuses on small-body contraction after upside pressure. Bullish harami focuses on small-body contraction after downside pressure. Harami cross is narrower because the second body is doji-like, not merely smaller.
Harami Cross vs Nearby Candlestick Patterns
Harami cross is often confused with related candlestick structures because several patterns involve contraction, hesitation, or a second candle that changes the prior reading. The distinction is the body test.
| Nearby pattern | Main diagnostic difference |
|---|---|
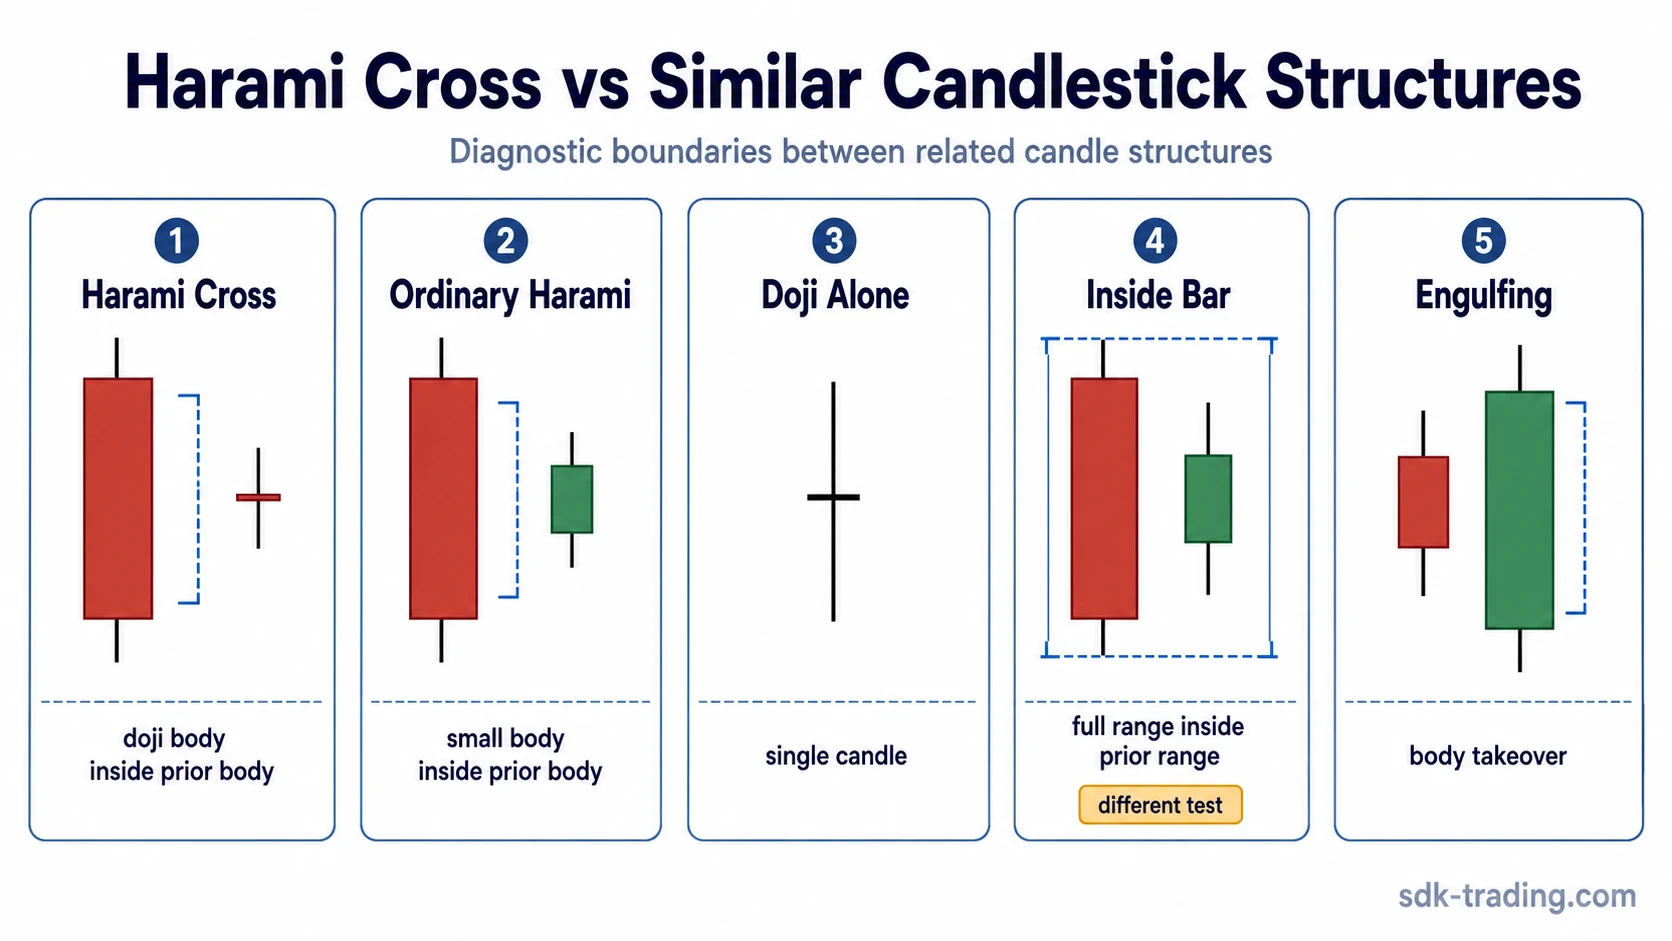
| Ordinary harami | The second candle has a small real body inside the prior real body, but it does not need to be a doji. |
| Doji alone | A doji is a single candle. Harami cross requires the doji body to sit inside the prior real body. |
| Inside bar | Inside bar uses full high-low range containment, while harami cross uses real-body containment with a doji-like second body. |
| Engulfing pattern | Engulfing uses real-body takeover. Harami cross uses contraction inside the prior real body. |
| Tweezer pattern | Tweezer structures focus on similar highs or lows. Harami cross focuses on doji containment inside the prior body. |
| Piercing pattern | Piercing pattern depends on a bullish candle closing deeply into the prior bearish body. Harami cross depends on a doji-like contained body. |
Contained Doji After Directional Pressure
Price declines for several candles and then prints a larger bearish candle. The next candle opens and closes near the same level, leaving a doji body inside the prior bearish real body. The initial temptation is to read the structure as a completed shift because downside pressure has paused.
The reading is still incomplete while closes remain trapped inside the prior body. Reclaiming the upper part of the prior bearish body makes the hesitation more meaningful. Acceptance below the structure means the doji failed to interrupt the prior pressure.
The diagnostic point is not the doji by itself. The question is whether the market treats the contained body area as a real change in behavior or only as a brief pause before continuation.
Common Mistakes When Reading a Harami Cross
A common mistake is treating any doji after a strong candle as a harami cross. The second candle must be evaluated against the prior real body. A doji that forms outside the prior body may still matter, but it is not the same structure.
Another mistake is overvaluing the wick relationship. Wicks can show testing, rejection, or volatility, but the core harami cross test is real-body containment. If the analysis depends entirely on wick overlap, the structure may belong to another pattern family.
The largest interpretive error is treating the pattern as confirmation. A harami cross shows hesitation or compression. It does not, by itself, confirm reversal, continuation, or trade direction. Later acceptance, rejection, or continuation determines whether the hesitation becomes useful.
FAQ
What does a harami cross candlestick pattern mean?
A harami cross means that a doji or near-doji formed inside the prior candle’s real body. It shows hesitation after a directional candle, but later price behavior is needed to clarify the reading.
Is a harami cross the same as a doji?
No. A doji is a single candle with a very small real body. A harami cross requires that doji or near-doji to form inside the real body of the previous candle.
Do wicks matter in a harami cross?
Wicks can add context, but the core requirement is real-body containment. The doji or near-doji body should sit inside the prior real body.
Can a harami cross fail?
Yes. A harami cross can fail if later candles continue through the structure or if the doji area never leads to clear acceptance or rejection. The pattern can also remain unresolved inside a range.