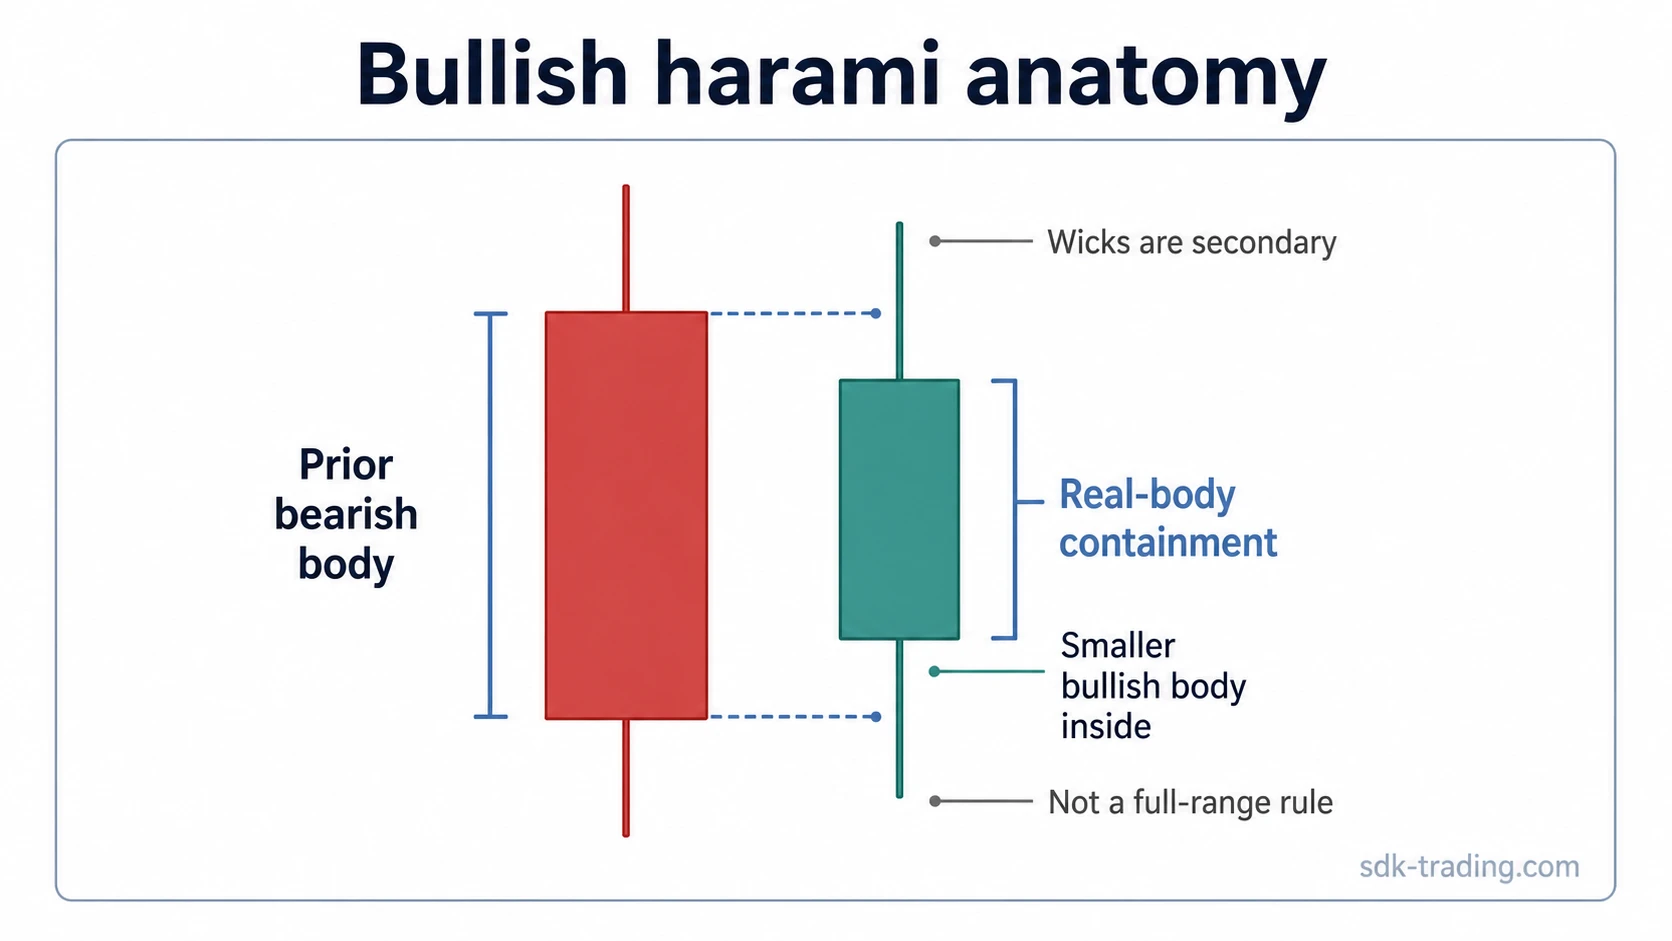
A bullish harami pattern is a two-candle candlestick structure where a small bullish real body forms inside the prior larger bearish real body after selling pressure. The defining feature is real-body containment: the second candle contracts inside the first candle’s open-close area instead of taking it over.
Definition: A bullish harami is a body-compression pattern that appears after downside pressure. It shows that the next candle did not extend the prior bearish body with the same force, but it does not confirm that buyers have taken control.
The useful reading is not “bullish reversal confirmed.” It is unresolved balance after a bearish push. The pattern becomes more informative when price respects, reclaims, or rejects the contained-body area instead of treating the two-candle shape as a complete trading signal.
Key Points
- A bullish harami uses two candles: a larger bearish body followed by a smaller bullish body.
- The second real body should sit inside the first real body.
- Prior selling pressure gives the compression its meaning.
- Wicks can add context, but real-body containment is the core rule.
- The pattern is different from an inside bar because an inside bar is usually judged by full high-low range containment.
What Is a Bullish Harami?
A bullish harami is a contraction pattern that forms after bearish movement. The first candle shows downside progress through a larger bearish real body. The second candle has a smaller bullish real body that opens and closes within the prior bearish body, showing that the next session or bar did not continue the same open-close downside expansion.
That compression can warn that selling pressure is slowing, but the candle pair alone remains conditional. A cleaner reading needs a body-area response: price holds above much of the prior bearish body, reclaims the contained area after a brief test, or fails the area and continues lower.
Bullish Harami Anatomy
| Part | What to look for | Why it matters |
|---|---|---|
| Prior movement | Price has been moving lower, pulling back, or pressing into a lower area. | The pattern needs prior selling pressure before the compression has diagnostic value. |
| First candle | A larger bearish real body. | It defines the open-close body area that the second candle must stay inside. |
| Second candle | A smaller bullish real body. | It shows narrower open-close movement after the prior bearish push. |
| Body relationship | The second real body is contained inside the first real body. | This is the core bullish harami structure. |
| Wicks | Upper or lower shadows may extend beyond the real-body area. | They can affect interpretation, but they do not replace the real-body containment test. |
Contained Body, Not Body Takeover
The bullish harami is easy to overread because the second candle is bullish. The important point is that the second candle is smaller and contained. It does not engulf the prior bearish body, erase the first candle, or prove that downside pressure has ended.
| Diagnostic lens | Correct reading | Common overread |
|---|---|---|
| What it is | A two-candle compression after bearish pressure. | A complete bullish reversal by itself. |
| What it is not | It is not defined by any small candle inside the full high-low range. | Calling every small inside candle a bullish harami. |
| Body signal | The second candle stays inside the first candle’s real body. | Treating wick overlap as the main rule. |
| Resolution | The body area still needs a later hold, reclaim, or failure. | Assuming the second candle already resolves direction. |
How to Identify a Bullish Harami
The cleanest identification starts with the real bodies, not the shadows. A bullish harami needs bearish pressure first, then a smaller bullish real body that remains inside the prior bearish real body.
- Look for a prior decline, pullback, or lower-area test.
- Check that the first candle has a larger bearish real body.
- Check that the second candle has a smaller bullish real body.
- Verify that the second candle opens and closes inside the first candle’s real body.
- Treat wick overlap as secondary context, not the defining rule.
- Judge the body-area response before assigning directional weight to the pattern.
A typical scenario is a market that has been moving lower, prints a wide bearish candle, then follows with a smaller bullish body inside that prior body. The structure shows that selling pressure has compressed. It does not show that directional control has already changed.
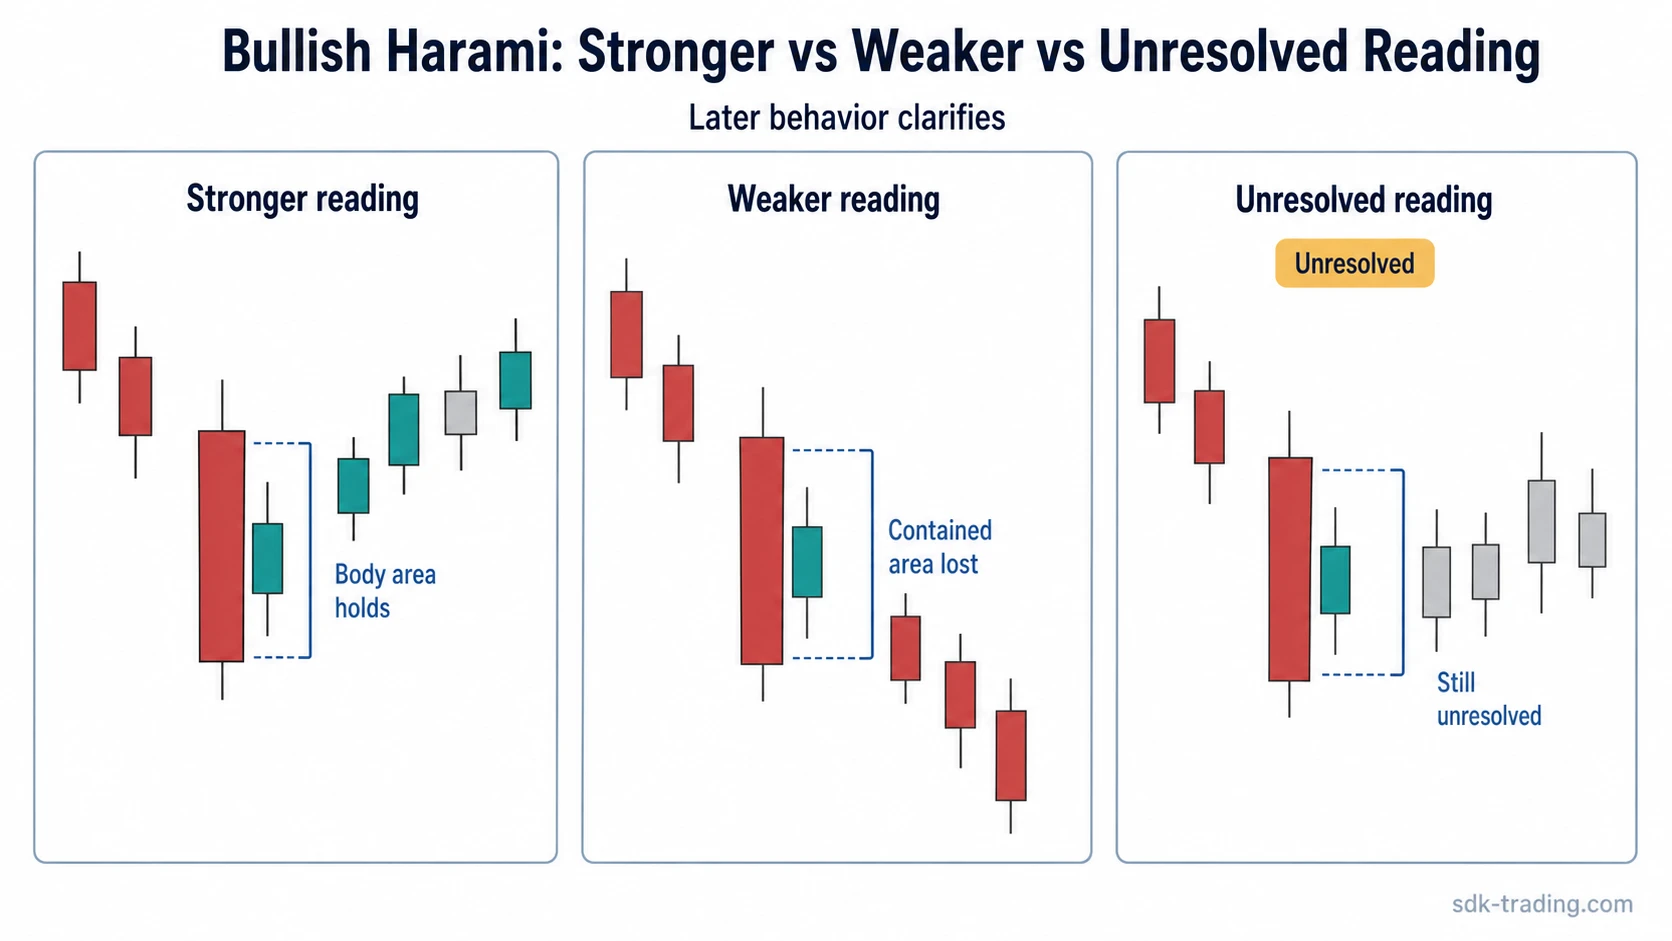
Clean, Weak, and Invalid Bullish Harami Readings
| Reading | What it looks like | Diagnostic meaning |
|---|---|---|
| Clean reading | Prior selling pressure is visible, the first bearish body is larger, the second bullish body is clearly smaller and contained, and the next price behavior respects the body area. | Downside expansion has paused in a way that deserves attention, but the reading still remains conditional. |
| Weak reading | The body relationship is small or unclear, the prior decline is not obvious, or the pattern appears inside random overlap. | The candle pair may be ordinary compression rather than a useful harami reading. |
| Invalid reading | Price quickly loses the contained-body area and continues lower without respecting the compression zone. | The pattern failed to create useful stabilization and becomes part of ongoing bearish movement. |
When the Contained Body Holds or Fails
The body area created by the first candle is the practical reference zone. A stronger reading forms when the market stops accepting lower prices through that area. A weaker reading forms when the same area is lost quickly and price continues lower.
| Feature | More defensible reading | Weaker reading |
|---|---|---|
| Prior pressure | Bearish movement is extended, slowing, or testing a lower area. | The pattern appears without a meaningful prior bearish push. |
| Second candle quality | The second bullish body is clearly smaller and contained. | The second body is not clearly contained, or the reading depends mainly on shadows. |
| Body-area response | Subsequent candles hold above, test, or reclaim much of the prior bearish body. | Subsequent candles lose the area and continue lower. |
| Interpretation | The pattern reflects compression that may become meaningful if the market stops accepting lower prices. | The pattern is likely only a pause inside continuing downside movement. |
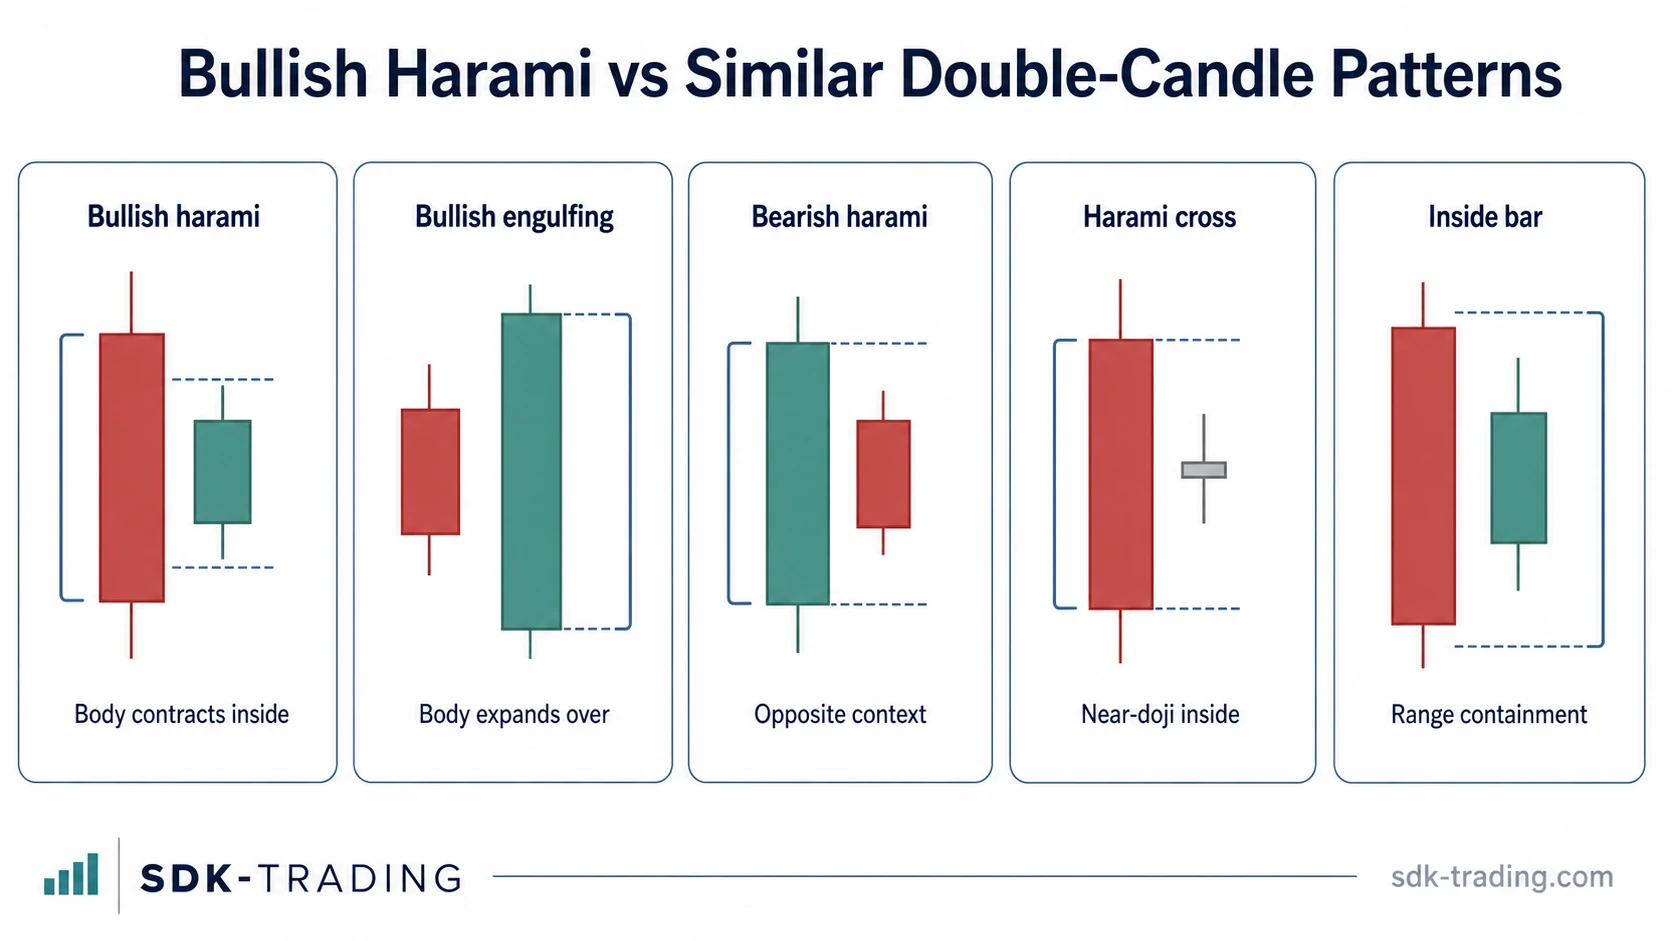
Bullish Harami vs Similar Patterns
Most confusion comes from grouping all two-candle inside or reversal-looking structures together. The useful distinction is whether the second candle contracts inside the prior body, expands beyond it, changes directional context, or becomes nearly bodyless.
| Pattern | Core body relationship | Main distinction |
|---|---|---|
| Bullish harami | Small bullish body inside a prior larger bearish body. | Contraction after selling pressure. |
| Bullish engulfing | Second bullish body expands over the prior bearish body. | Expansion, not containment. |
| Bearish harami | Small bearish body inside a prior larger bullish body. | Opposite directional context after upside pressure. |
| Harami cross pattern | The second candle is near-doji inside the prior body. | Near-bodyless second candle, not a normal small bullish body. |
| Inside bar | Often judged by full high-low range containment. | Range containment is different from real-body containment. |
Common Bullish Harami Mistakes
- Using wick containment as the main rule. The bullish harami is built around real bodies. Wicks can matter, but they are not the core structure.
- Ignoring prior selling pressure. A small bullish candle inside another body has weaker meaning if it appears without a preceding decline, pullback, or lower-area test.
- Calling the pattern resolved too early. The two-candle structure only creates compression. The body area still needs to hold, be reclaimed, or be lost before the reading has useful weight.
- Confusing contraction with engulfing. Bullish harami contracts inside the prior body. Bullish engulfing expands beyond the prior body.
- Treating the pattern as a complete trading method. Candlestick patterns can warn, but structure, location, and directional resolution decide whether the warning remains useful.
FAQ
What does a bullish harami pattern mean?
A bullish harami pattern means downside pressure has compressed after a larger bearish candle. The smaller bullish body inside the prior bearish body can warn that selling pressure is slowing, but the pattern remains conditional until the body area is respected or lost.
When does a bullish harami reading become stronger?
The reading becomes stronger when the contained body appears after clear downside pressure and later candles hold the contained-body area instead of accepting back below it.
What is the difference between bullish harami and bullish engulfing?
A bullish harami contracts inside the prior bearish real body. A bullish engulfing pattern expands over the prior bearish real body. The first structure shows compression; the second shows expansion.
What is the difference between bullish harami and harami cross?
A bullish harami has a smaller bullish real body inside the prior bearish body. A harami cross uses a near-doji second candle, meaning the second candle has little or almost no real body.