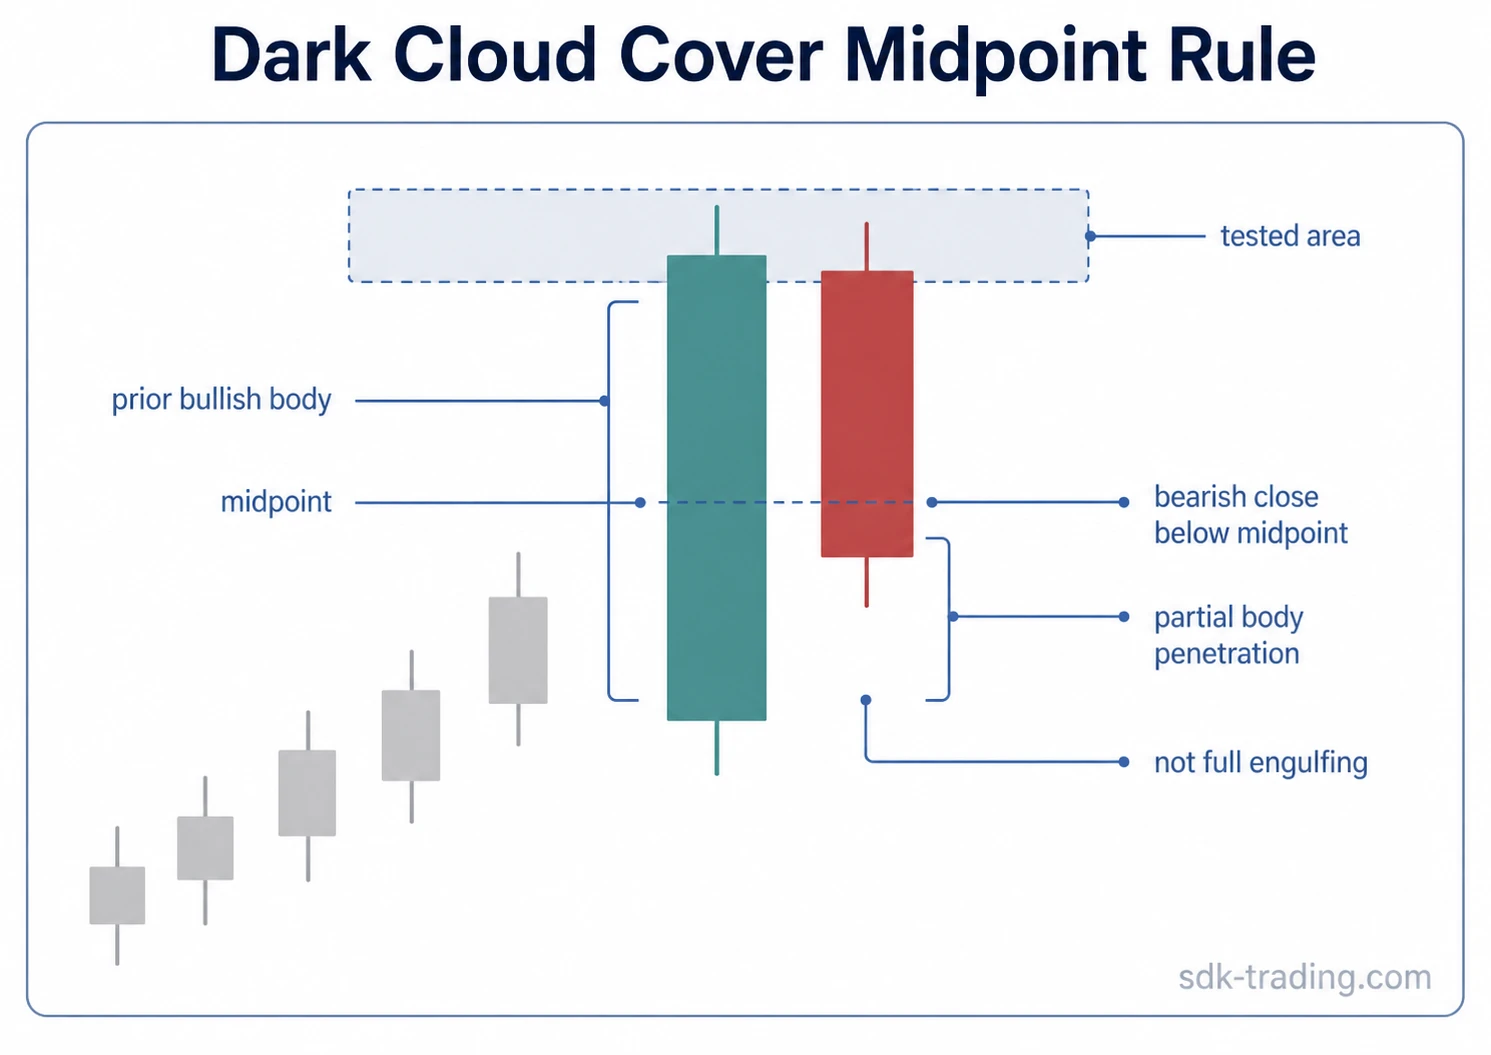
A dark cloud cover candlestick pattern is a two-candle bearish warning that appears after upward movement. It forms when a bullish candle is followed by a bearish candle that opens high, moves into the prior candle’s real body, and closes below the midpoint of that prior real body without fully engulfing it.
Definition: The pattern requires a bearish second candle to close below the midpoint of the prior bullish real body. That midpoint rule separates dark cloud cover from a shallow pullback or a full bearish engulfing pattern.
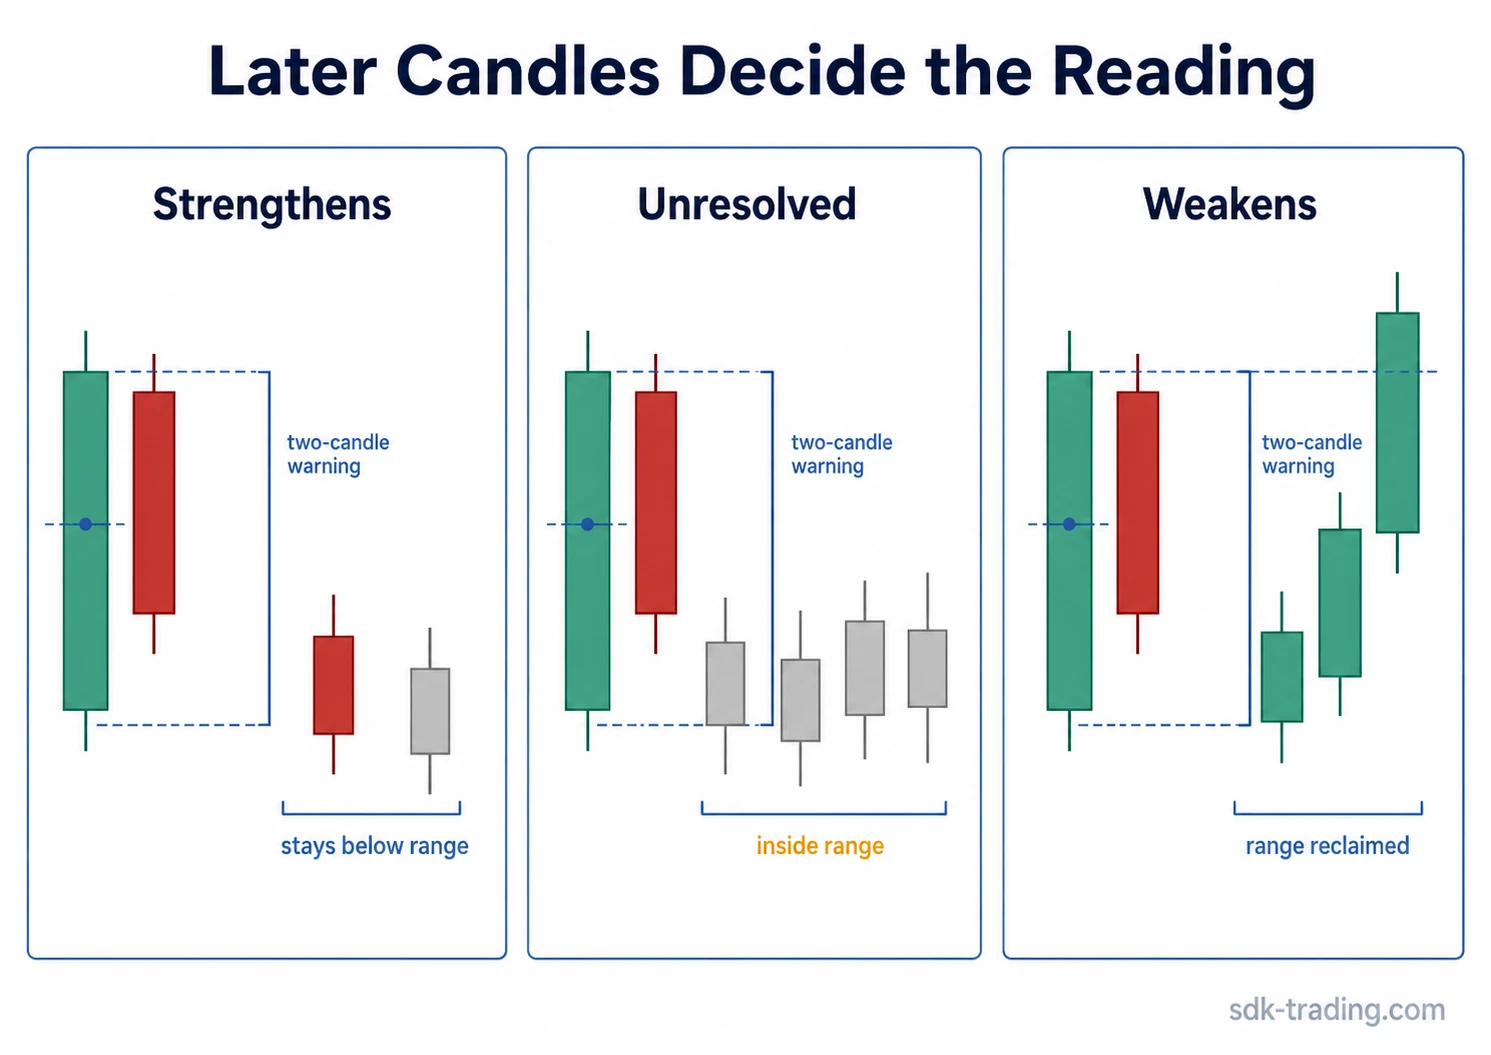
The first two candles create the warning, not the final answer. Later candles still decide whether the warning strengthens, fails, or remains unresolved.
Dark Cloud Cover Reading Rules
- Dark cloud cover is a two-candle bearish warning after an advance.
- The second candle must close below the midpoint of the prior bullish real body.
- The pattern shows partial body penetration, not full real-body engulfing.
- Later candles decide whether the warning strengthens, fails, or remains unresolved.
What Is a Dark Cloud Cover Candlestick Pattern?
A dark cloud cover pattern belongs to the family of two-candle reversal-warning structures. It appears after price has been rising or pressing into an upper area, then shows a bearish response strong enough to close more than halfway into the prior bullish candle’s real body.
The pattern is not defined by the full high-low range. It is defined by the relationship between the real bodies: the prior bullish body, the following bearish body, and the second close below the prior body midpoint.
| Classification point | Dark cloud cover reading |
|---|---|
| Pattern family | Double candlestick pattern |
| Usual location | After an advance or near an upper tested area |
| Core structure | Bullish real body followed by bearish real body |
| Key boundary | Second close below the midpoint of the prior bullish body |
| Main warning | Buyers extend first, then sellers close deeply into that prior advance |
The Bearish Midpoint Close Rule
The first candle should show bullish pressure through its real body. The second candle should challenge that strength by opening near the prior upper area or above the prior close, then closing bearish and below the midpoint of the first candle’s real body.
The midpoint is not a decorative detail. A shallow bearish close inside the prior body may show hesitation, but it does not meet the dark cloud cover threshold. The pattern becomes more meaningful when the second close reaches far enough into the prior body to question the prior bullish control.
Wicks can add context, but they do not define the pattern. A long upper wick on the second candle may show failed upside acceptance, yet the dark cloud cover label still depends on the real-body relationship and the second close below the prior body midpoint.
The Prior Bullish Body Boundary
| Diagnostic question | What to check | Why it matters |
|---|---|---|
| What it is | A bullish candle followed by a bearish candle closing below the prior body midpoint | Defines the pattern through partial body penetration |
| What it is not | A full-body engulfing pattern, a small inside pause, or any bearish candle after a rise | Prevents over-labeling normal pullback candles |
| What strengthens it | Price forms after an advance, fails to hold the upper area, and later candles stay below the penetrated body area | Shows that sellers may be defending the rejected area |
| What weakens it | Buyers quickly reclaim the second candle’s range or push back above the prior upper area | Shows that the bearish response did not create lasting control |
Why Dark Cloud Cover Can Warn of Selling Pressure
The warning comes from a control shift inside two candles. The first candle suggests buyers are still able to push price higher. The second candle starts from a strong-looking position, but the close lands deep inside the prior bullish body. That change says the upper area was tested, but buyers did not keep control into the close.
A dark cloud cover reading becomes more useful when it appears where price was already extended, slowing, or testing a visible upper area. A candle pattern matters most when it appears where structure already expects a reaction. Away from that context, the same two candles may only show short-term hesitation.
Dark Cloud Cover vs Similar Two-Candle Patterns
Dark cloud cover is often confused with other two-candle structures because several patterns use a bullish candle followed by a bearish response. The clean distinction is the degree and type of overlap.
| Pattern | Body or range relationship | Main distinction |
|---|---|---|
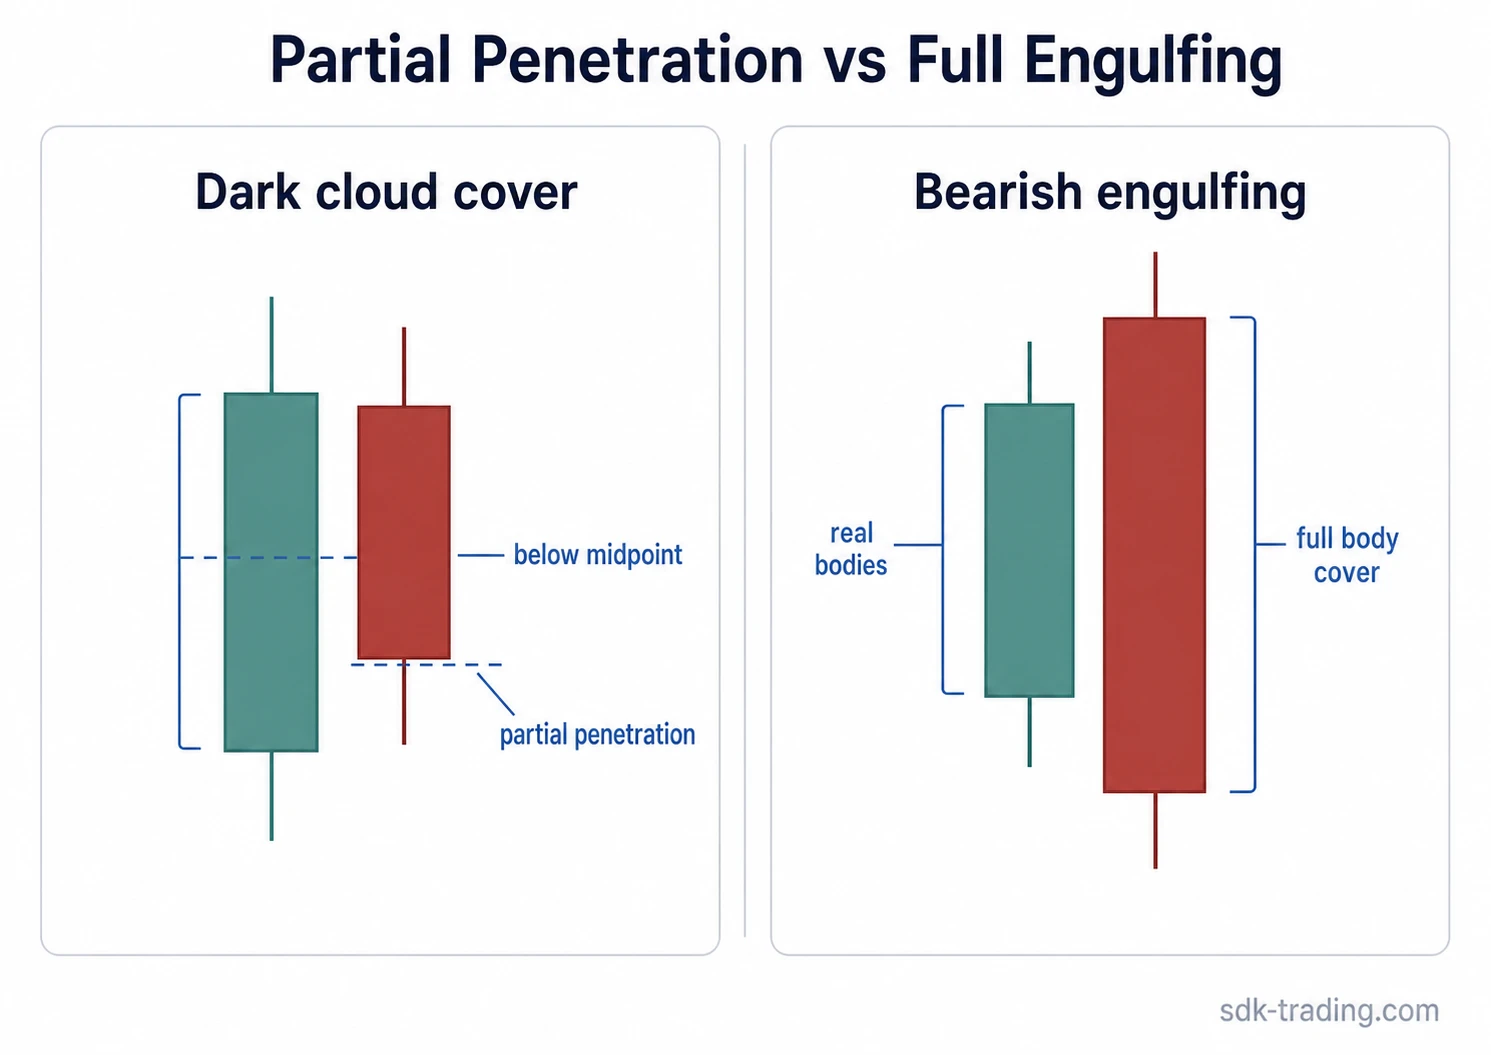
| Dark cloud cover | Second bearish body closes below the midpoint of the prior bullish body | Partial bearish penetration after an advance |
| Bearish engulfing | Second bearish real body covers the prior bullish real body | Stronger body takeover than dark cloud cover |
| Bullish harami | Second real body is contained inside the prior real body | Useful contrast for body containment: harami stays inside the prior body, while dark cloud cover penetrates below the prior bullish body midpoint |
| Inside bar | Second candle stays inside the prior high-low range | Range containment, not real-body midpoint penetration |
| Piercing pattern | Bearish candle followed by bullish penetration above the prior body midpoint | Bullish mirror logic after downward movement |
When the Reading Strengthens or Fails
The first two candles create the warning, not the full answer. The reading gains weight when later candles struggle to reclaim the upper part of the dark cloud cover range, especially if sellers keep closes below the midpoint area that was penetrated.
The reading loses weight when buyers quickly recover the bearish candle’s body, close back above the prior upper area, or continue forming higher lows without meaningful downside follow-through. In that case, the pattern may mark a temporary hesitation rather than a durable shift in pressure.
An unresolved response sits between those outcomes. Price may remain around the two-candle range without accepting higher or lower levels. That condition keeps the pattern on watch, but it does not justify treating the warning as confirmed bearish control.
Failed Continuation After a Midpoint Close
Price advances into an upper area where recent candles are making less upside progress. A wide bullish candle then closes near its high, making the advance look strong. The next candle opens around the prior upper area, trades briefly higher, and then closes below the midpoint of the prior bullish body.
The bearish warning is clearer if a recovery attempt stalls below the upper part of that two-candle range and sellers keep price under the penetrated body area. The read stays unresolved if price remains inside the same range, and it weakens if buyers reclaim the area and continue the advance with higher closes.
Common Mistakes When Reading Dark Cloud Cover
| Mistake | Why it weakens classification | Better diagnostic check |
|---|---|---|
| Calling every bearish candle after a rise a dark cloud cover | A bearish candle after upward movement may show hesitation, but the dark cloud cover label needs a second close below the midpoint of the prior bullish real body. | Check whether the second close actually penetrates below the prior body midpoint. |
| Using the full candle range instead of the real bodies | The high and low can add context, but the pattern is judged through real bodies. | Use the prior bullish real body and the second bearish real body as the main measurement. |
| Treating the midpoint close as final proof | Dark cloud cover warns that sellers answered prior bullish pressure, but the warning is still conditional. | Check whether recovery attempts fail and price remains below the penetrated bullish body area. |
FAQ
Is dark cloud cover a bearish reversal pattern?
Dark cloud cover is a bearish reversal-warning pattern, not a confirmed reversal by itself. The warning becomes stronger only if later candles fail to reclaim the upper area or continue accepting lower prices.
Does the second candle have to close below the midpoint?
Yes. The second candle should close below the midpoint of the prior bullish real body. A bearish close that does not reach that midpoint is weaker and usually does not qualify as a dark cloud cover pattern.
What is the difference between dark cloud cover and bearish engulfing?
Dark cloud cover closes below the midpoint of the prior bullish body but does not need to cover the whole body. Bearish engulfing requires the second bearish real body to engulf the prior bullish real body more completely.
Do wicks matter in a dark cloud cover pattern?
Wicks can add context, especially when the second candle rejects an upper area, but the pattern is defined by real-body penetration and the second close below the prior body midpoint.