In trading, a dragonfly doji pattern is confirmed only when later candles accept the recovery after the lower-wick rejection. The wick shows that lower prices were rejected during the candle, but it does not prove that buyers have gained lasting control.
The candle warns that downside pressure met a response. Confirmation depends on what follows: whether buyers can hold the recovery area, whether price can stay above the important part of the candle, and whether the next reaction avoids erasing the rejection.
Key Points
- A dragonfly doji is recognized by its candle structure, but confirmation comes from later price behavior.
- A green candle after the pattern is weak evidence if it remains trapped inside the original range.
- Support can improve the context, but it does not prove a reversal by itself.
- The reading weakens when price cannot hold the recovery and falls back into the candle’s lower area.
What Confirms a Dragonfly Doji?
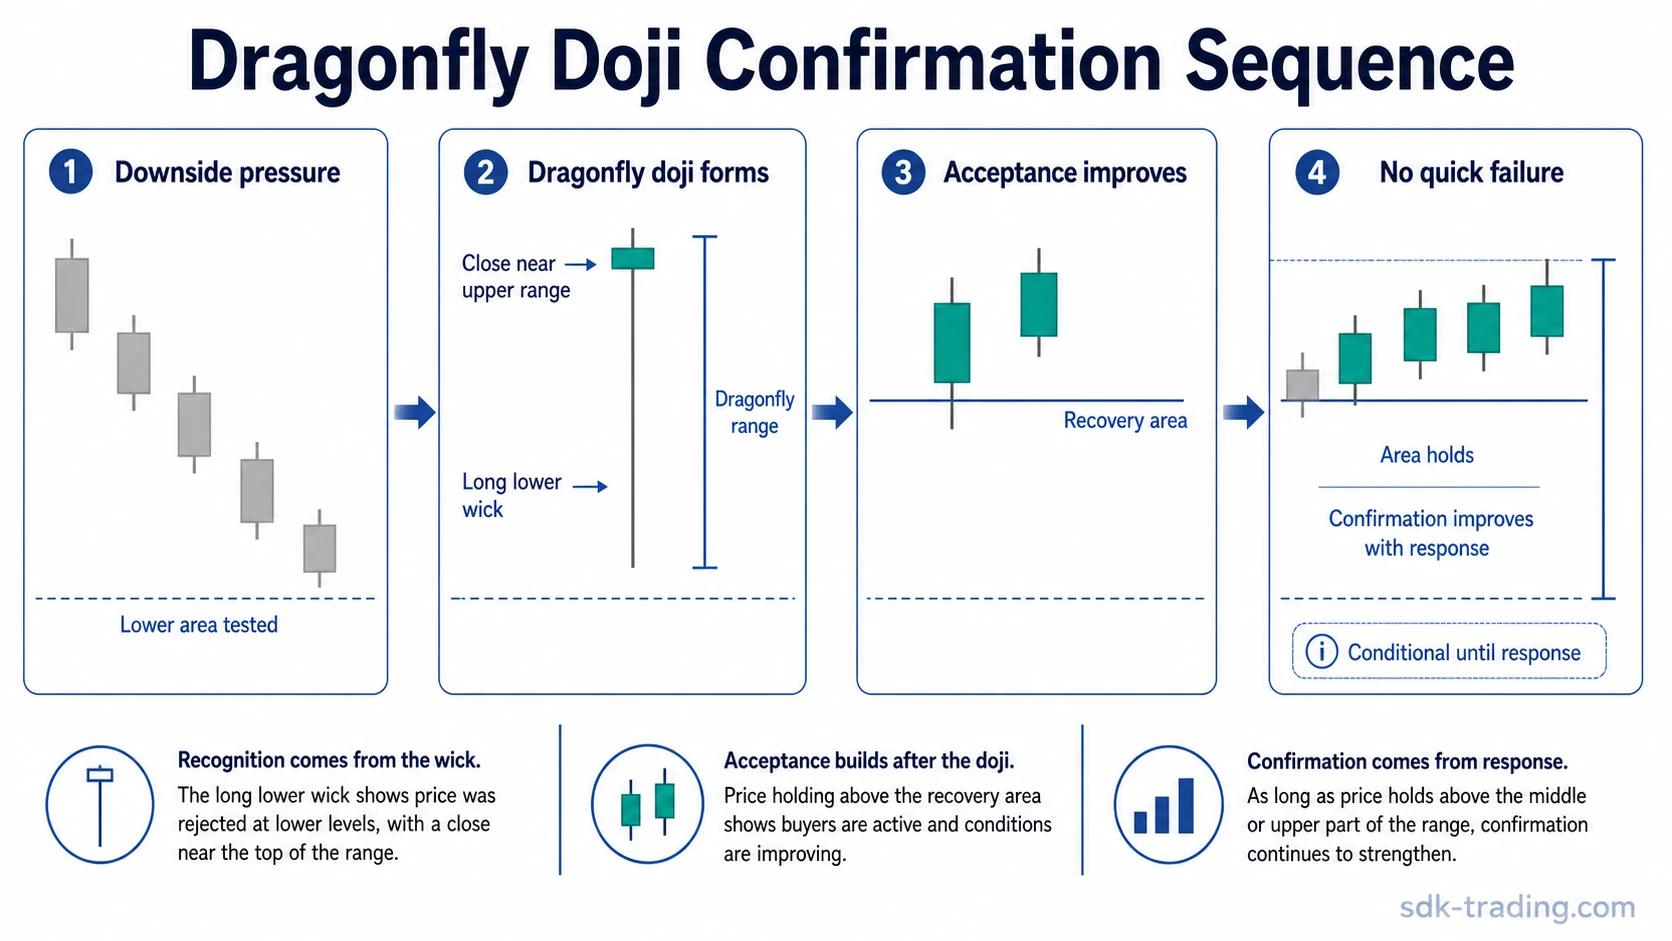
A dragonfly doji reading strengthens when price holds above the recovered area instead of returning into the lower wick. The important shift is not simply that the next candle closes higher. The stronger clue is that price can hold above the area where the rejection began to matter.
A stronger response starts with defense of the recovery area, then improves if later candles hold the middle or upper part of the dragonfly range and sellers cannot drive price back toward the lower wick.
A weak response looks different. Price may close slightly higher, but the move stays inside the original candle range, stalls near the upper area, or quickly gives back the recovery. That leaves the candle as a rejection attempt rather than a stronger bullish interpretation.
Dragonfly Doji Recognition vs Confirmation
A doji candlestick reflects a narrow open-to-close relationship, but the type of doji and the later response determine how useful the reading becomes. For a dragonfly doji, the long lower shadow shows that price traded lower and then recovered toward the open or close area.
Recognition answers the first question: did the candle form with open, high, and close near the upper part of the range, plus a long lower shadow? Confirmation answers a different question: did later trading accept the recovery, or did the market reject it?
| Stage | What it checks | What it cannot prove alone |
|---|---|---|
| Recognition | Open, high, and close near the upper range with a long lower wick | That buyers have taken lasting control |
| Context | Prior downside pressure, support, or a tested lower area | That the market must reverse |
| Confirmation | Later acceptance above the important candle area | That the move will continue without failure |
Weak vs Stronger Confirmation Readings
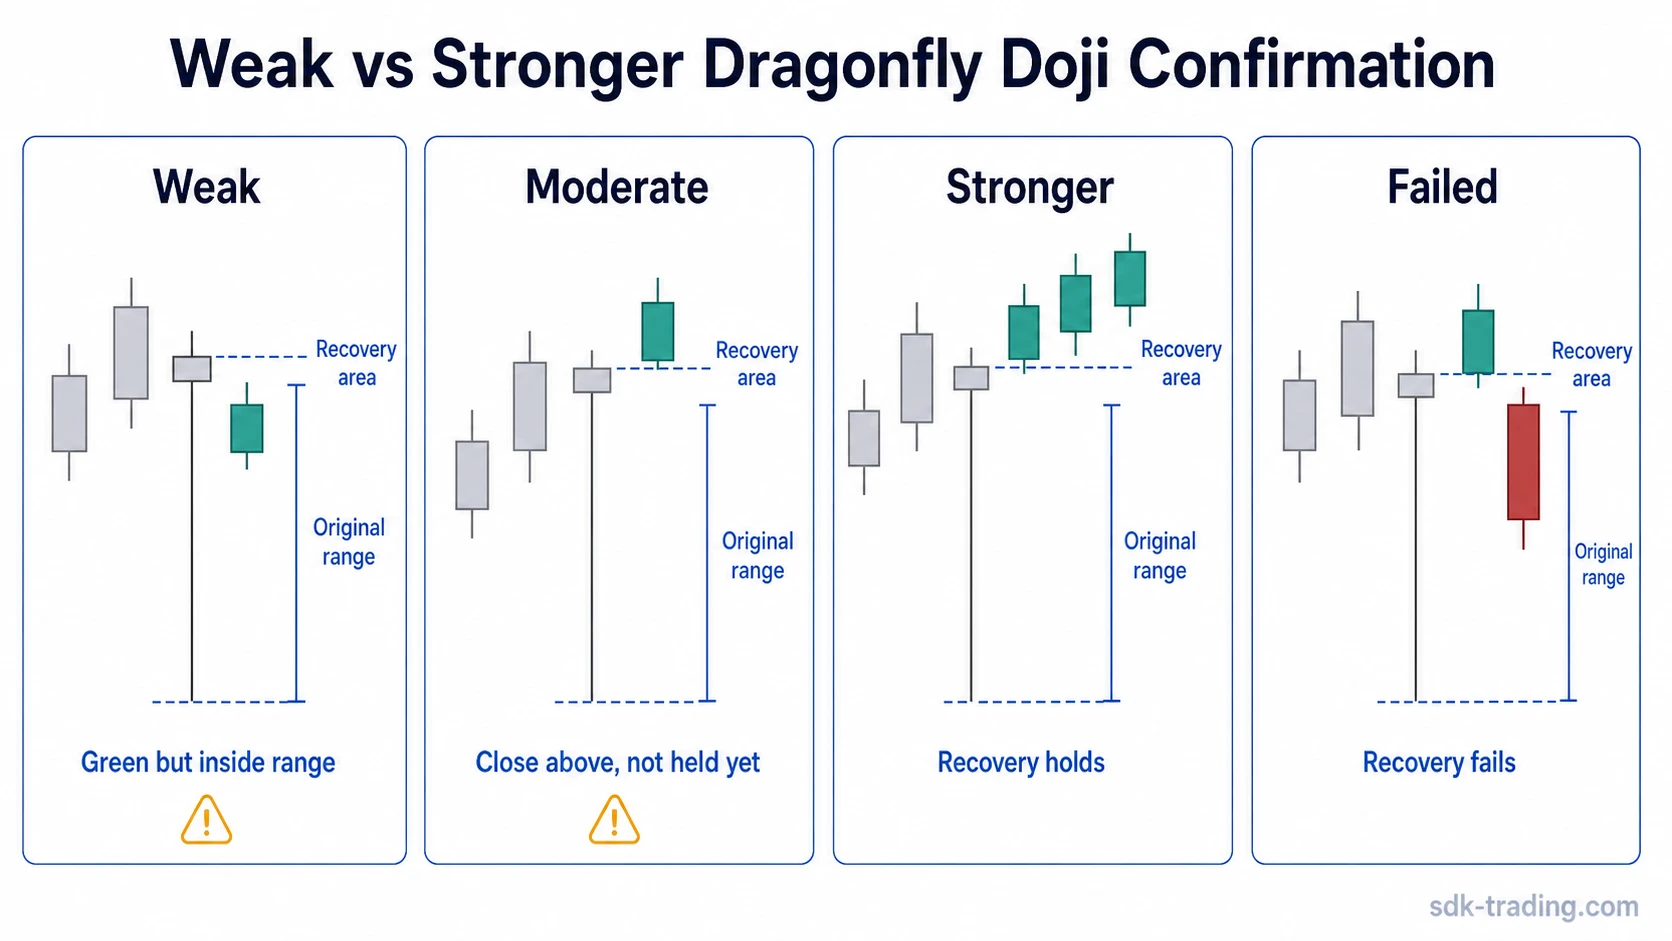
Confirmation quality is a spectrum. A dragonfly doji can receive a weak, moderate, stronger, or failed reading depending on how price behaves after the candle appears.
| Reading | Later price behavior | Interpretation |
|---|---|---|
| Weak | The next candle is green but remains inside the dragonfly range. | Recovery exists, but acceptance is still limited. |
| Moderate | Price closes above the upper area of the dragonfly doji, but later candles have not yet defended that area. | The response improves, but acceptance remains unproven until the market avoids an immediate failure. |
| Stronger | Later candles hold the reclaim and do not quickly fall back into the range. | The lower-wick rejection has stronger follow-through. |
| Failed | Price loses the recovery and moves back toward or below the lower part of the candle. | The rejection attempt did not hold, so the bullish reading weakens. |
Misread vs Safer Interpretation
The main mistake is treating any dragonfly doji as already confirmed. The safer reading separates the candle’s shape from the market’s later acceptance of that shape.
| Observation | Common misread | Safer interpretation |
|---|---|---|
| Long lower wick | Lower prices were rejected, so the reversal is confirmed. | The candle shows rejection pressure, but confirmation still depends on later acceptance. |
| Next candle closes green | Green color confirms the dragonfly doji. | Candle color helps only if price holds a meaningful recovery area. |
| Pattern forms near support | Support automatically confirms the candle. | Support improves context only if later candles defend the recovery. |
| Price briefly moves above the candle | The brief break confirms follow-through. | A brief move is weaker if price immediately falls back into the range. |
| Price revisits the lower wick | The pattern is still valid because the wick rejected lower prices once. | A renewed test of the lower area weakens the reading unless rejection appears again. |
Dragonfly Doji at Support
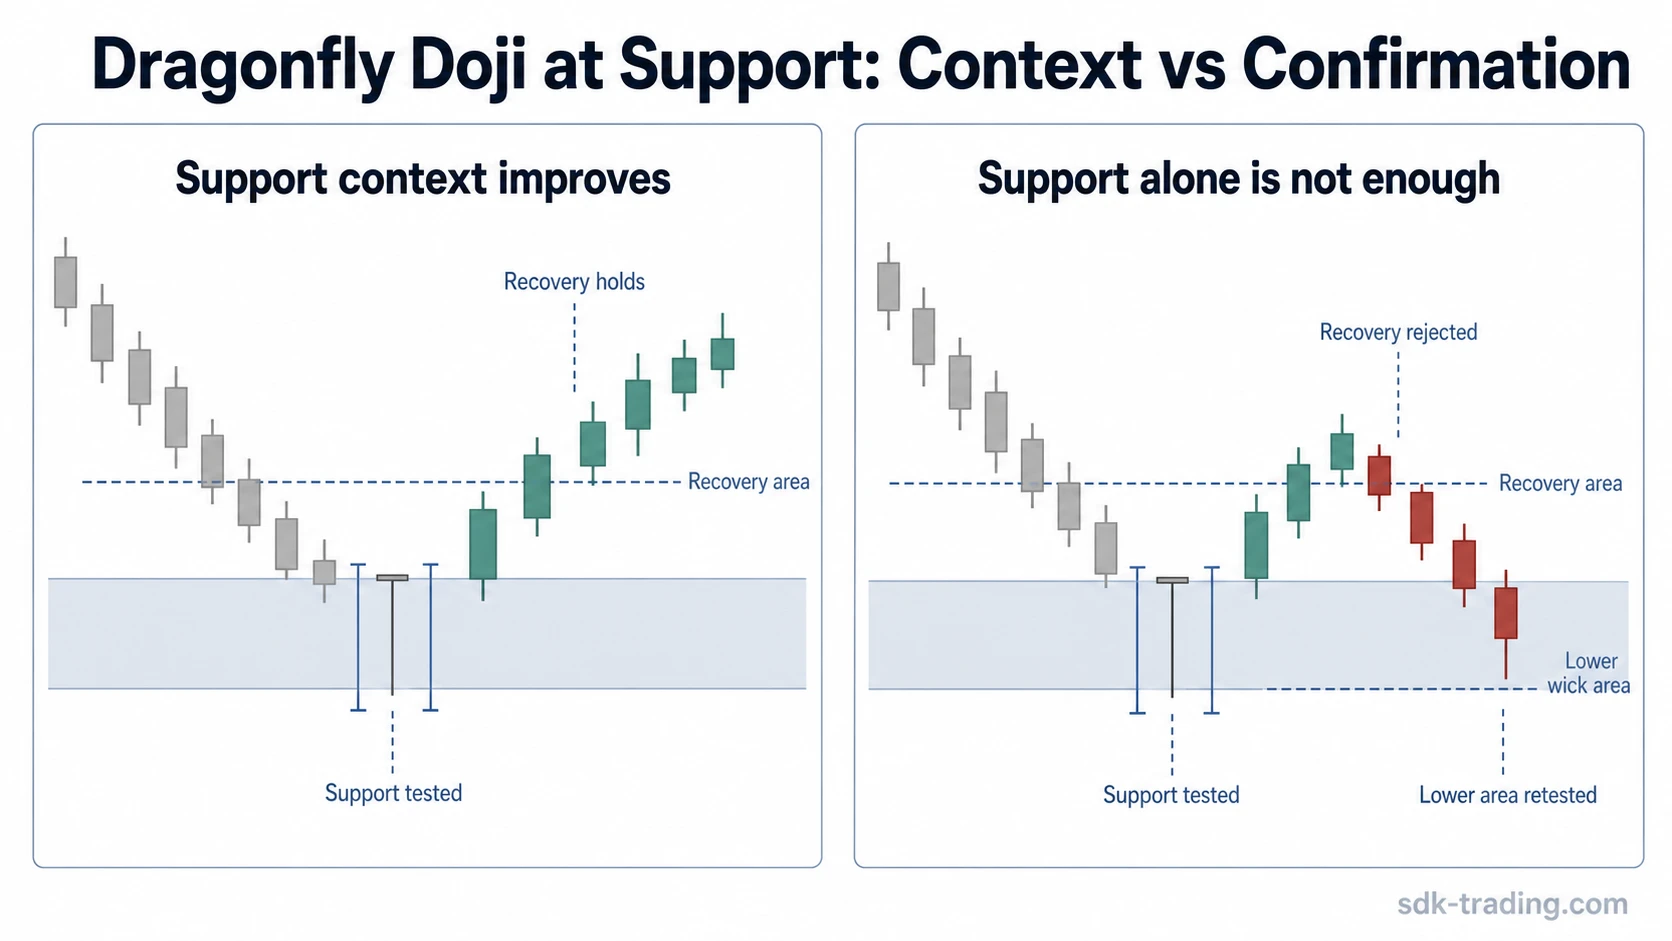
A dragonfly doji near support can carry more meaning than the same candle in the middle of a range. The location gives the lower-wick rejection a clearer reference point because price has tested an area where buyers previously responded.
Support still remains conditional. A candle can reject a lower area once and still fail if the next attempts to hold higher prices are weak. The stronger reading comes from a sequence: downside pressure into support, lower-wick rejection, later acceptance above the candle’s important area, and no immediate return into the lower range.
A support-based reading is weakest when the market only pauses. If price cannot build above the dragonfly doji and keeps returning to the same lower area, the candle may be showing hesitation rather than durable demand.
When Confirmation Fails
Dragonfly doji confirmation fails when price cannot defend the recovery that followed the lower-wick rejection. A quick fall back into the candle range means the rejection did not produce enough acceptance.
Failure can also appear through stalled recovery. Price may move above the candle briefly, then close back below the upper area or keep forming candles that reject higher prices. That behavior reduces confidence because the market is not accepting the area that should have supported the bullish interpretation.
The most direct failure occurs when price breaks below the dragonfly doji’s lower area after the initial rejection. That does not turn the candle into a useful bullish confirmation. It shows that the first rejection did not hold against later selling pressure.
Dragonfly Doji Confirmation Checklist
- Did the candle form after downside pressure or near a meaningful lower area?
- Is the lower wick large enough to show a real rejection of lower prices?
- Did the next candles accept higher prices, rather than only print a small green response?
- Did price hold above the middle or upper part of the dragonfly range?
- Did sellers fail to push price back into the lower wick area?
- Did the recovery avoid immediate rejection near the candle’s upper area?
The checklist is strongest when several conditions point in the same direction, rather than when one green candle carries the whole interpretation. Missing conditions do not automatically invalidate the candle, but they keep the interpretation weaker and more conditional.
Dragonfly Doji Confirmation Example in Context
Price declines toward a prior support area and briefly trades below it during the candle. By the close, price has recovered near the upper part of the range, leaving a long lower wick. The lower wick makes the candle worth attention, but the rejection is still only the first event.
The next candle closes green but remains inside the dragonfly doji range. That response is not enough by itself because price has not accepted higher levels beyond the original candle. A stronger case develops only if later candles hold above the recovery area and avoid falling back toward the lower wick.
The failed version is equally important. If price rises briefly, stalls, and then closes back inside the dragonfly range, the market has not accepted the recovery. If the next attempt also fails near the same area, the bullish reading becomes weaker instead of stronger.
Related Candlestick Context
Dragonfly doji confirmation is one part of doji interpretation: the candle shows lower-wick rejection, while later trading decides whether that rejection gains support or fades. The full dragonfly doji structure explains the candle’s shape; confirmation explains whether later trading supports that first rejection.
Gravestone doji confirmation uses the opposite logic because it starts with upper-wick rejection. Dragonfly doji confirmation starts with lower-wick rejection, then asks whether price can hold the recovery instead of losing it.
FAQ
When does a green candle add value after a dragonfly doji?
A green candle adds more value when it closes with acceptance above the dragonfly doji recovery area and does not immediately fall back into the original candle range.
What does support add to dragonfly doji confirmation?
Support gives the lower wick a meaningful tested area. The reading is still incomplete unless later candles hold the recovery and avoid accepting below the lower-wick zone.
What makes dragonfly doji confirmation fail?
Confirmation fails when price cannot hold the recovery, falls back into the candle range, or breaks below the lower area after the initial rejection. That behavior shows that the rejection did not hold.
What should stay separate from dragonfly doji confirmation?
Trade planning, outcome assumptions, and reversal expectations should stay separate from the candle confirmation check. The page-level question is whether the lower-wick rejection remains accepted or fails.