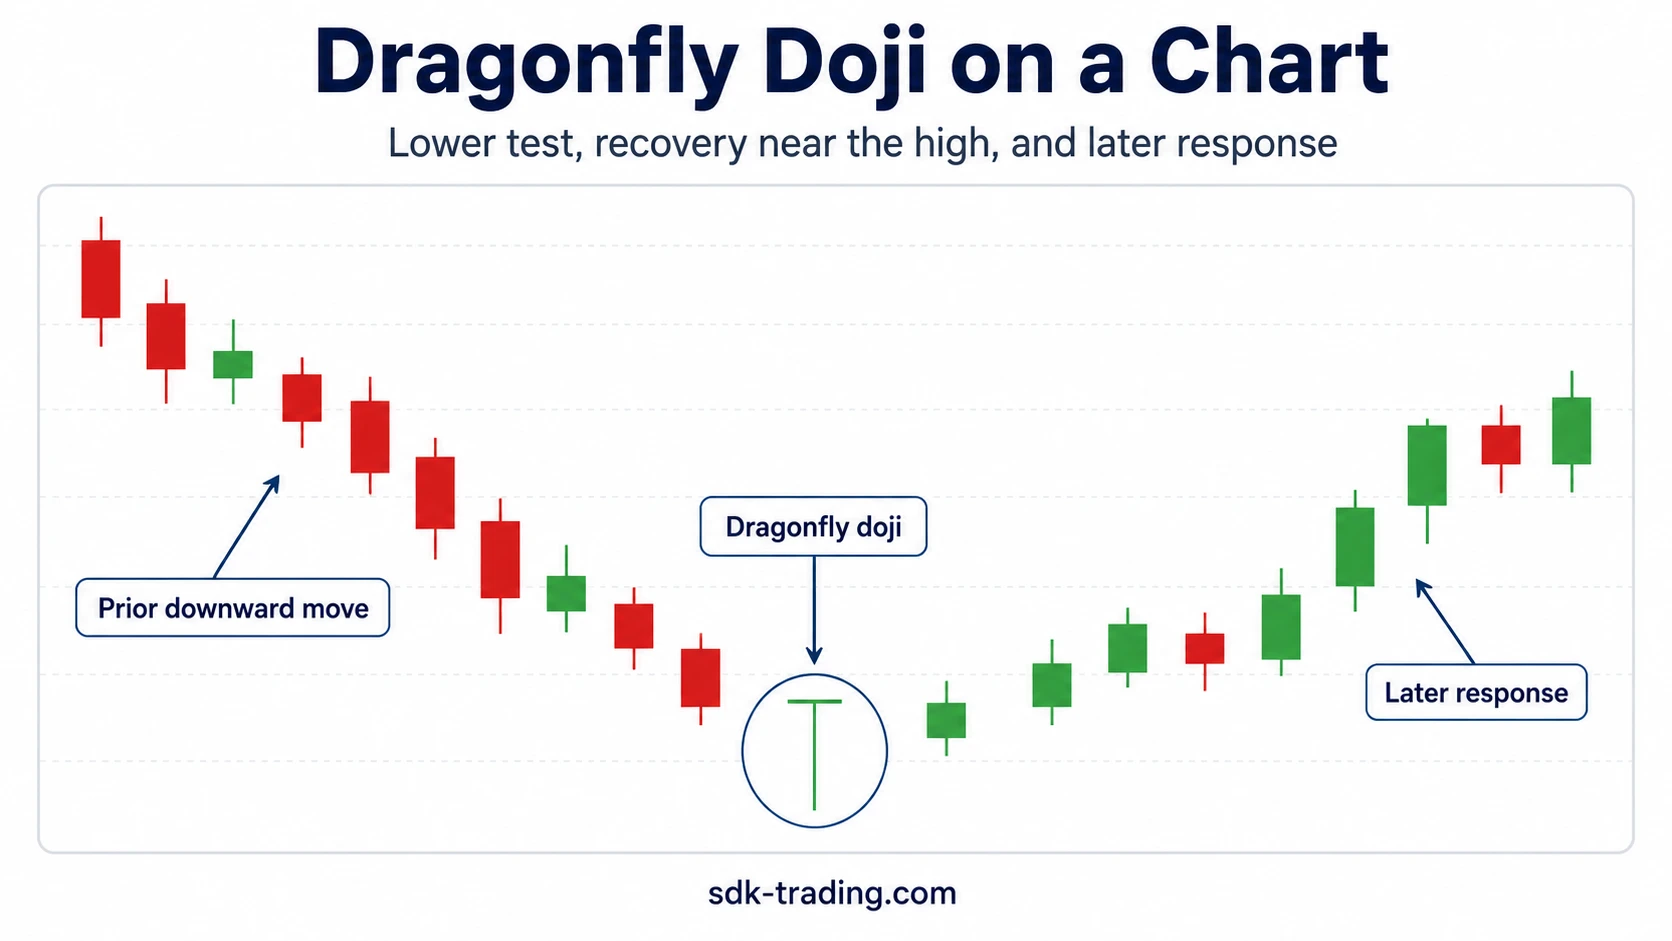
A dragonfly doji candlestick is a doji-family candle with open-close compression near the session high, a dominant lower shadow, and little or no upper shadow. It records a lower price test that recovered before the candle closed.
The useful reading is not “automatic reversal.” The structure shows that price probed lower and failed to remain near the low during that candle period. The next question is whether the market continues to reject that lower area or returns to it and accepts it.
Dragonfly Doji Definition
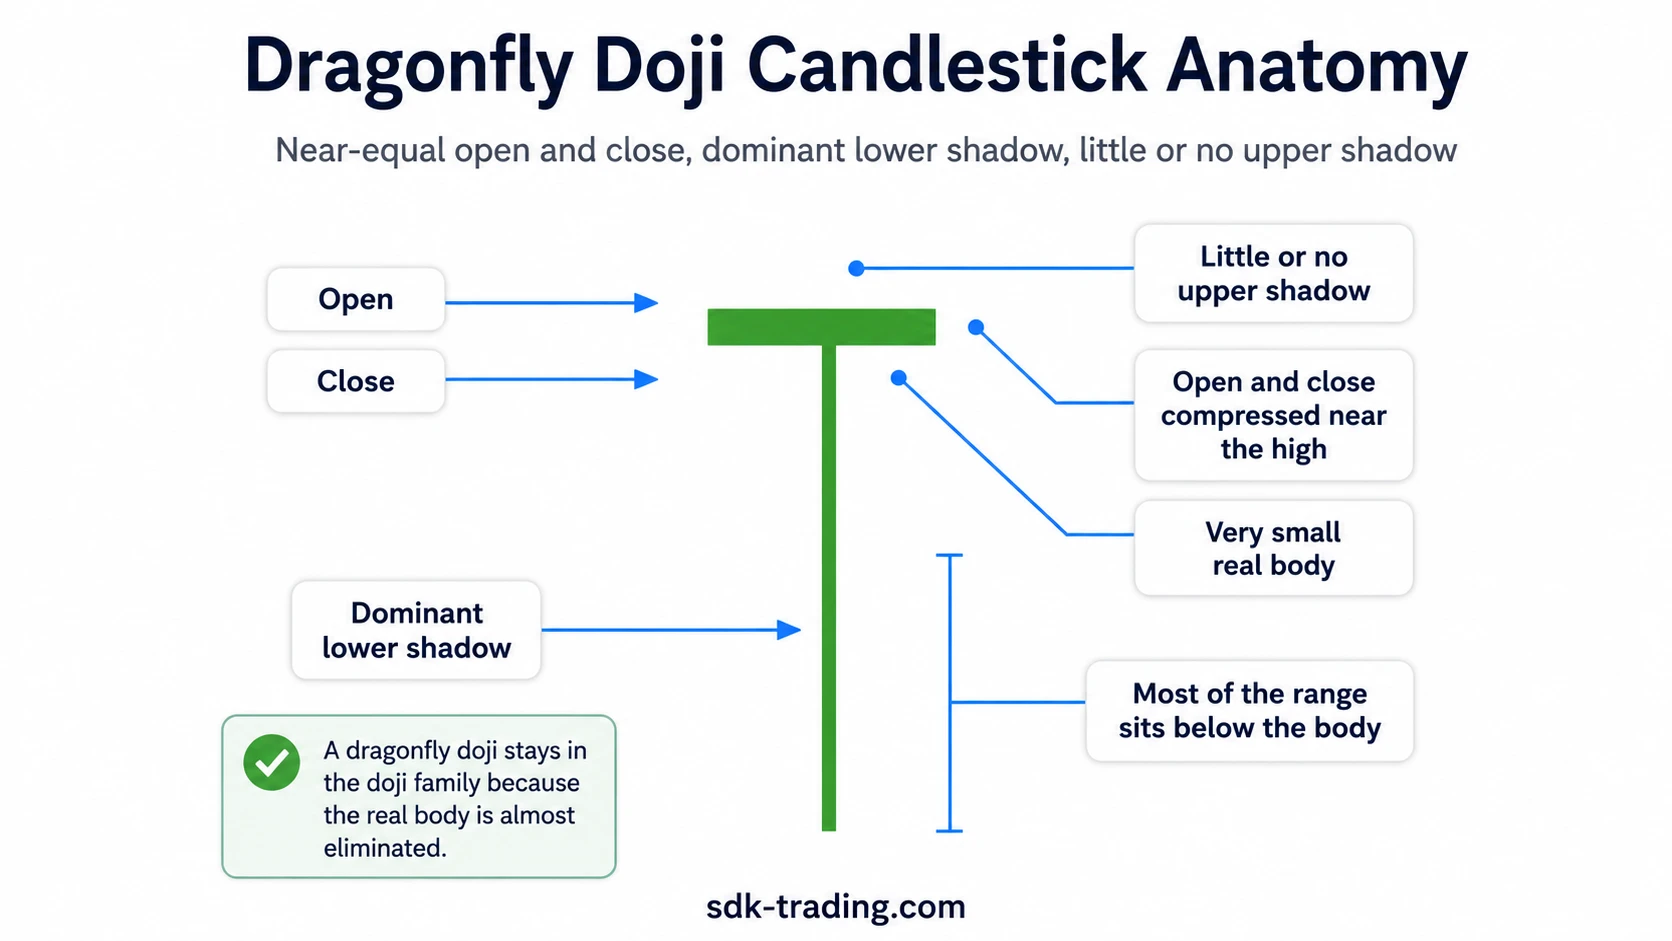
A dragonfly doji forms when the open and close are nearly equal near the high of the candle range, while the lower shadow is much longer than the body. The shape keeps the candle inside the doji family because the real body is almost eliminated.
What to Check First
- The open and close should be compressed near the candle high.
- The lower shadow should dominate the candle range.
- The upper shadow should be small or absent.
- The candle is more meaningful when the lower test happens near a relevant structure, such as support, a range low, or a prior reaction area.
- The reading weakens if later candles accept the lower-shadow area instead of rejecting it.
What a Dragonfly Doji Shows
A dragonfly doji shows a candle period where sellers pushed price below the open, but the close returned near the open and high. The real body becomes compressed at the top of the full range, while most of the visible range sits below the body.
The lower shadow is the diagnostic part. It marks the tested area below the open-close zone. The later response decides whether that test becomes a cleaner rejection reading or remains only an unresolved pause.
The candle becomes more useful when the lower shadow has a structural reference point. A lower probe into a prior support area, range low, or previously defended zone is easier to interpret than the same shape printed in the middle of a noisy range.
Dragonfly Doji Anatomy
| Candle element | Dragonfly doji structure | Diagnostic meaning |
|---|---|---|
| Open | Near the session high. | Price starts near the area where it later closes. |
| Close | Near the open and near the session high. | The candle recovers after trading lower during the period. |
| Real body | Very small or almost absent. | The near-equal open and close keep the candle in the doji family. |
| Lower shadow | Long and dominant. | The candle records a downside probe below the open-close area. |
| Upper shadow | Small or absent. | Little range remains above the open-close area. |
| Range location | The body is contained near the top of the full range. | Most of the tested range sits below the body, not above it. |
A clean dragonfly doji depends on body containment. If the body becomes clearly visible, the candle may still show lower-shadow rejection, but it moves closer to a hammer-style reading than a strict dragonfly doji label.
How to Identify a Dragonfly Doji Without Overreading It
The first task is classification: the candle needs a nearly eliminated body near the high and a dominant lower shadow. The second task is interpretation: price must show whether the lower-shadow area is being rejected or accepted after the candle forms.
| Reading area | What to check | Why it matters |
|---|---|---|
| What it is | Near-equal open and close near the high, with a dominant lower shadow. | The candle records lower testing followed by recovery into the open-close area. |
| What it is not | Automatic reversal, hammer, gravestone doji, or standalone trading signal. | The shape is only a rejection clue until later candles show directional resolution. |
| What strengthens the reading | Failed lower acceptance, recovery near the high, and later holding above the probed area. | Repeated rejection supports the idea that the lower test did not attract sustained selling. |
| What weakens the reading | Lower-area acceptance, immediate breakdown, large real body, or unclear location. | The candle loses value when price returns to the lower area and closes there. |
Clean, Weak, and Invalid Dragonfly Doji Readings
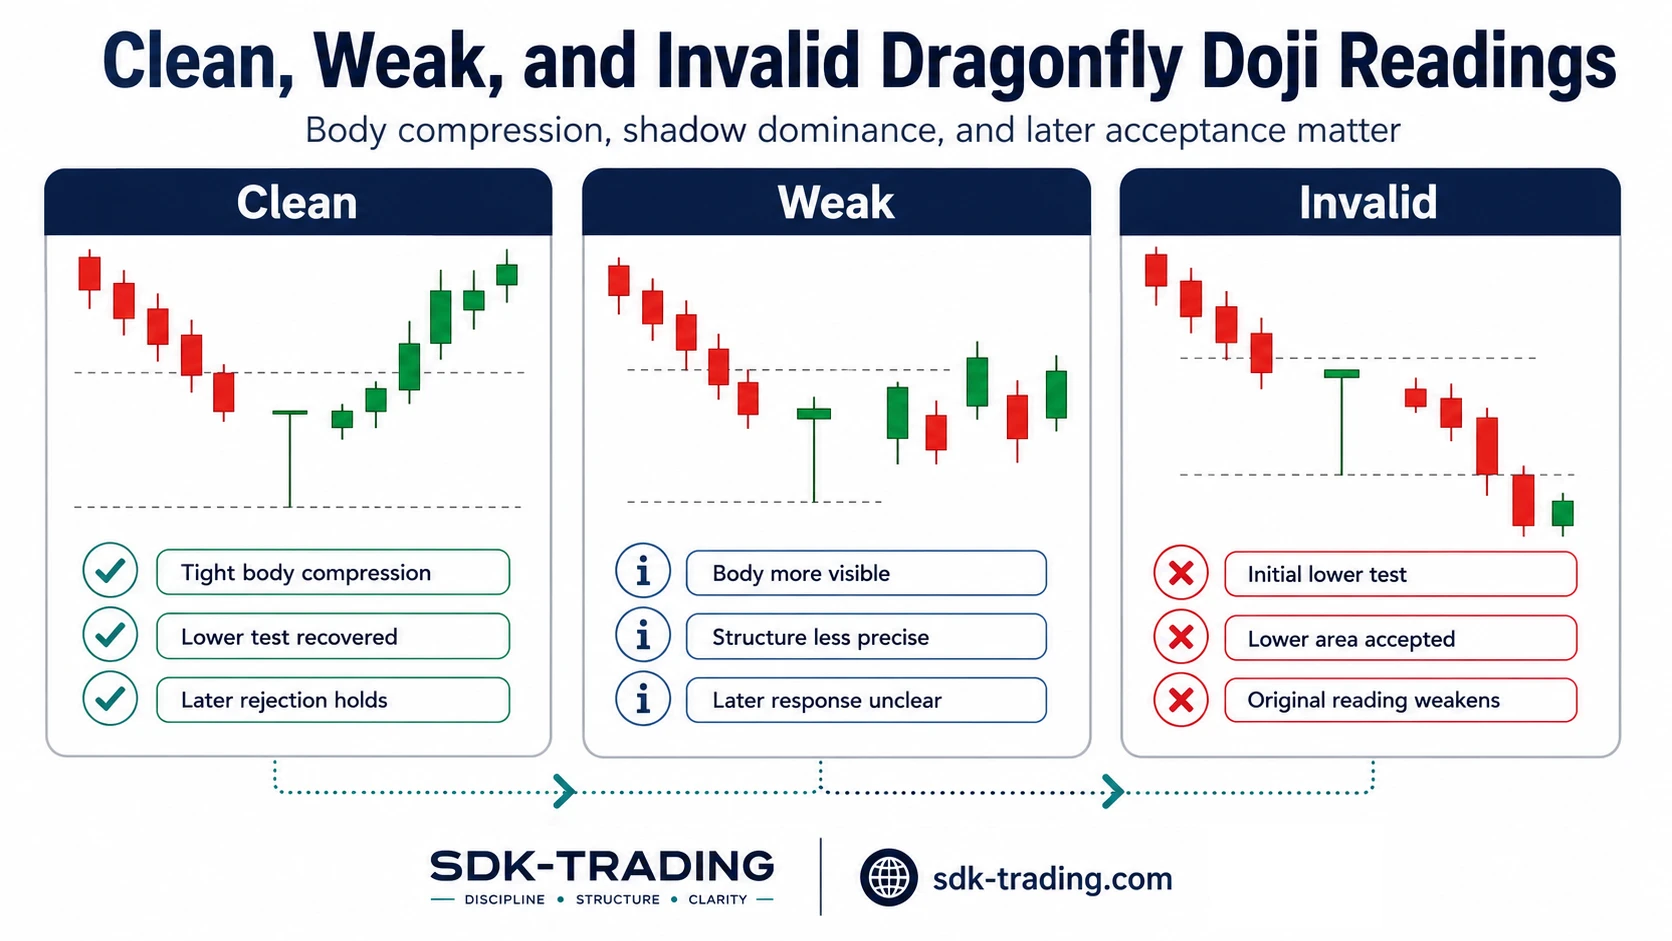
The same candle shape can produce different readings depending on body compression, shadow dominance, location, and later acceptance. A cleaner reading does not mean a prediction is confirmed; it only means the candle structure is easier to defend.
| Reading quality | Typical structure | Later behavior to watch | Interpretation risk |
|---|---|---|---|
| Cleaner reading | Open and close nearly equal near the high, dominant lower shadow, minimal upper shadow. | Later candles avoid deep acceptance back into the lower-shadow area. | Lower. The candle has a clear lower test and recovery sequence. |
| Weaker reading | Visible body, mixed shadows, unclear location, or lower shadow that is not dominant. | Follow-through remains unresolved or price rotates around the body. | Medium. The candle may be a noisy doji, weak hammer-like candle, or unresolved range candle. |
| Invalid reading | The candle may look like a dragonfly doji initially, but structure does not hold. | Price accepts the lower-shadow area, breaks below it, or repeatedly closes near the low. | High. The lower test was not rejected strongly enough to support the original reading. |
Volume can add context when it shows broader participation in the lower test and recovery, but volume alone does not convert the candle into a confirmed signal. The price response around the lower-shadow area still has to be checked.
When a Dragonfly Doji Reading Is Stronger Near Support
A dragonfly doji is easier to interpret when it appears after price has declined into a known support area, range low, or prior reaction zone. In that location, the lower shadow is not just an isolated wick; it becomes a test of a visible chart area.
A common scenario is a decline into a previously defended zone. Price briefly trades below that zone, then recovers and closes near the session high. The candle records a lower probe, but the reading remains conditional until later candles show whether that lower area is rejected or accepted.
If later candles hold above the lower-shadow area and fail to return meaningfully below it, the rejection reading becomes more defensible. If price quickly trades back into the lower area and starts closing there, the earlier recovery loses strength.
How to Confirm a Dragonfly Doji
Dragonfly doji confirmation is not one fixed candle color or a universal follow-through rule. The cleaner test is whether later price action continues to reject the lower-shadow area.
Confirmation can appear through later candles holding above the lower shadow, reclaiming the tested range, or showing that attempts to trade lower are not accepted. The reading remains weaker when the market repeatedly returns to the lower range and closes there.

When the Reading Fails
A dragonfly doji reading fails when the market accepts the area that the lower shadow appeared to reject. Repeated closes near that lower range weaken the original classification and can invalidate the rejection reading.
Failure risk is higher when the candle appears in the middle of a noisy range. Without a clear support area, prior reaction zone, or structural test, the long lower shadow may reflect temporary volatility rather than meaningful rejection.
A large real body also weakens the label. A dragonfly doji needs the open and close to remain nearly equal. If the body is small but clearly visible, a hammer-style interpretation may be cleaner than a strict dragonfly doji label.
A candle with long shadows on both sides may fit a long-legged doji reading instead. In that structure, both upper and lower probes matter, while a dragonfly doji is defined by the lower shadow dominating the range.
Dragonfly Doji vs Hammer, Gravestone Doji, and Long-Legged Doji
Several single-candle patterns can look similar because they use small bodies and long shadows. The label changes when body size, shadow direction, or open-close location changes.
| Pattern | Main structure | How it differs from a dragonfly doji |
|---|---|---|
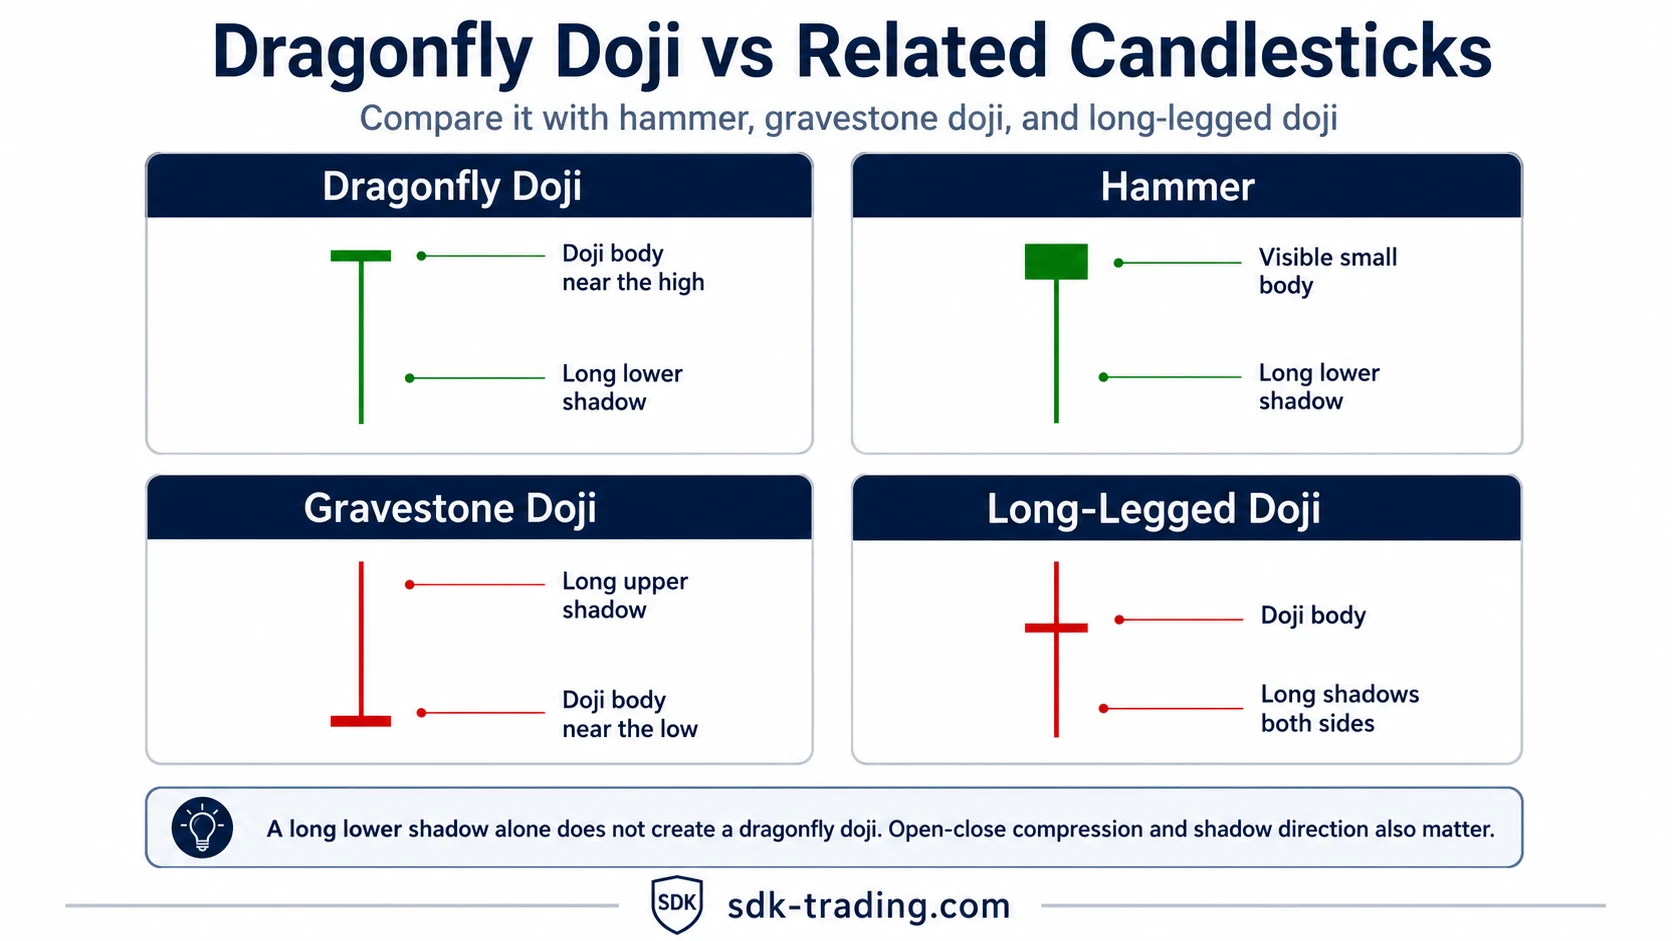
| Dragonfly doji | Open and close nearly equal near the high, with a dominant lower shadow. | The real body is almost eliminated, and most of the range sits below the body. |
| Hammer | Small real body near the high, with a long lower shadow. | A hammer can have a more visible real body. A dragonfly doji needs tighter open-close compression. |
| Gravestone doji | Open and close near the low, with a dominant upper shadow. | The shadow direction is opposite. A gravestone doji tests higher prices and closes near the low. |
| Long-legged doji | Near-equal open and close with long shadows above and below. | Both sides of the range are extended. A dragonfly doji is dominated by the lower shadow. |
A long lower shadow alone does not create a dragonfly doji. The open and close must also be close enough for the real body to nearly disappear near the top of the range.
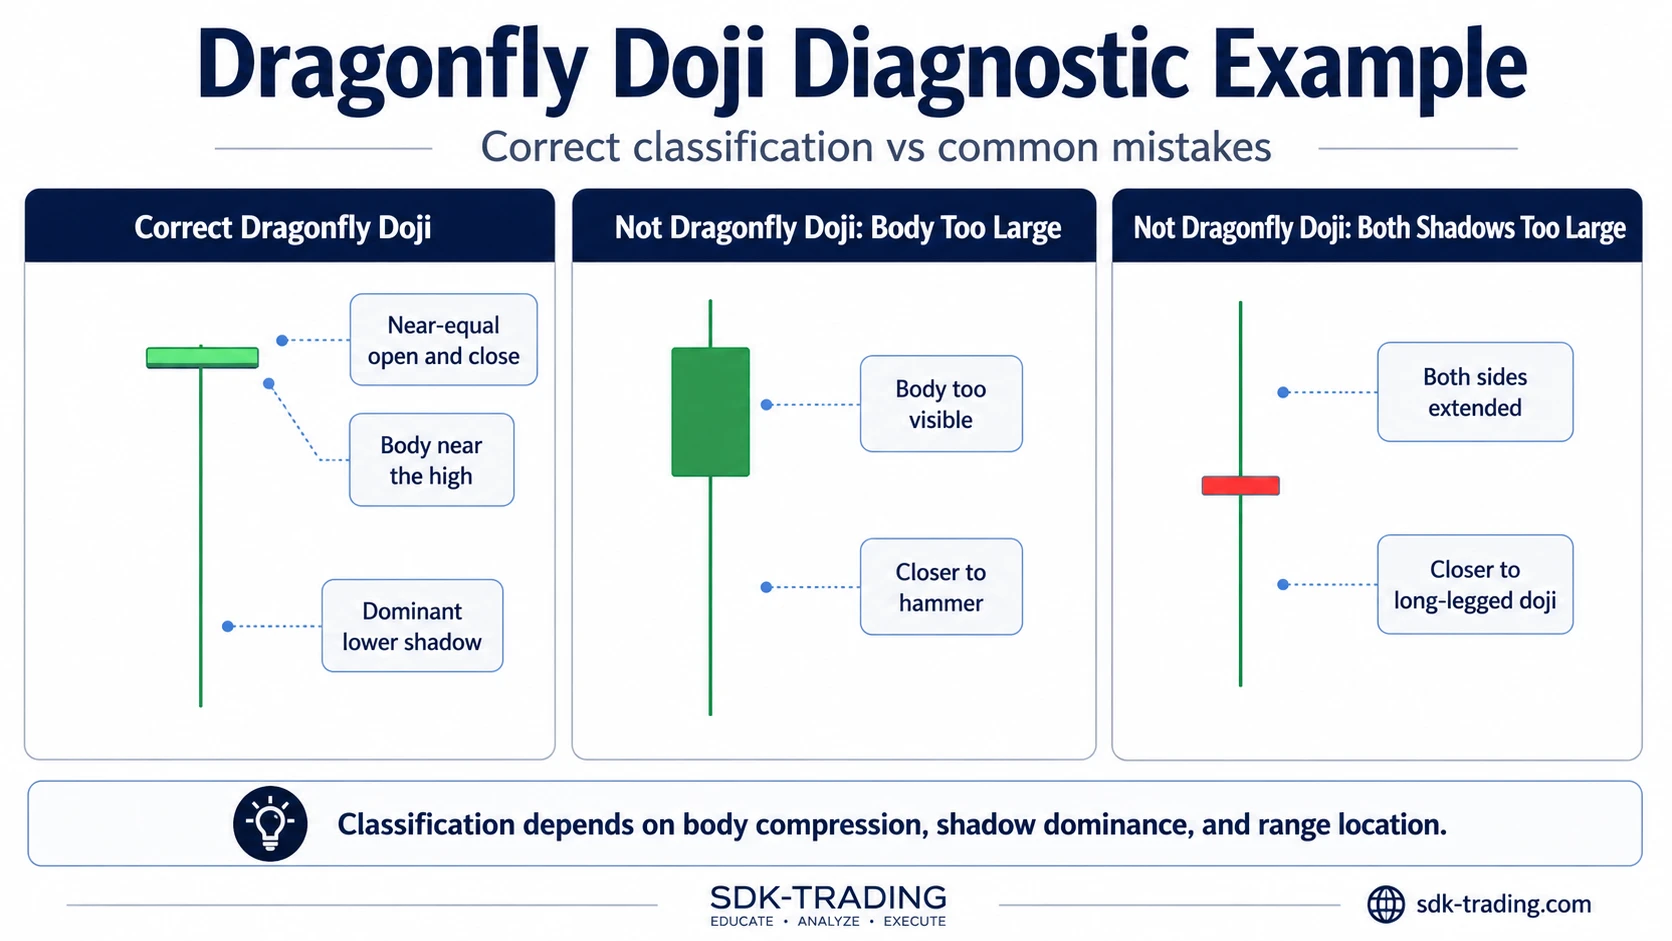
Dragonfly Doji Diagnostic Example
A practical diagnostic check starts with classification, not interpretation. The candle must have near-equal open and close near the high, a dominant lower shadow, and little or no upper shadow. If one of those conditions is missing, the candle may still be useful, but the dragonfly doji label becomes less precise.
| Diagnostic case | What the candle shows | Better label or reading |
|---|---|---|
| Correct dragonfly doji | Near-equal open and close near the high, dominant lower shadow, little or no upper shadow. | Dragonfly doji. |
| Body too large | The lower shadow is long, but the open and close are visibly separated. | Closer to a hammer-style candle than a strict dragonfly doji. |
| Both shadows too large | The open and close may be close together, but both upper and lower shadows dominate. | Closer to a long-legged doji than a dragonfly doji. |
Common Mistakes When Reading a Dragonfly Doji
| Mistake | Why it weakens the reading | Better diagnostic check |
|---|---|---|
| Treating the candle as a completed reversal | The candle only records a lower probe and recovery inside one period. | Check whether later candles keep rejecting the lower-shadow area. |
| Ignoring the candle’s location | The same shape has different meaning near support, inside a choppy range, or after a sharp move. | Use the lower shadow only if the tested area has a visible structural reference. |
| Confusing the pattern with a hammer | Both candles can have long lower shadows, but a dragonfly doji has a nearly eliminated real body. | If the open and close are visibly separated, the candle may belong outside the doji family. |
| Reading confirmation as one fixed rule | One candle color, one fixed close, or one follow-through bar does not confirm every dragonfly doji. | Check whether price accepts or rejects the lower-shadow area after the candle forms. |
FAQ
What does a dragonfly doji candle indicate?
A dragonfly doji indicates that price traded lower during the candle period and then recovered to close near the open and session high. It can point to rejection of lower prices, but later price behavior must show whether that rejection holds.
Is a dragonfly doji bullish or bearish?
A dragonfly doji is often read as potentially bullish after a decline or near support because price recovered from the session low. It is not automatically bullish. The reading weakens if price accepts the lower-shadow area or breaks below it.
How is a dragonfly doji confirmed?
A dragonfly doji is better confirmed when later candles hold above the lower-shadow area, reclaim the tested range, or show that sellers cannot continue below the probed level. Confirmation is weaker when price quickly returns to and accepts the lower area.
Can a dragonfly doji fail?
Yes. A dragonfly doji fails when the market does not reject the lower area after the candle forms. A breakdown below the lower shadow, repeated acceptance near the low, or lack of follow-through can invalidate the initial rejection reading.
What is the difference between a dragonfly doji and a hammer?
A dragonfly doji has a near-equal open and close, creating a very small real body near the high. A hammer also has a long lower shadow, but its real body can be larger. The tighter open-close relationship keeps the dragonfly doji inside the doji family.