Gravestone doji confirmation means later candles fail to continue above the long upper shadow, or show that the attempted upside rejection is holding. The candle alone only records a push higher and a retreat; the confirmation depends on what price accepts or rejects afterward.
The main confirmation clue is failed upside follow-through after the upper wick. A lower close after the doji can add evidence, but it is secondary to the more important question: does price fail again near the upper-shadow area, or reclaim and hold it?
Key Points
- The gravestone doji creates the upper test; follow-through below the tested area shows whether rejection is still active.
- Failed follow-through above the upper wick is the main confirmation clue.
- A lower close helps only when the upper-shadow failure is also visible.
- Holding inside the upper-shadow area weakens the bearish interpretation.
The Common Misread
The most common mistake is treating every gravestone doji as bearish immediately. A long upper shadow can show that buyers lost control during the candle, but it does not prove that sellers kept control afterward.
The difference is acceptance. If price tests above the candle’s small body and cannot stay there, the upper wick carries more weight. If price returns into the upper wick and holds, the earlier rejection has not carried forward.

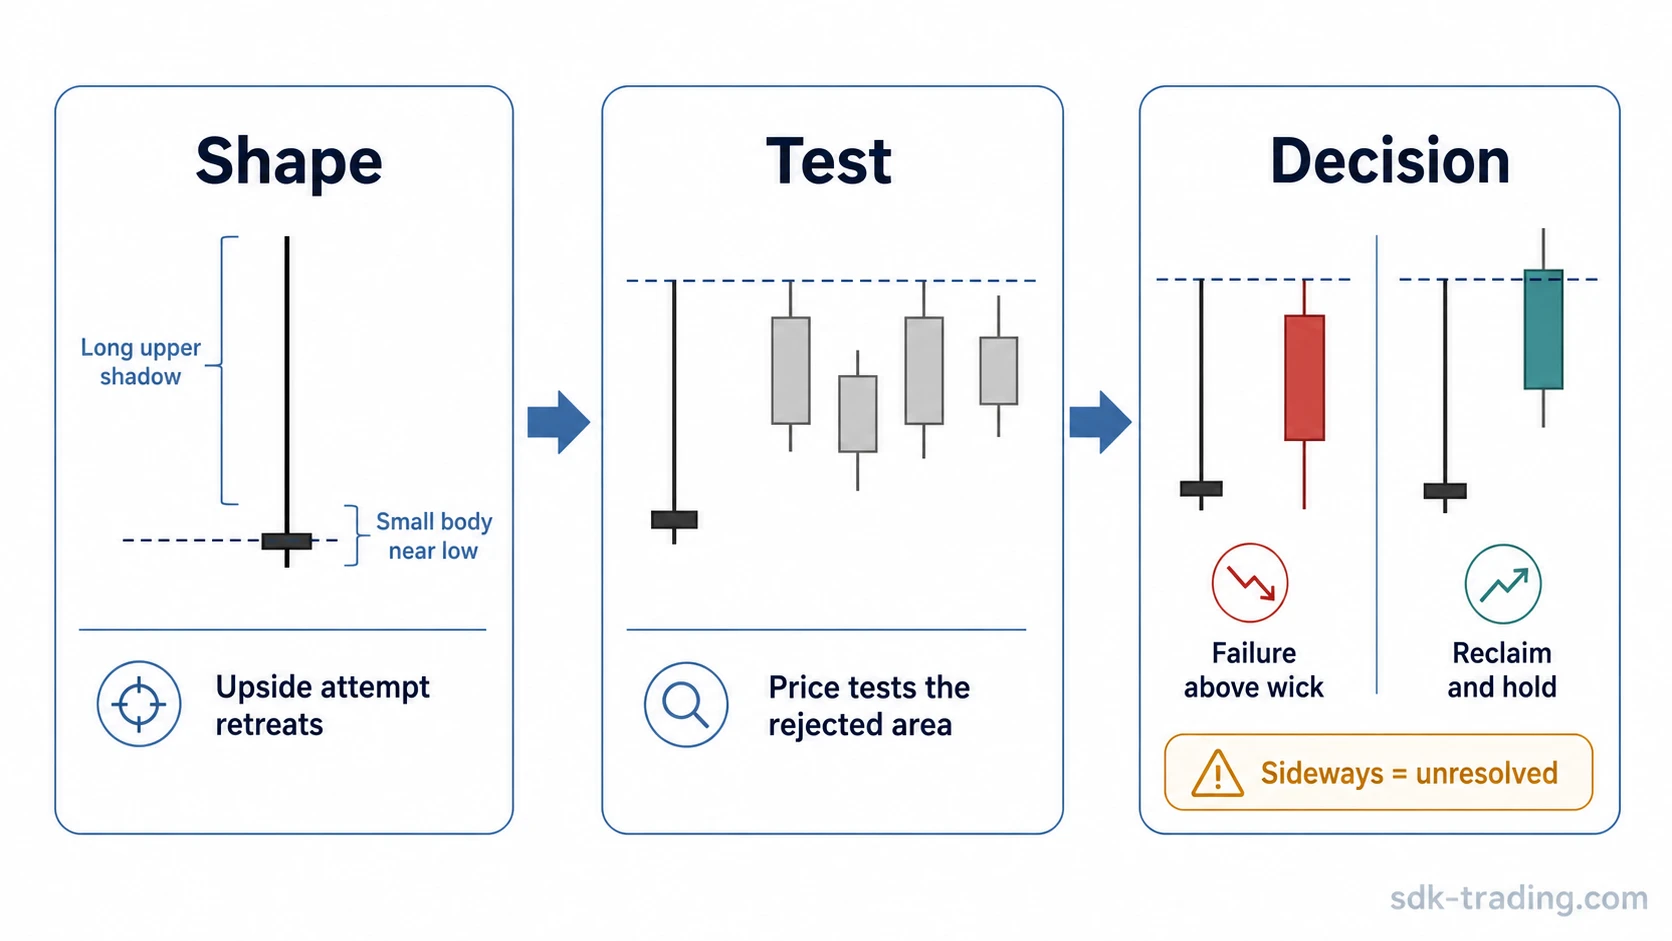
Shape vs Confirmation Behavior
A gravestone doji candle has a small real body near the low of the candle and a long upper shadow. That shape records an upside attempt that failed before the candle closed.
Confirmation comes later, when the market either respects the rejected upper area or absorbs it. The shape describes the first rejection. Later behavior decides whether that rejection is still active.
| Later price behavior | What it suggests | Confirmation quality |
|---|---|---|
| Price fails to follow through above the upper wick | The rejected upper area is still controlling the reaction | Primary confirmation clue |
| Next candles close below the doji body area | Sellers are getting a clearer price result after the failed upper test | Secondary support, strongest near resistance |
| Price reclaims and holds inside the upper-shadow area | The earlier rejection is being absorbed | Bearish interpretation loses force |
| Price moves sideways around the doji body | The market has not chosen acceptance or rejection yet | Unresolved |
Gravestone Doji Confirmation Example in Context
Price advances into a prior resistance area and briefly trades higher, but the candle closes near its low with a long upper wick. The first reaction can look bearish because higher prices did not hold.
The next recovery attempt carries more information than the shape alone. If price tries to move back into the upper-wick area, stalls, and closes weaker, the failed-upside reading gains weight. If price reclaims the upper area and holds there, the earlier wick becomes less decisive.
The diagnostic question is simple: did the market reject the same upper area again, or did buyers absorb it?
False Positives and Limitations
A gravestone doji can appear during ordinary hesitation, especially when the surrounding structure is weak or unclear. Without resistance context, a prior advance, or later failure above the wick, the candle may not carry much information.
Neutral consolidation is another false-positive risk. Several small candles around the doji body can mean the market is pausing rather than rejecting. The bearish interpretation becomes cleaner only when price begins to accept lower levels after the upper-shadow failure.
How It Fits With Doji Context
A gravestone doji is part of the broader doji candle family, where the open and close are close together. The gravestone version is more specific because the long upper shadow highlights a failed upside attempt.
That makes confirmation narrower too. A general doji may need context to show indecision, continuation, or reversal pressure. Gravestone doji confirmation focuses on whether the market fails to follow through above the upper wick after the rejection has appeared.
FAQ
Does a gravestone doji need confirmation?
Yes. The candle shows an upside attempt and retreat, but confirmation depends on later candles. Failed follow-through above the upper wick, weaker closes, or rejection of the same upper area can strengthen the bearish reading.
What confirms a gravestone doji most clearly?
The clearest confirmation is later failure above the upper-shadow area followed by acceptance lower. A lower close after the doji can help, but it is secondary to whether price fails again around the upper wick.
What weakens a gravestone doji reading?
Later candles weaken the reading when they reclaim the upper-shadow area, close above the doji high, or hold above the small body with renewed demand. That behavior suggests the earlier rejection may have been absorbed.
Can a gravestone doji be neutral?
Yes. If price moves sideways around the doji body and does not reject or reclaim the upper area clearly, the candle can remain unresolved. The shape alone is not enough to force a bearish interpretation.
Is gravestone doji confirmation the same as shooting star confirmation?
No. The ideas can overlap because both involve upper-shadow rejection, but the candle structures are not identical. Gravestone doji confirmation focuses on the doji-style open and close near the low and the later failure or acceptance of the upper wick.