Hanging man confirmation becomes more defensible when the candle appears after an advance or near resistance, and later price fails to reclaim the upper part of that candle’s range. The hanging man candlestick creates the initial warning, but confirmation comes from the next price response: price has to fail near the candle’s upper recovery area instead of moving cleanly back above it.
The shape alone is insufficient. A small real body with a long lower wick can show intraperiod rejection from lower prices, but the close near the upper area also means buyers recovered part of the move before the candle finished. A bearish reading becomes stronger only when later candles fail to hold that recovery or accept lower prices after the pattern.
What Confirms a Hanging Man?
A hanging man is confirmed more by failed recovery than by the next candle’s color alone. The strongest confirmation usually appears when price moves lower after the hanging man and then cannot regain the candle’s upper body area, especially if the pattern formed after a visible advance or at a resistance area.
Hanging Man Confirmation Checklist
- The candle appears after an upward move or near a resistance area.
- Later candles fail to reclaim the hanging man’s upper body area.
- Price accepts below the body or lower part of the candle range.
- Volume supports the reading only when price result confirms weakness.
- A quick return above the upper area weakens the bearish interpretation.
The useful distinction is between recognizing a candle shape and reading the next market response. Shape recognition identifies the candidate candle. Confirmation asks whether the recovery inside that candle was rejected, lost, or successfully reclaimed.
Why the Upper Area Matters
The upper part of the hanging man matters because it marks the area where the candle finished after probing lower. If later price cannot return to that area, the recovery inside the hanging man looks less durable. The lower wick then becomes less like successful demand absorption and more like an early warning that the advance is becoming unstable.
A red candle after the hanging man can look convincing, but color alone does not prove much. A small red candle that remains inside the prior range may show hesitation rather than rejection. A stronger reading appears when the next movement breaks the body area, fails on a rebound attempt, and leaves price unable to recover the upper zone.
Resistance strengthens the interpretation because the market has already reached an area where supply may appear. After an advance, a hanging man near resistance creates a test of whether buyers can still defend higher prices. Failed reclaim of the upper area gives the bearish reading a clearer price-result basis.
Weak vs Stronger Confirmation
| Later behavior | Reading quality | Why it matters |
|---|---|---|
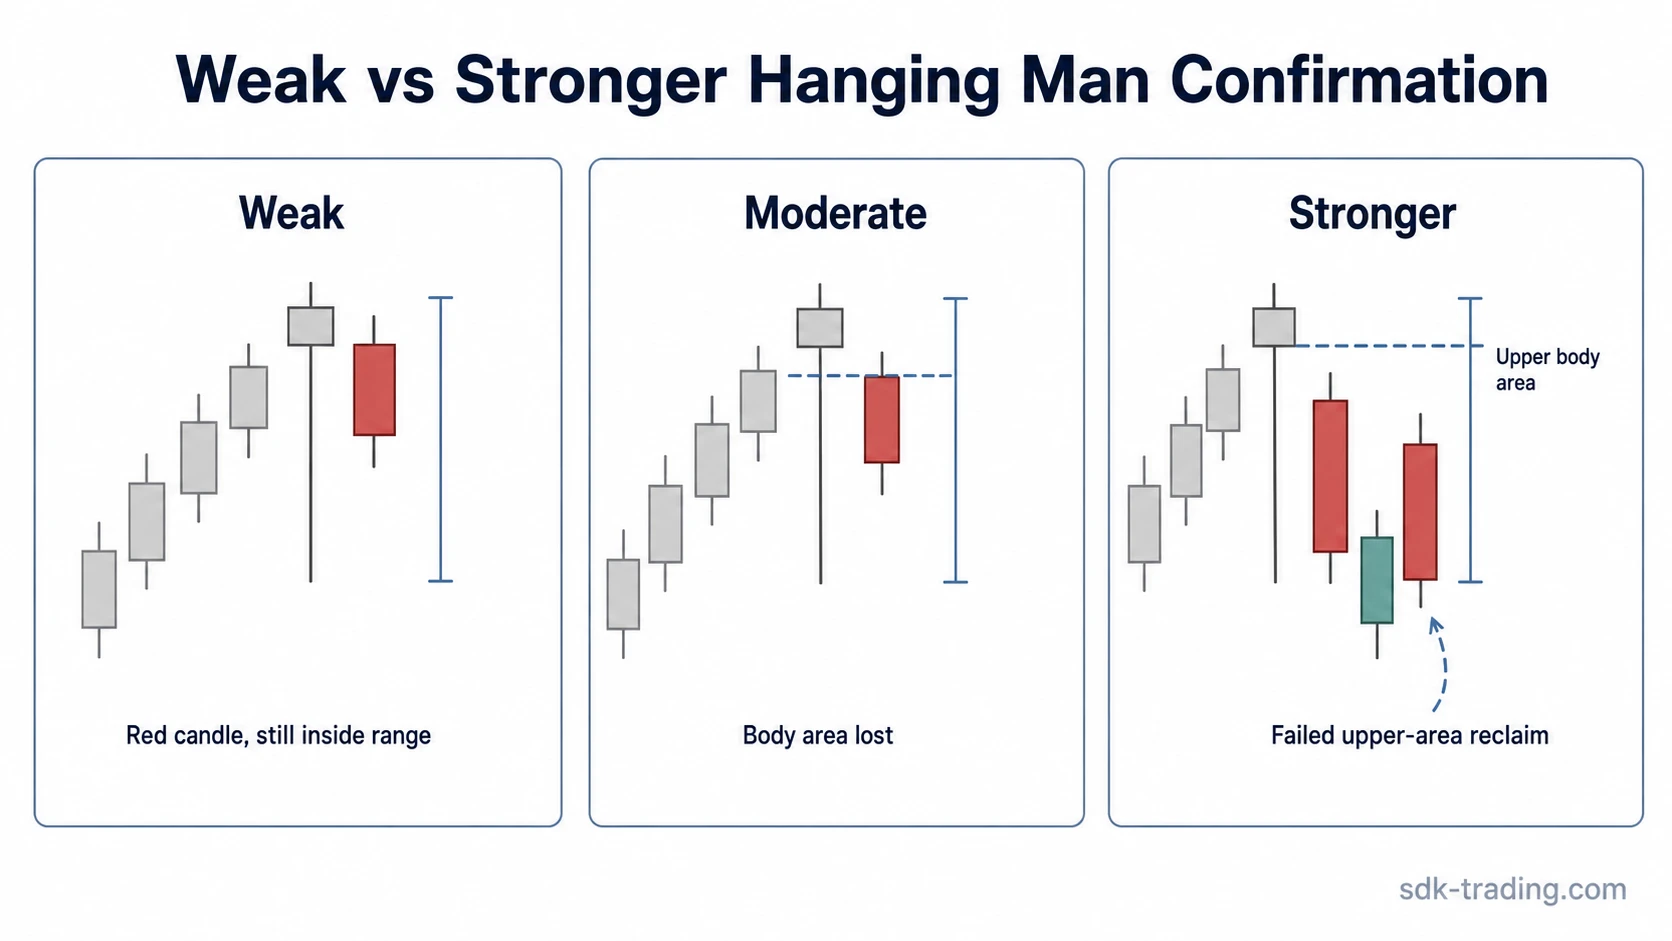
| Next candle closes red but stays inside the hanging man range | Weak confirmation | Color changes, but price has not clearly rejected the upper recovery area. |
| Price closes below the hanging man body | Moderate confirmation | The recovery inside the candle is partly lost, but the range may still be unresolved. |
| Price fails to reclaim the upper body area after a lower move | Stronger confirmation | The market attempts recovery and cannot regain the area where buyers previously recovered. |
| Price accepts below the lower part of the hanging man range | Stronger bearish evidence | The lower probe is no longer rejected cleanly, and sellers show more control over later price result. |
| High volume appears but price quickly reclaims the upper area | Unreliable confirmation | Activity alone does not confirm weakness if the price result reverses the bearish reading. |
Volume can support the reading, but it cannot replace price behavior. Heavy activity near resistance may show a real contest between buyers and sellers, yet the confirmation still depends on whether price is rejected from the upper area or returns above it.
Confirmation Conditions and Limits
| Condition | Implication | Limitation |
|---|---|---|
| Hanging man forms after a clear advance | The candle appears where upside momentum may be tiring. | The advance still needs later weakness before the bearish reading becomes defensible. |
| Hanging man forms near resistance | The candle tests whether buyers can continue absorbing supply near a known reaction area. | Resistance alone does not confirm rejection if price later trades back above the candle’s upper area. |
| Later price fails to reclaim the upper body area | The recovery inside the hanging man is not being defended. | The reading is weaker if price only hesitates briefly and then recovers. |
| Later price closes below the hanging man low | The market accepts prices below the area that previously produced the lower-wick recovery. | A single break can still fail if it is immediately reclaimed. |
| Volume expands during the hanging man or follow-through candle | The reaction may involve stronger participation. | Volume is secondary unless the price result confirms loss of the upper area. |
Common False Positives
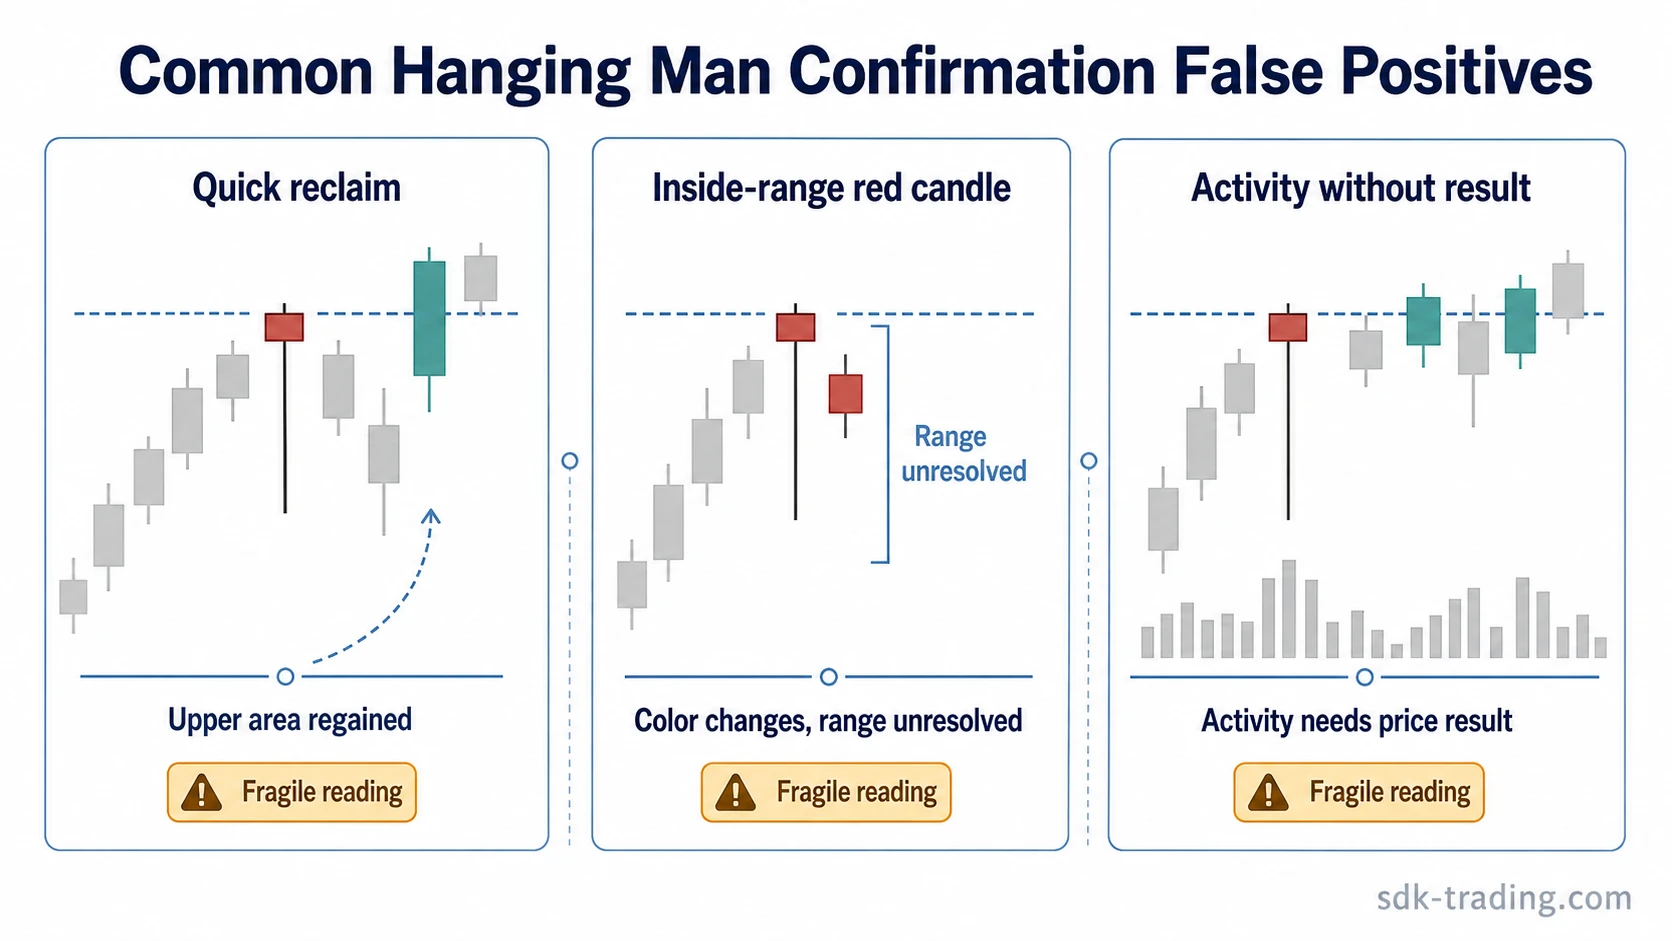
A common false positive occurs when price forms a hanging man near resistance, dips below the candle body, and then quickly recovers above the upper area. That sequence weakens the bearish interpretation because price did not remain below the area that needed to act as resistance after the first reaction.
Another false positive appears when the next candle is red but narrow. If it does not break the body area, challenge the lower part of the range, or reject a recovery attempt, the evidence remains shallow. The candle color may look bearish while the actual price result stays indecisive.
Volume-only confirmation is also fragile. A high-volume hanging man can suggest a stronger contest, but heavy activity can also reflect active two-way trading. Bearish evidence improves only when later movement loses or rejects the candle’s recovery zone.
Location can reduce the quality of the reading. A hanging man in the middle of a choppy range does not carry the same weight as one that forms after an advance into resistance. Without a meaningful prior move or nearby reaction area, later weakness may reflect ordinary range noise rather than a clean rejection attempt.
How This Relates to the Hanging Man Pattern
The hanging man pattern identifies the candidate candle: a small body near the upper part of the range with a long lower wick after upward movement. The confirmation question is narrower. It asks whether later candles defend or reject the recovery that happened before the hanging man closed.
The small body can resemble body compression seen in a doji candlestick, but a hanging man keeps its own structure because the long lower wick and location after an advance are central to the reading. The confirmation test is therefore not about the body alone. It is about whether price can regain the upper part of the hanging man after the market has had time to respond.
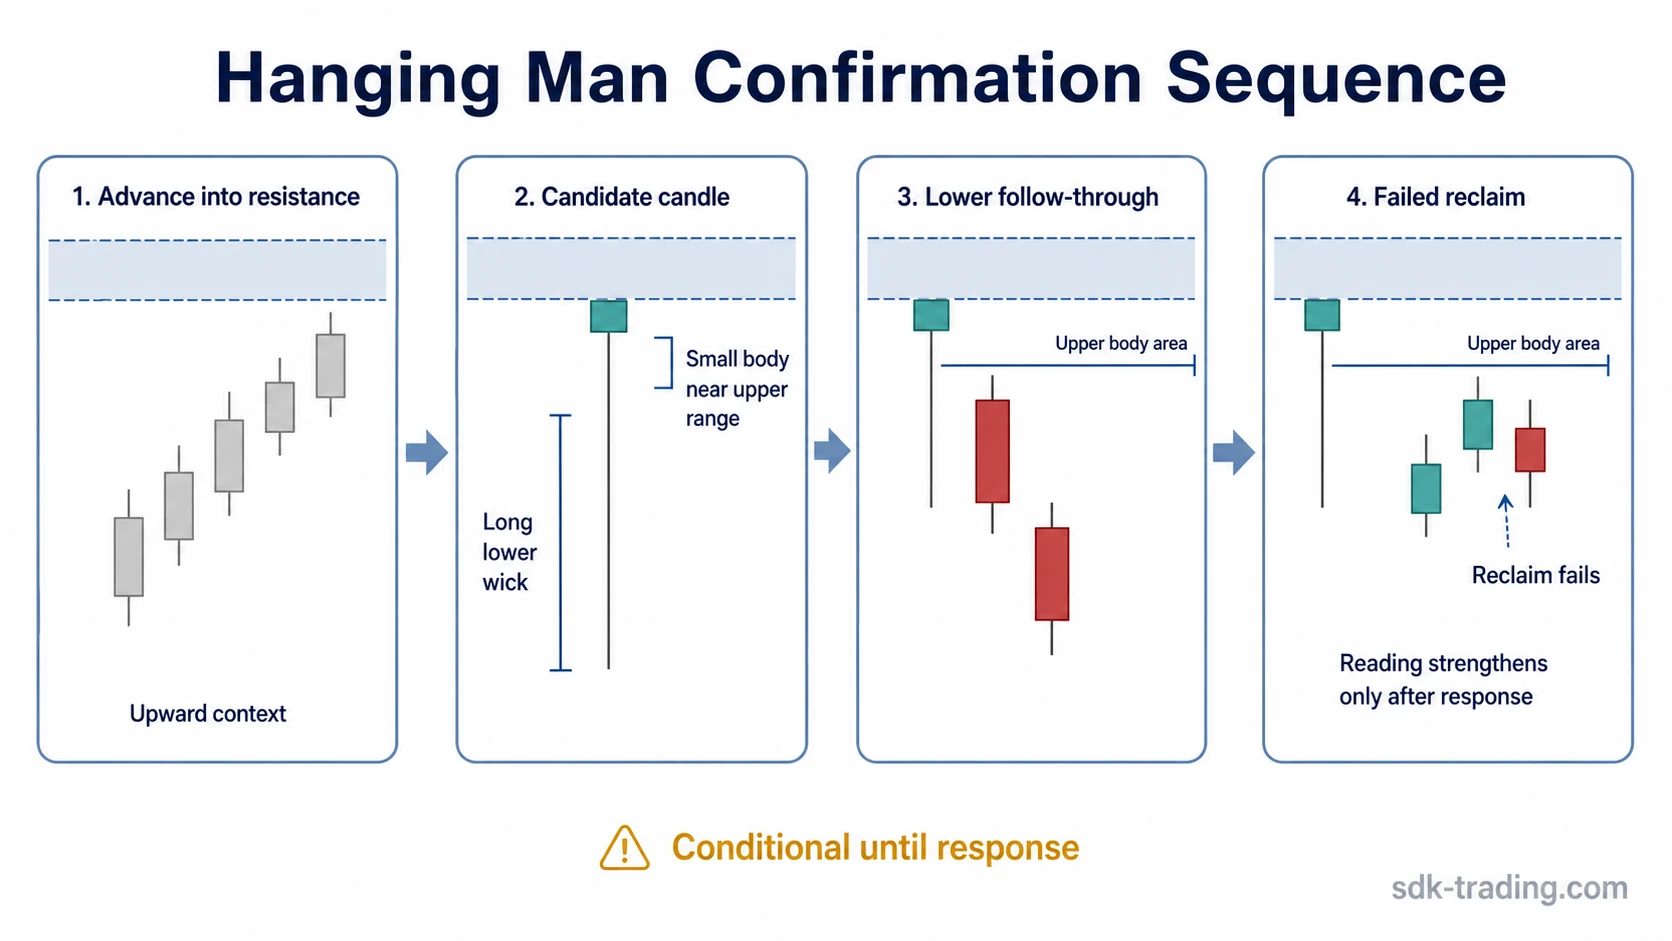
A cleaner bearish interpretation usually requires a sequence: upward context, hanging man formation, lower follow-through, failed upper-area reclaim, and no immediate recovery above that zone. If any part of that sequence is missing, the candle remains a warning candidate rather than a confirmed reversal reading.
Hanging Man Confirmation FAQ
Does a red candle after a hanging man confirm it?
A red candle can add bearish evidence, but it is weak if price remains inside the hanging man range. Confirmation is stronger when price fails to reclaim the upper body area or accepts lower prices after the pattern.
Can volume confirm a hanging man by itself?
Volume cannot confirm the pattern by itself. Higher volume may show stronger participation, but the price result still has to show failed recovery, rejection near resistance, or acceptance below the hanging man range.
What weakens hanging man confirmation?
Fast recovery above the upper area of the hanging man weakens the bearish reading. The same is true when the next candle is small, stays inside the range, or appears away from a meaningful resistance area.