A Swing Failure Pattern (SFP) forms around a prior swing high or swing low when price trades beyond that level but the defining candle closes back on the original side of the swing. The excursion creates the failed-break structure; the close separates the SFP from a breakout candle that remains beyond the level.
Definition: In the standard candle-based definition, a bearish Swing Failure Pattern trades above a prior swing high and closes back below it. A bullish Swing Failure Pattern trades below a prior swing low and closes back above it.
SFPs are often discussed within liquidity analysis because obvious prior highs and lows can become watched order locations. A prior high may sit near buy-side liquidity. The observable pattern itself is simpler: identify the swing, observe the excursion beyond it, and check where the candle closes.
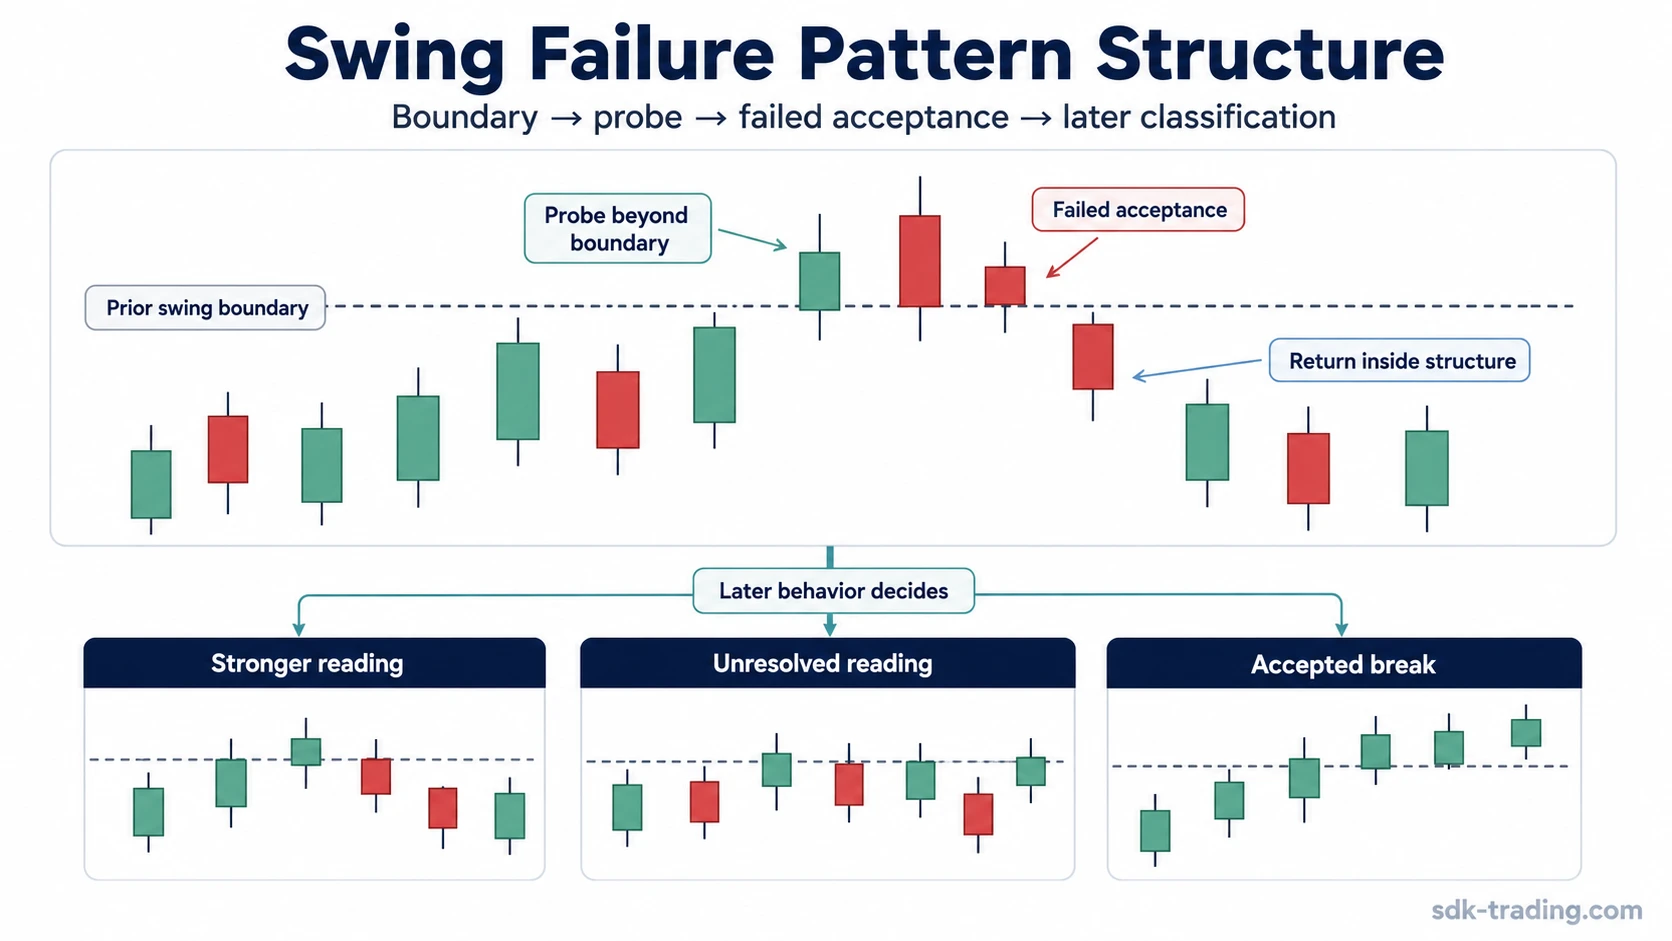
Swing Failure Pattern Rule
The pattern can be reduced to three required observations. Later price action may strengthen or weaken the broader interpretation, but it is separate from the basic SFP definition.
| Step | Required observation | What it establishes |
|---|---|---|
| 1. Prior swing | A previously formed swing high or swing low provides the reference level. | The price boundary that will be tested. |
| 2. Excursion | The current candle trades beyond that swing level. | An intrabar break of the previous extreme. |
| 3. Close | The candle closes back on the original side of the prior swing. | The defining failed-break condition of the SFP. |
Pattern boundary: If price trades beyond the swing and the candle closes beyond it, the standard SFP condition has not been completed on that candle.
Bullish and Bearish Swing Failure Patterns
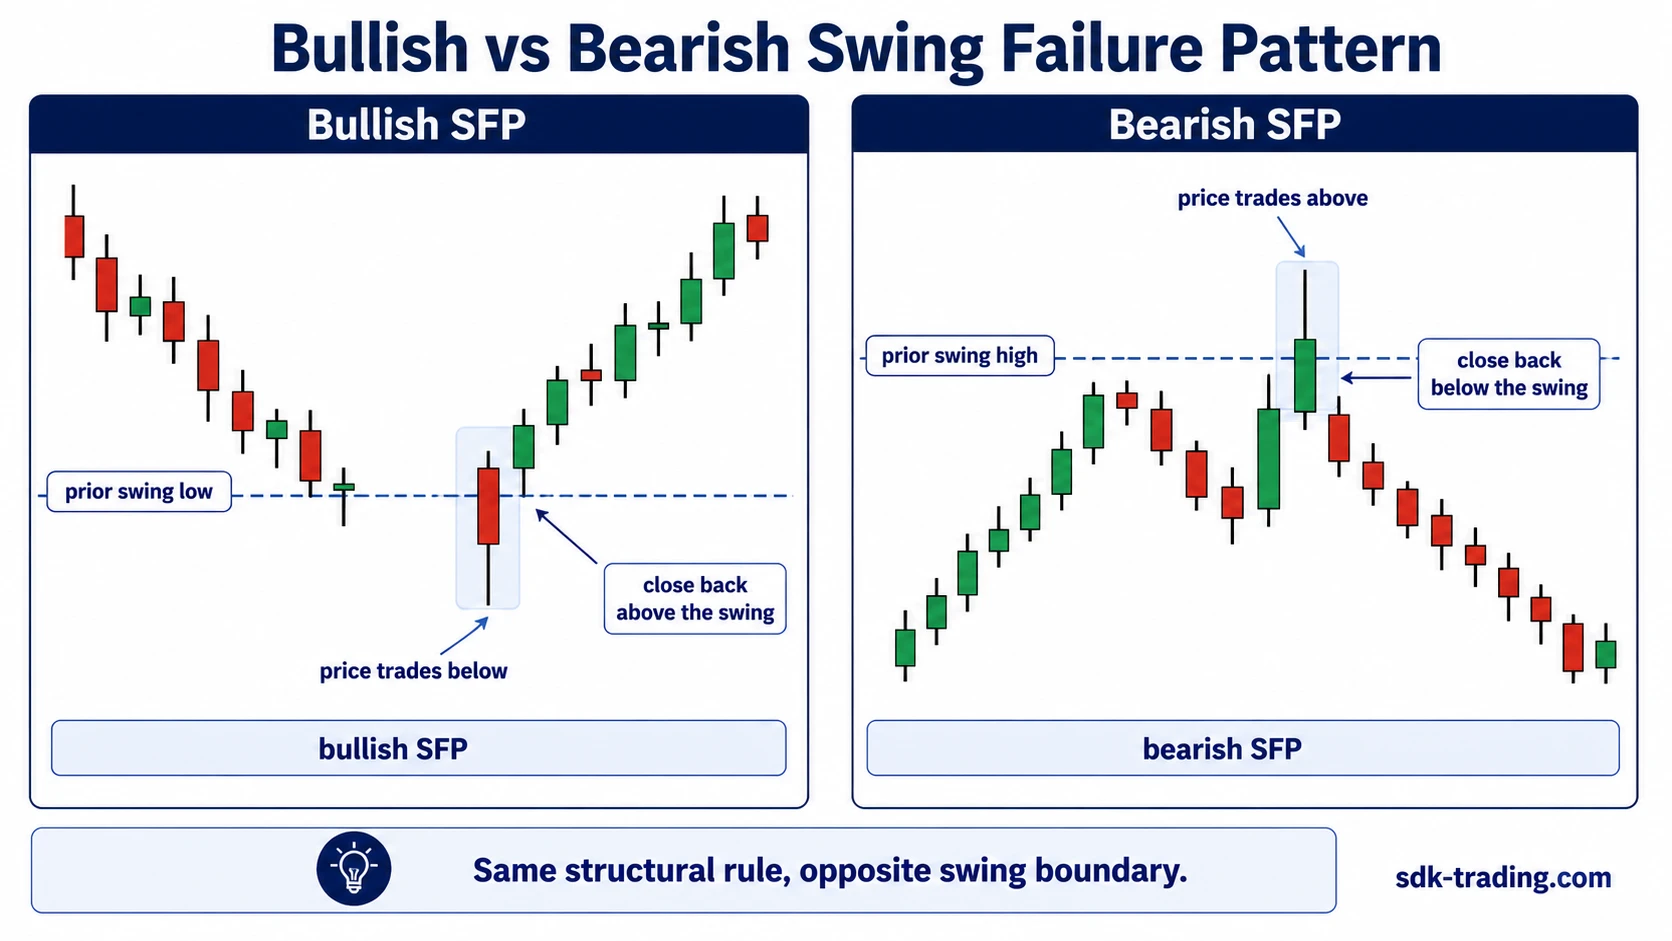
Bullish and bearish SFPs use the same geometry in opposite directions. The label comes from which swing is breached and reclaimed by the close.
| Type | Prior level | Intrabar move | Defining close |
|---|---|---|---|
| Bullish SFP | Prior swing low | Price trades below the swing low | The candle closes back above the swing low |
| Bearish SFP | Prior swing high | Price trades above the swing high | The candle closes back below the swing high |
Why the Close Matters
An intrabar break only proves that price traded beyond the previous extreme. It does not show where the market finished the candle relative to that swing.
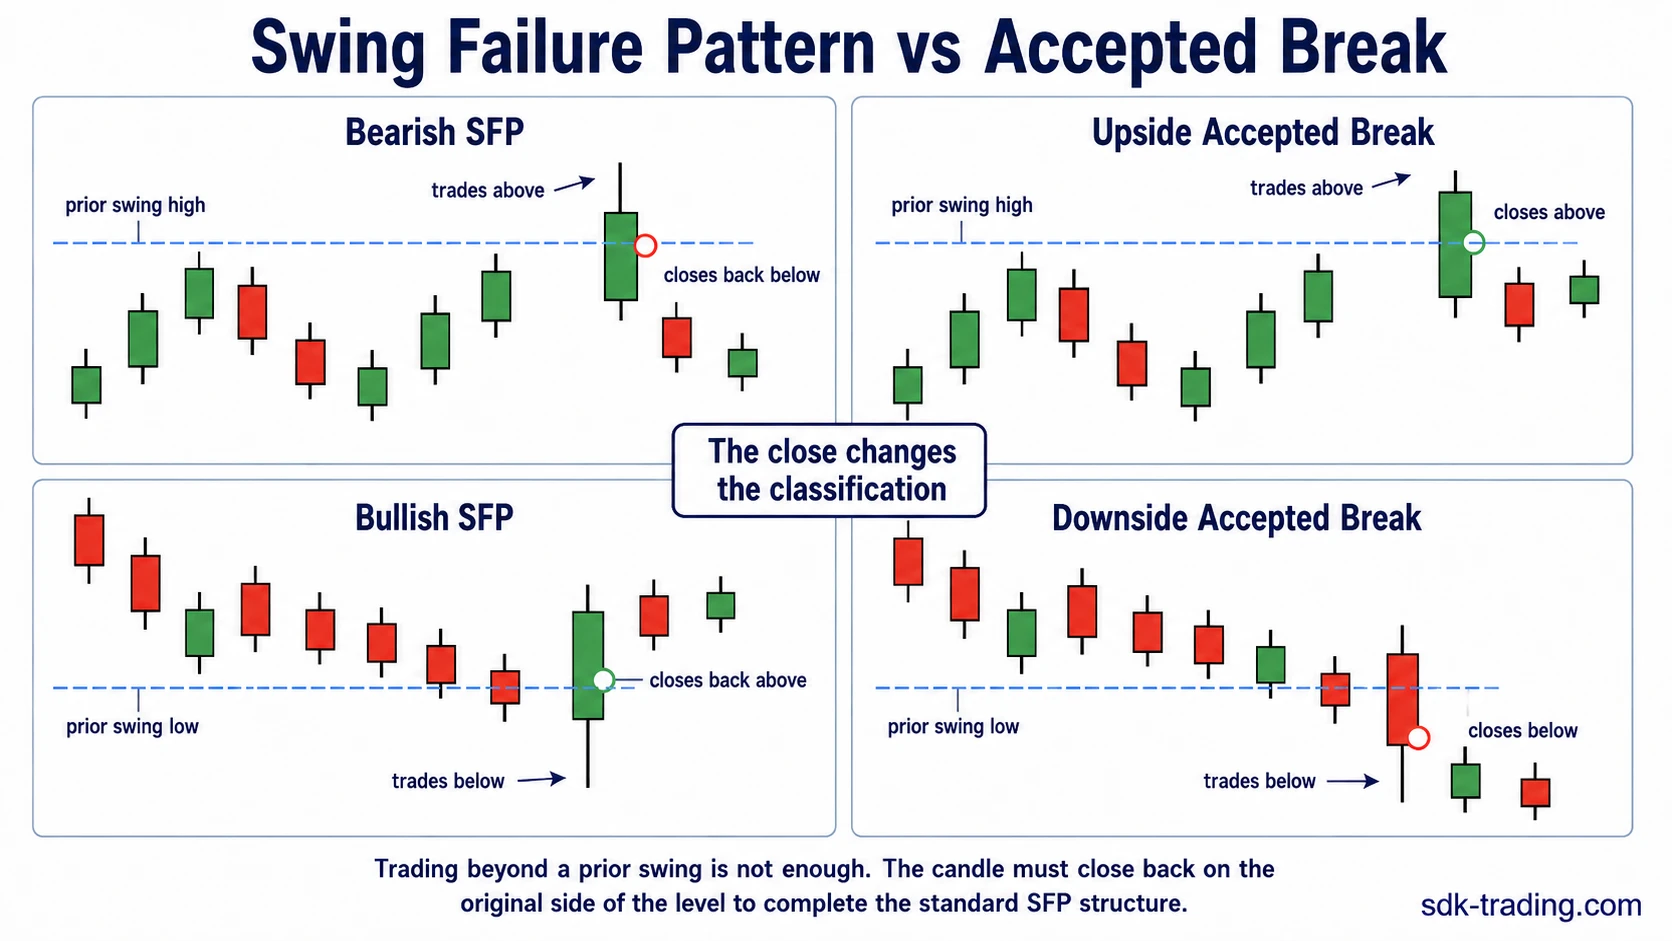
The close supplies the classification boundary. A candle that trades above a prior high and closes below it has produced different structure from a candle that trades above the same high and finishes above it. The first fits the bearish SFP rule. The second remains a break beyond the prior swing at that candle close.
The same distinction applies below a prior swing low. A temporary move below the low followed by a close back above fits the bullish SFP structure. A close below the previous low does not.
Swing Failure Pattern vs Accepted Break
The clearest comparison is between a failed intrabar break and a close that remains beyond the swing.
| Price behavior | Close location | Structural classification |
|---|---|---|
| Trades above a prior swing high | Closes back below the high | Bearish SFP structure |
| Trades above a prior swing high | Closes above the high | Break remains accepted at the candle close |
| Trades below a prior swing low | Closes back above the low | Bullish SFP structure |
| Trades below a prior swing low | Closes below the low | Break remains accepted at the candle close |
Subsequent candles can change the larger market structure, but this initial distinction prevents a wick beyond a swing from being labeled as an SFP before the defining close is known.
What Makes the Swing Reference Usable?
The reference level should come from an identifiable prior swing rather than an arbitrary candle high or low. A swing high requires price to have turned lower from a local peak, while a swing low requires price to have turned higher from a local trough.
Swing detection can vary with timeframe and pivot sensitivity. A minor intrabar high can qualify as a swing on a very short lookback while remaining insignificant on a wider chart. The SFP rule stays the same, but the selected swing determines which boundary is being tested.
What Happens After the SFP Candle?
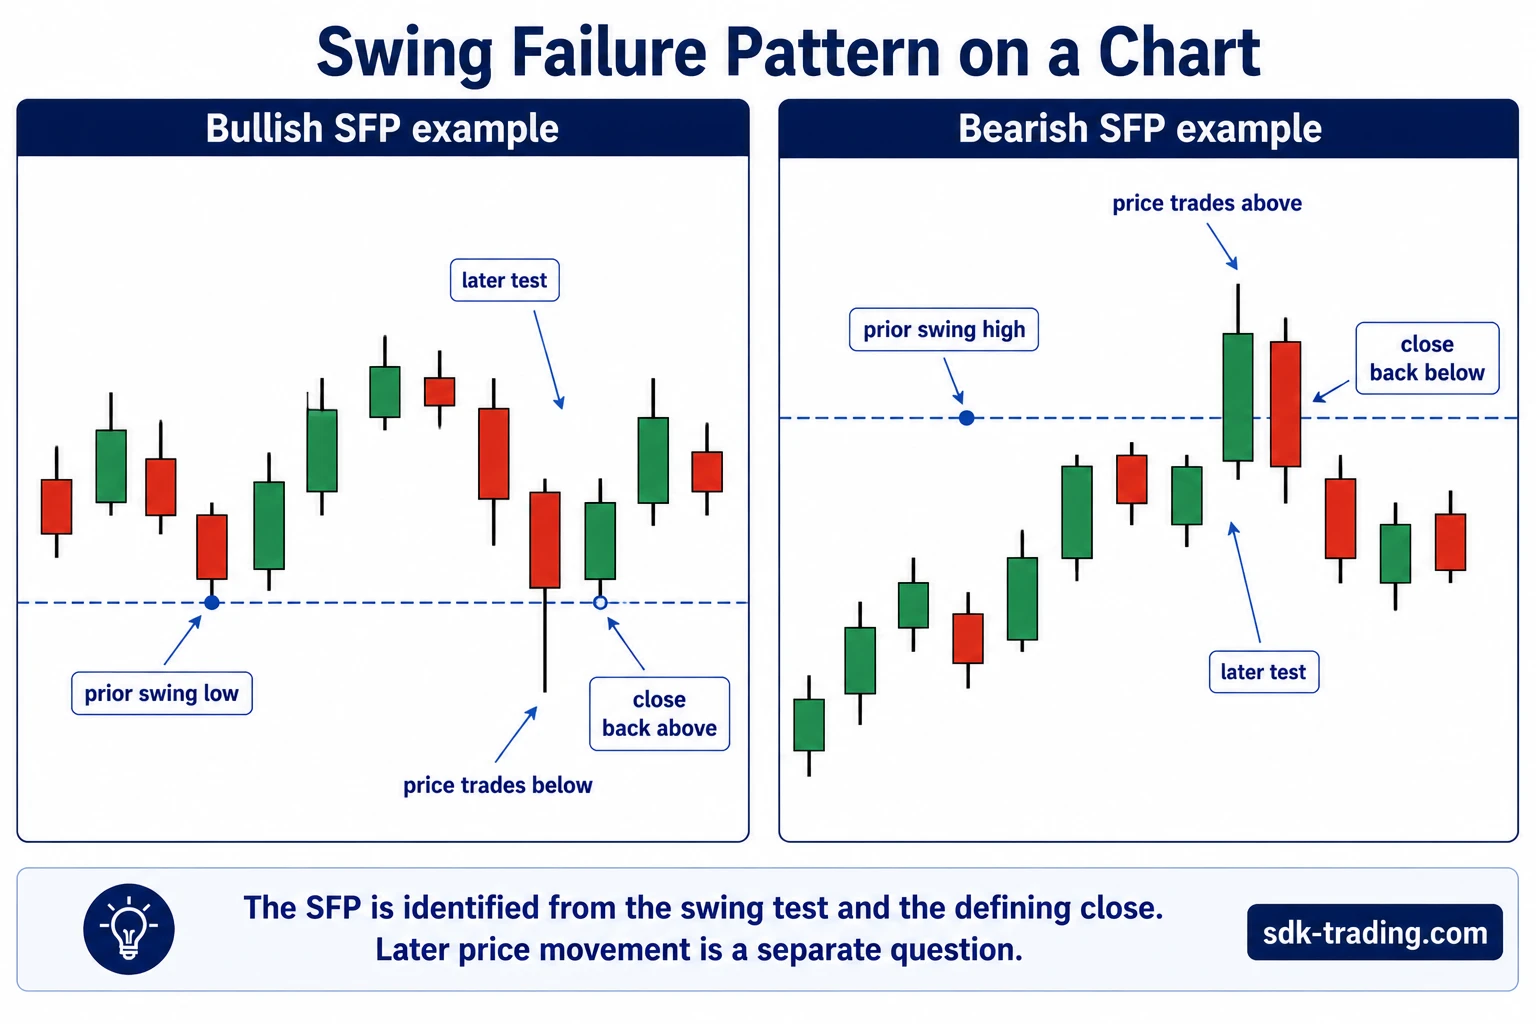
The SFP is identified at the close back inside the prior swing. Price behavior after that candle answers a separate question: whether the failed break develops into meaningful movement away from the level or is quickly challenged again.
A rapid move away from the swing shows stronger separation from the failed break. Repeated trading around the same level shows that the boundary remains contested. A later close through the swing can erase the initial rejection and restore price beyond the previous extreme.
Practical Swing Failure Example
Bearish example: A visible swing high forms at 100. A later candle trades to 101.20 but closes at 99.60. The candle exceeded the previous high intrabar and finished back below 100, so it meets the bearish SFP structure. Whether price subsequently declines or retests 100 is a separate follow-through question.
Bullish example: A visible swing low forms at 80. A later candle trades to 79.30 but closes at 80.40. The candle moved below the previous low and finished back above 80, which meets the bullish SFP structure.
Swing Failure Pattern vs Liquidity Grab and Liquidity Sweep
SFP, liquidity grab, and liquidity sweep terminology can describe overlapping chart events, especially when price moves through an obvious high or low. SFP has the narrower candle-level rule: a prior swing is exceeded and the candle closes back on the original side of that swing.
Liquidity grab and liquidity sweep are broader labels and are used differently across trading frameworks. They can describe movement through one level or a wider liquidity area without always requiring the exact SFP close condition.
Observable boundary: The chart can establish the swing level, the excursion, and the close. Claims about exactly which orders were triggered or why participants created the move require information beyond the candle itself.
Related Liquidity Structure
A liquidity void describes a different price structure. The SFP is defined around a previous swing boundary and the candle’s return close. A liquidity void concerns rapid traversal through a price segment with limited visible overlap.
They can occur near each other without being the same event. An SFP can form without a meaningful liquidity void, while a fast low-overlap move can occur without testing and reclaiming a prior swing.
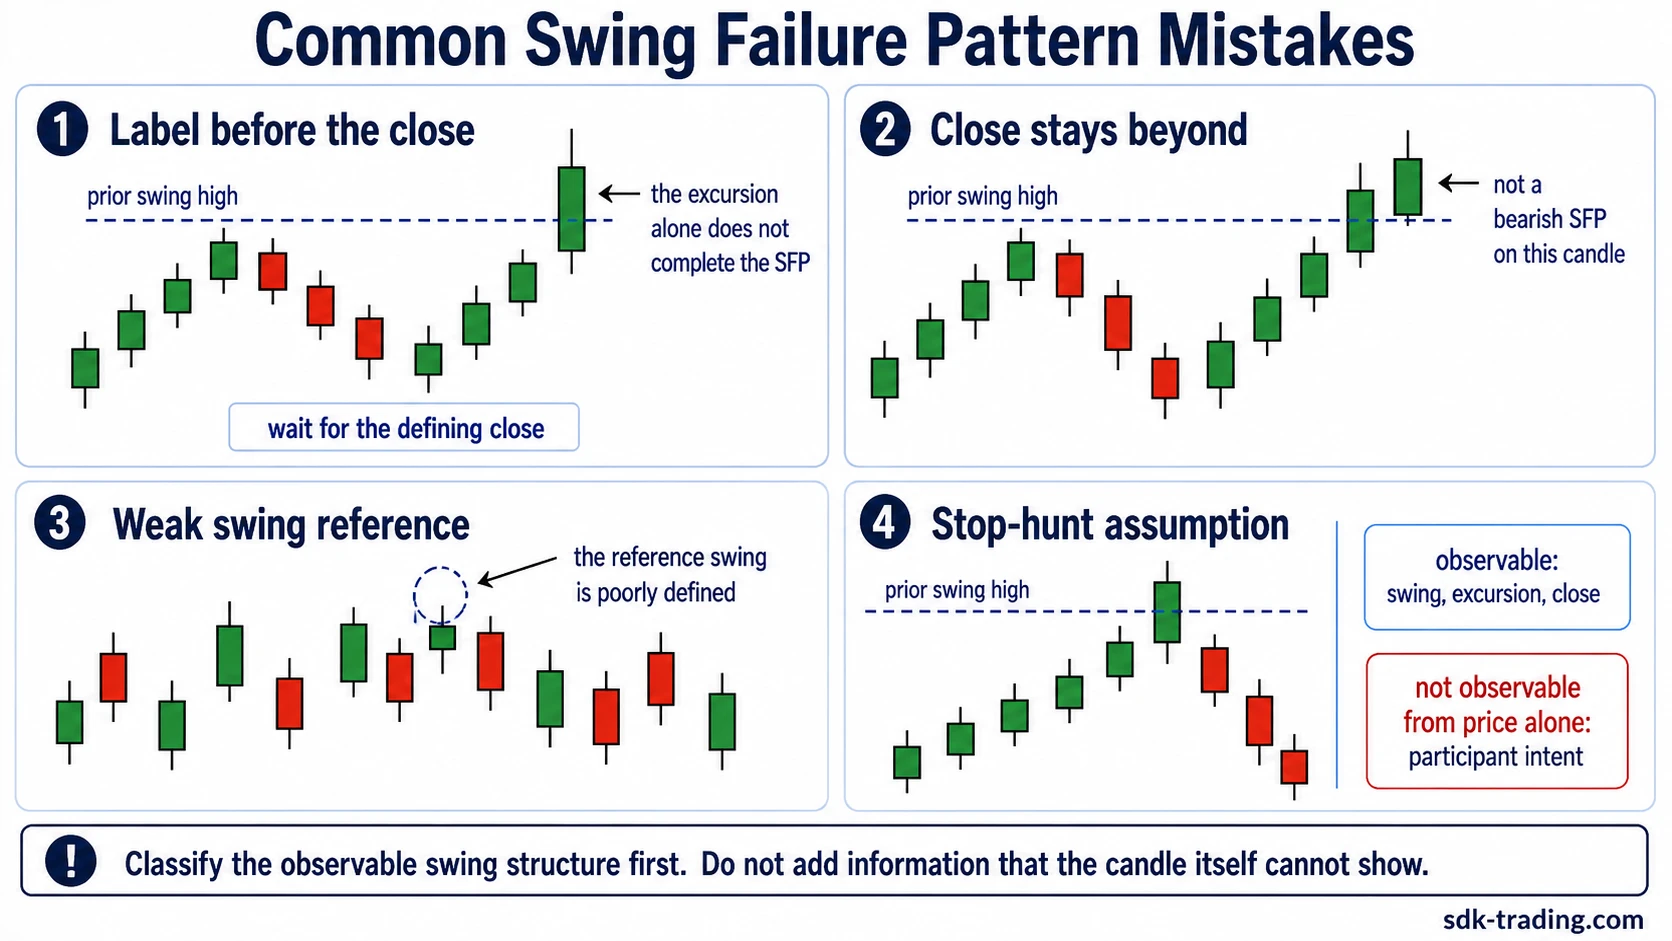
Common Swing Failure Pattern Mistakes
| Mistake | Classification problem |
|---|---|
| Labeling the pattern before the candle closes | The defining close relative to the prior swing is still unknown. |
| Using any nearby high or low as the reference | The SFP rule requires a prior swing point, so pivot selection changes the level being tested. |
| Calling a candle that closes beyond the swing an SFP | The candle did not close back on the original side of the reference level. |
| Assuming the SFP guarantees a reversal | The pattern classifies a failed intrabar break. Subsequent price movement remains a separate outcome. |
| Assuming the chart proves a deliberate stop hunt | Price reveals the boundary test and close, while participant intent is not directly observable from the candle. |
FAQ
Is a swing failure pattern the same as a liquidity grab?
No. The terms can describe overlapping events, but an SFP has a narrower structural rule: price trades beyond a prior swing point and the candle closes back on the original side of that level.
Does a wick beyond a swing high or low always create a swing failure?
No. The candle must also close back on the original side of the prior swing. Until the close is known, the move is only an intrabar break of the level.
What invalidates a swing failure reading?
The defining SFP candle requires a close back inside the prior swing. A candle that closes beyond the swing does not meet that standard definition. After an SFP forms, later price can still move back through the level and change the broader structure.
Can a swing failure pattern be bullish or bearish?
Yes. A bullish SFP trades below a prior swing low and closes back above it. A bearish SFP trades above a prior swing high and closes back below it.