A hammer at support is a hammer-shaped candle whose lower wick tests a visible support zone, but the wick is often misread when price only briefly pierces the area and closes back above it. The wick supports a rejection reading only if price recovers into or above the zone and later candles avoid accepting lower prices.
The key distinction is acceptance, not the wick by itself. A wick shows where price traveled during the candle; it does not prove that the market rejected that area. If later candles hold below the same support zone, the hammer-at-support reading becomes weaker and can instead mark a failed support test.
What a hammer at support means
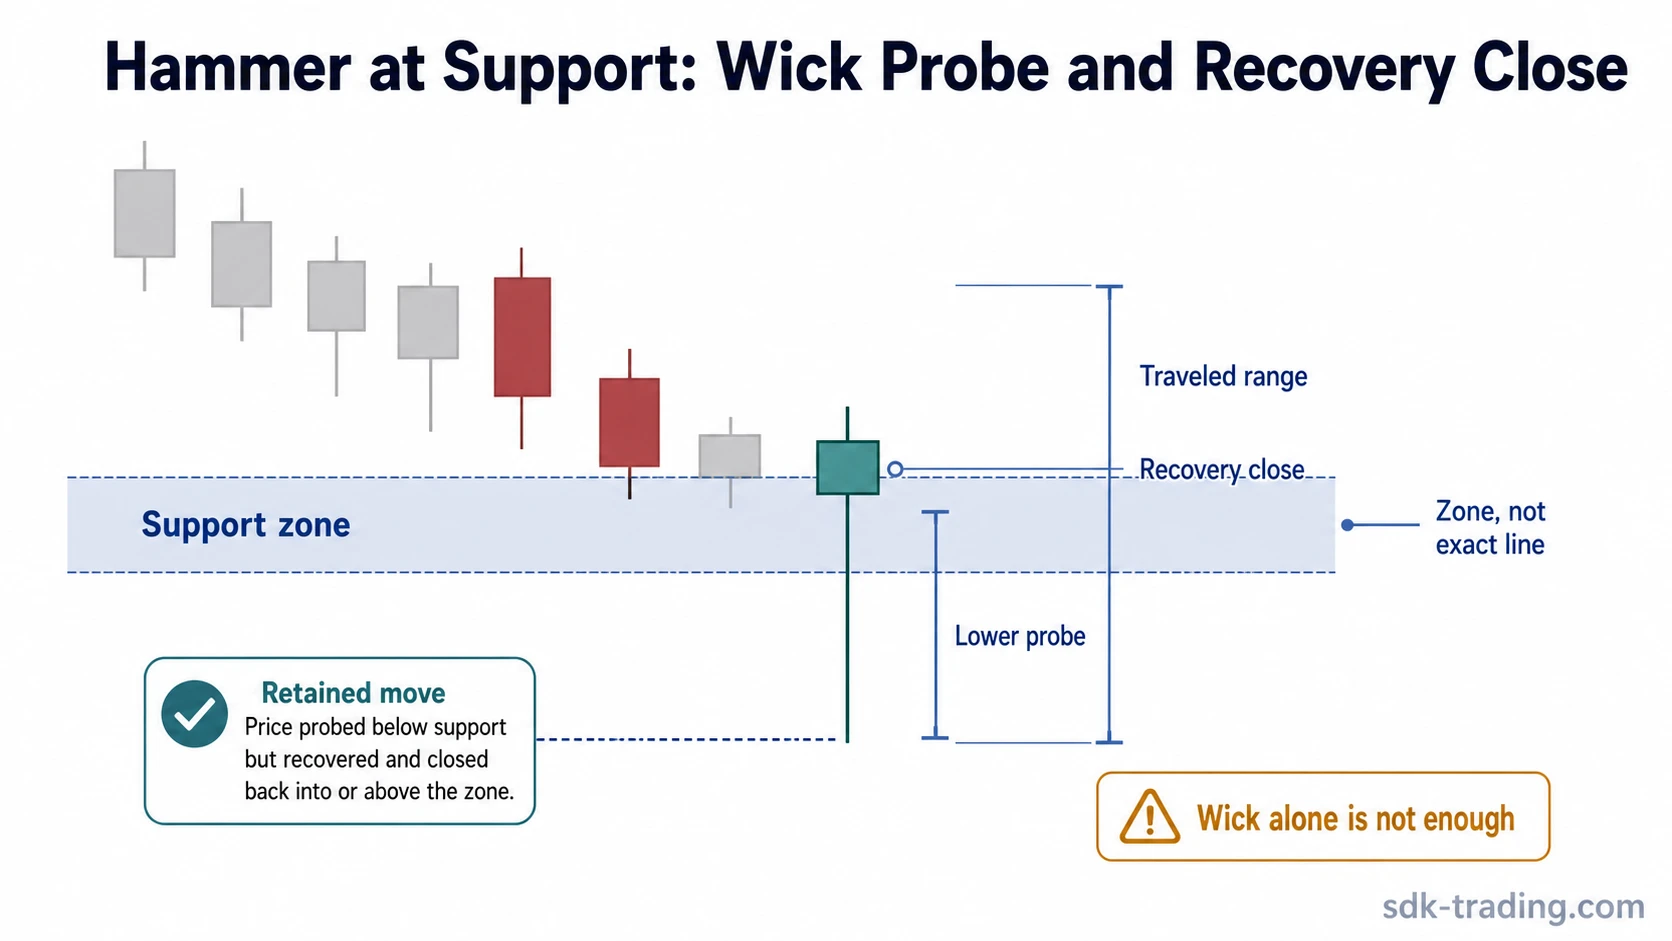
A hammer at support is a hammer-shaped candle that appears around a visible support area, usually after price has moved into or tested a prior reaction zone. It has a small real body near the upper part of the candle range and a dominant lower wick, which means price moved lower during the candle before recovering.
The underlying candle shape comes from the hammer candlestick pattern, but the support reading depends on more than shape. The narrower issue is whether the lower wick tested support and then failed to hold below that area.
This distinction keeps the reading conditional. A hammer can pierce support and still remain relevant if price closes back into or above the zone. It becomes weaker if later candles spend time below that same zone and show that lower prices are being accepted.
Why the support zone matters more than one exact line
Support is usually better read as a reaction zone, not as one perfect horizontal line. Real candles often overlap, pierce, or rotate around prior reaction areas. A small penetration below the line does not automatically mean support failed, and a simple touch of the line does not automatically make the hammer meaningful.
The useful distinction is touch, penetration, recovery, and acceptance. A touch means price reached the area. A penetration means price moved through part of it. Recovery means price returned into or above the zone before the candle closed. Acceptance means later candles continue to hold beyond the zone instead of reclaiming it.
A hammer at support is stronger as a reading when the lower probe fails and price recovers. It is weaker when the market treats the lower area as acceptable after the candle. That is why the close and the next candles matter more than the wick alone.
When the Lower Wick Supports the Reading
The lower wick supports the hammer-at-support reading when it behaves like a failed probe below support. Price travels into or below the reaction zone, but the candle closes near the upper part of its range and does not retain the lower move.
A practical way to read it is to separate the traveled range from the retained range. The wick shows that price traveled lower. The close shows how much of that move was retained. If price closes back inside or above the support zone, the lower move was not fully accepted during that candle.
Hammer at Support Reading Checklist
- The real body is small and located near the upper part of the candle range.
- The lower wick is the dominant feature of the candle.
- The wick interacts with a visible prior support zone.
- Price recovers into or above the zone before the candle closes.
- Later candles do not hold below the support zone.
These are qualitative checks, not mechanical rules. The candle does not need to respect a perfectly drawn line. The more important question is whether the market rejects the lower area or begins to accept it.
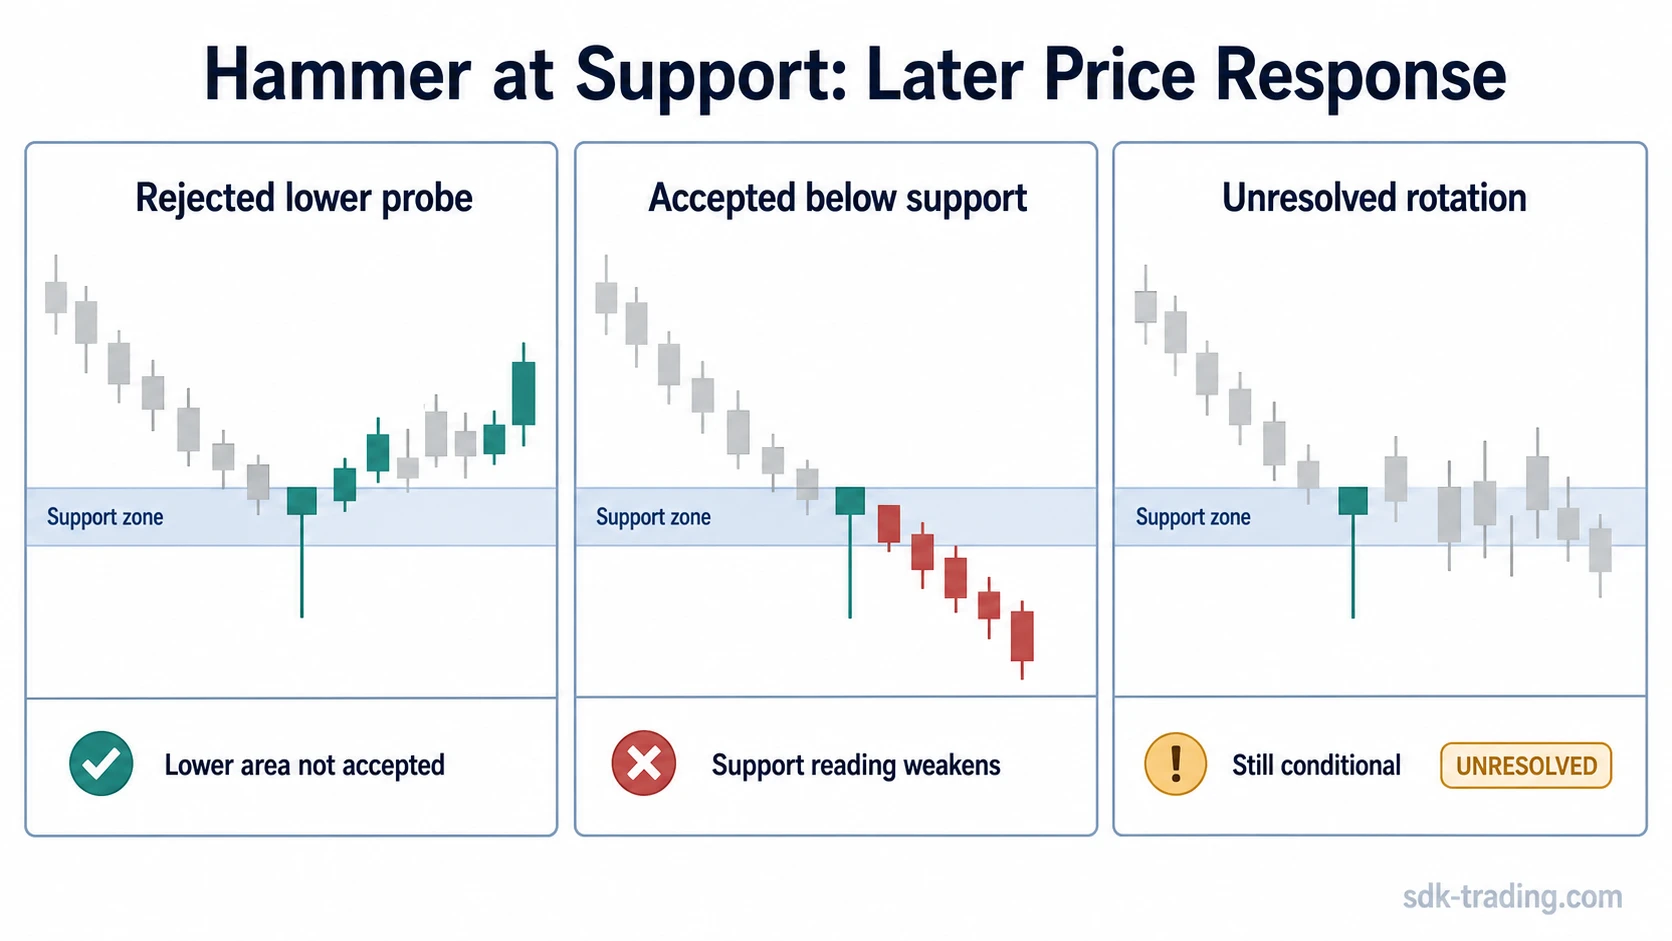
When a hammer at support weakens or fails
A hammer at support weakens or fails as a support reading when later candles accept prices below the zone. The candle may still look like a hammer, but the support message becomes less useful because the lower area was not rejected for long.
This can happen quickly if the next candles close and rotate below support. It can also happen more slowly if price repeatedly tests the lower area and each recovery becomes weaker. In both cases, the issue is not whether the first candle had a lower wick. The issue is that the market stopped treating the zone as a defended reaction area.
Broad support zones make this harder to judge. If the zone is too wide, almost any lower wick can be described as being “at support.” Repeated probing also reduces distinctiveness because the candle may be part of normal rotation rather than a clean failed move below the area.
Common misreads
| Condition | Common misread | Safer interpretation |
|---|---|---|
| Wick pierces support and closes back inside the zone | Support broke | It can still be a support test if lower prices are not accepted afterward. |
| Wick pierces support but later candles hold below the zone | The hammer protected support | The support reading weakens because the lower area was accepted. |
| The support zone is very broad | Every lower wick is meaningful | Precision is lower, so later behavior matters more. |
| Price recovers during the candle but immediately rotates lower again | The rejection is complete | The reading remains conditional until the lower-area acceptance question is resolved. |
| The candle has a lower wick but no clear support interaction | Any hammer-like candle is enough | The support context is weak if no visible reaction area is involved. |
Hammer at support vs nearby candle readings
A hammer at support focuses on a lower wick that probes a prior reaction area and then recovers. The location gives the candle a specific support-zone question: did price reject the lower area, or did the market later accept below it?
An inverted hammer candlestick has the opposite wick emphasis. Its long upper wick shifts attention toward an upper probe rather than a lower test of support. That difference matters because the two candles test different sides of the candle range.
A high-wave candle can also show uncertainty, but it usually has broader two-sided movement. When both upper and lower wicks are large, the reading often shifts toward indecision or volatility rather than a cleaner lower-wick support test.
The boundary is simple: a hammer at support is not mainly about having any long wick. It is about a lower wick that probes a support zone, recovers, and avoids later lower-area acceptance.
FAQ
Can a hammer at support pierce the support zone?
Yes. A hammer at support can pierce the zone and still remain relevant if price recovers into or above the area. The reading weakens if later candles accept price below the zone.
What makes a hammer at support more defensible?
The reading becomes more defensible when the lower wick tests a visible support zone, the candle closes back into or above that zone, and later candles avoid accepting below it.
What makes a hammer at support fail?
The reading weakens or fails when later candles hold below the support zone. That means the lower wick no longer looks like a rejected probe and starts to look like part of a support break.
Is support a line or a zone?
Support is usually better treated as a zone. Candles can temporarily pierce exact lines, so the important issue is whether price recovers from the area or begins accepting below it.