A Shooting Star at resistance is a location-specific candlestick reading where price tests an overhead resistance area, fails to hold the upper probe, and closes back away from the tested zone. The candle matters only when the upper wick, close location, resistance quality, and later response are read together.
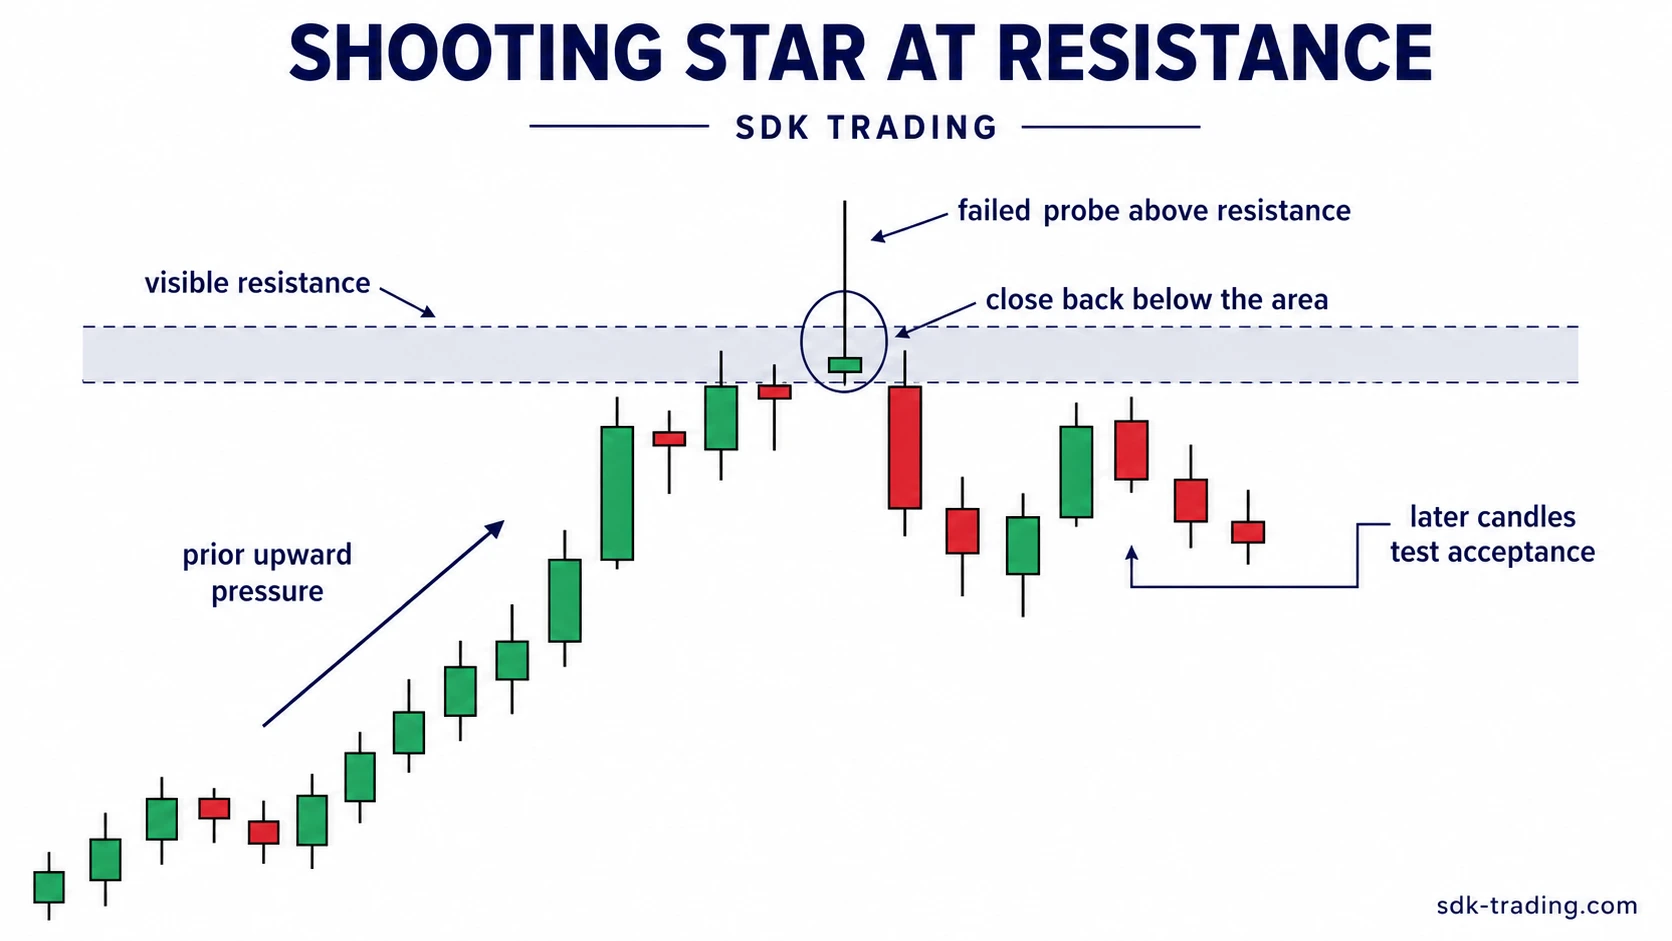
Interpretation boundary: the candle is not a completed rejection by itself. A Shooting Star candlestick describes the shape; the resistance version asks whether that shape tested a meaningful overhead level and then failed to accept above it.
The resistance context changes the reading from simple candle recognition to level-based interpretation. The question is not only whether the candle has a long upper wick, but whether buyers tested a known area, failed to hold it, and later failed to reclaim it.
Key Points
- The resistance area must be clear enough for the upper wick to carry location-based meaning.
- A wick above resistance is only a test until price either accepts or rejects the area.
- The close matters because it shows whether price held above resistance or retreated back below it.
- Later candles separate held rejection, upside acceptance, and unresolved rotation near the level.
- The reading weakens when resistance is vague, the close is too high, or price later holds above the tested area.
Shooting Star at Resistance Anatomy
This reading combines candle structure with level quality. The candle should show a long upper wick testing resistance, a small real body near the lower part of the candle range, and a close that does not hold above the tested area.
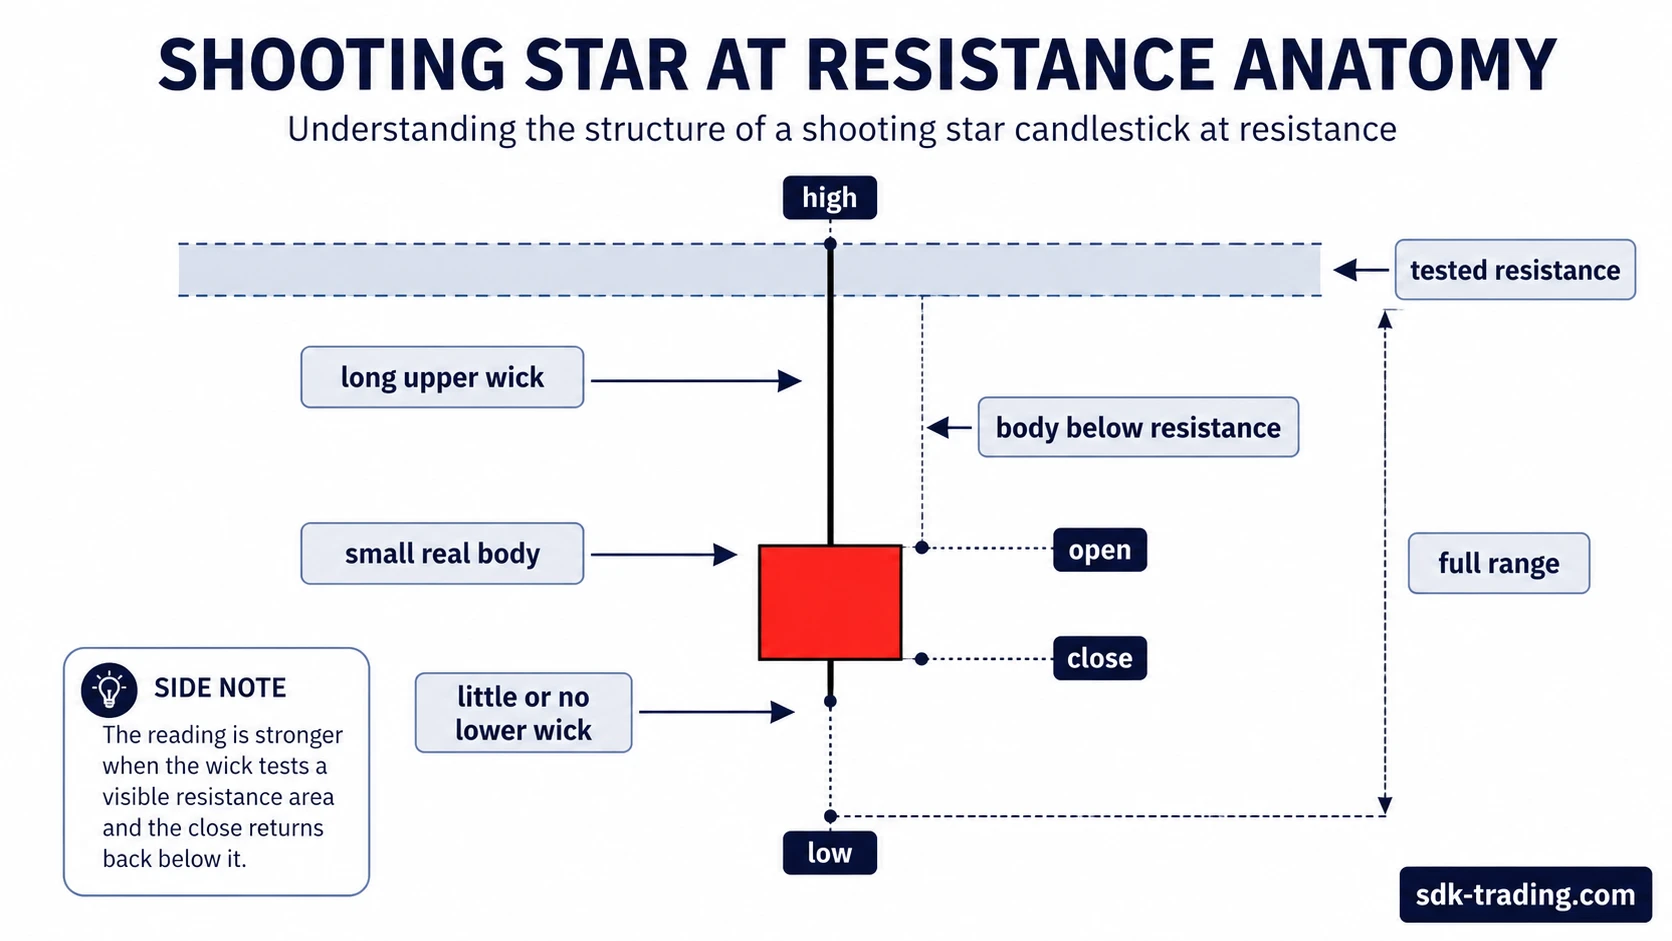
| Element | Cleaner reading | Weaker reading |
|---|---|---|
| Resistance area | Visible prior high, repeated reaction area, or clear overhead zone. | Loose or vague area with no obvious level being tested. |
| Upper wick | Tests into or slightly above resistance and then fails to hold. | Forms away from a meaningful level or does not clearly test resistance. |
| Real body | Small and positioned below or near the lower edge of the tested area. | Large, centered, or too close to the high. |
| Close location | Closes back below the tested resistance area. | Closes too close to the high or above the level. |
| Later response | Later candles fail to accept above resistance. | Later candles close and hold above the tested area. |
Why Resistance Quality Comes First
Resistance gives the upper wick a location-based job. The same candle structure is more useful near a visible prior high, repeated rejection area, or well-tested supply zone than it is in the middle of a loose range.
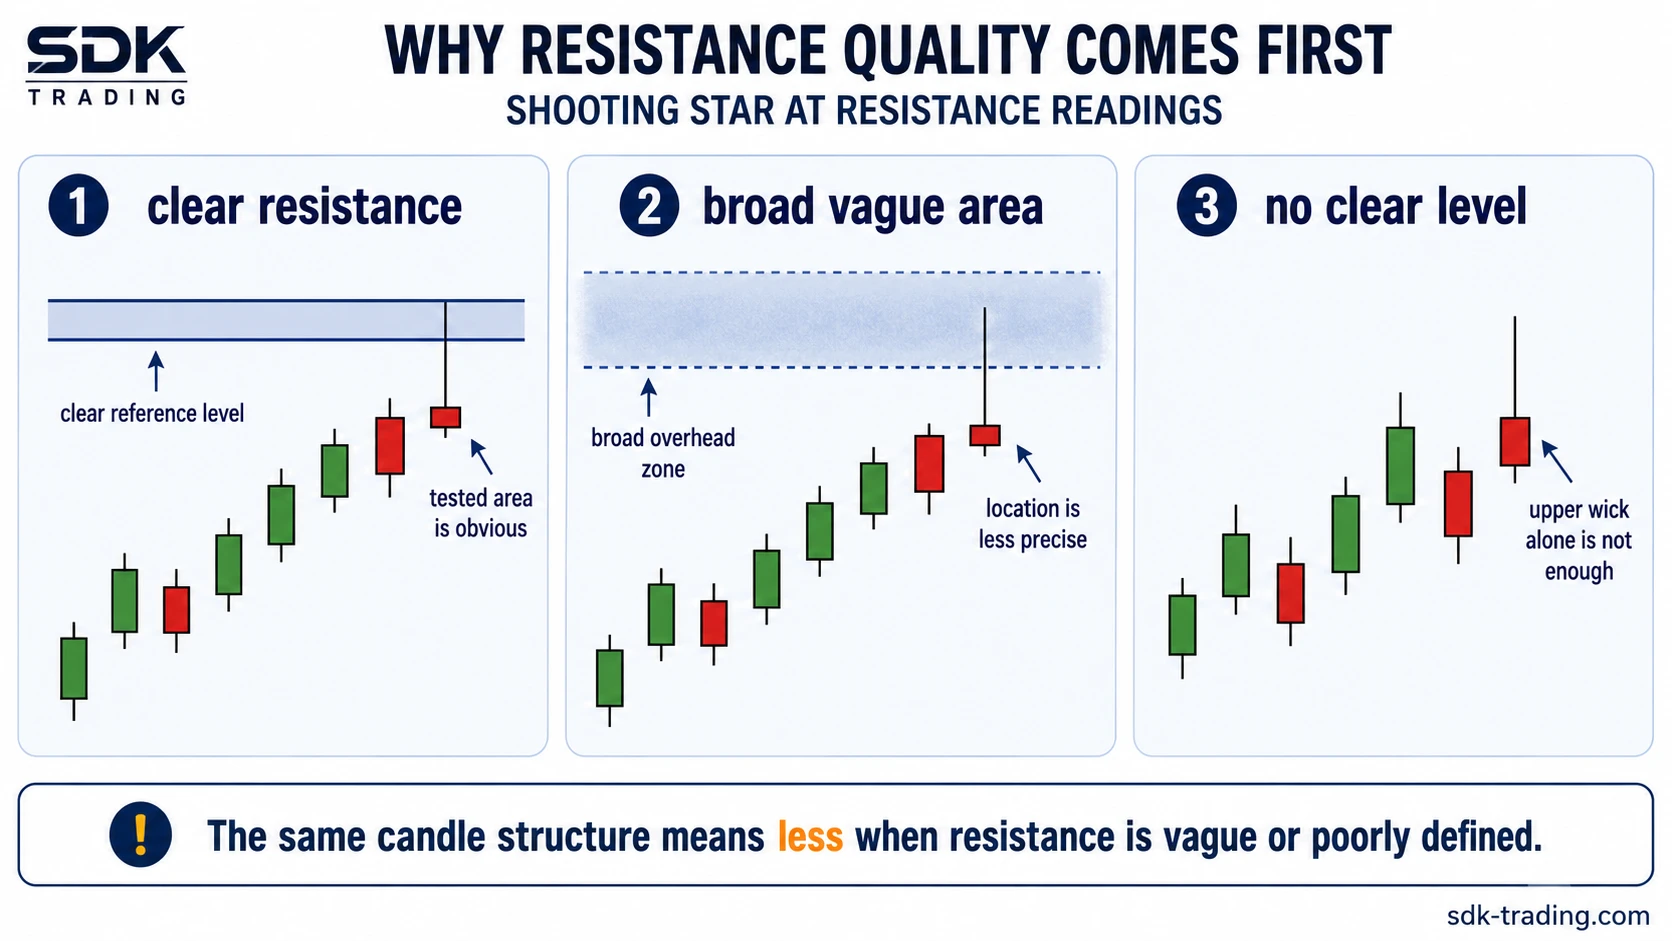
A clean resistance reading usually has three parts: price pushes into or slightly above the area, the upper wick records failed upside acceptance, and the close finishes back below the tested zone. Without those pieces, the candle may show volatility rather than meaningful rejection.
Structure first: the candle can warn that buyers failed at a tested extreme, but the level decides whether that warning has useful context.
Clean vs Weak Resistance Readings
A sharper resistance area makes the candle easier to interpret. The level does not need to be exact to the tick, but it should be visible enough that the upper wick is clearly testing a known area rather than reacting to random intraperiod movement.
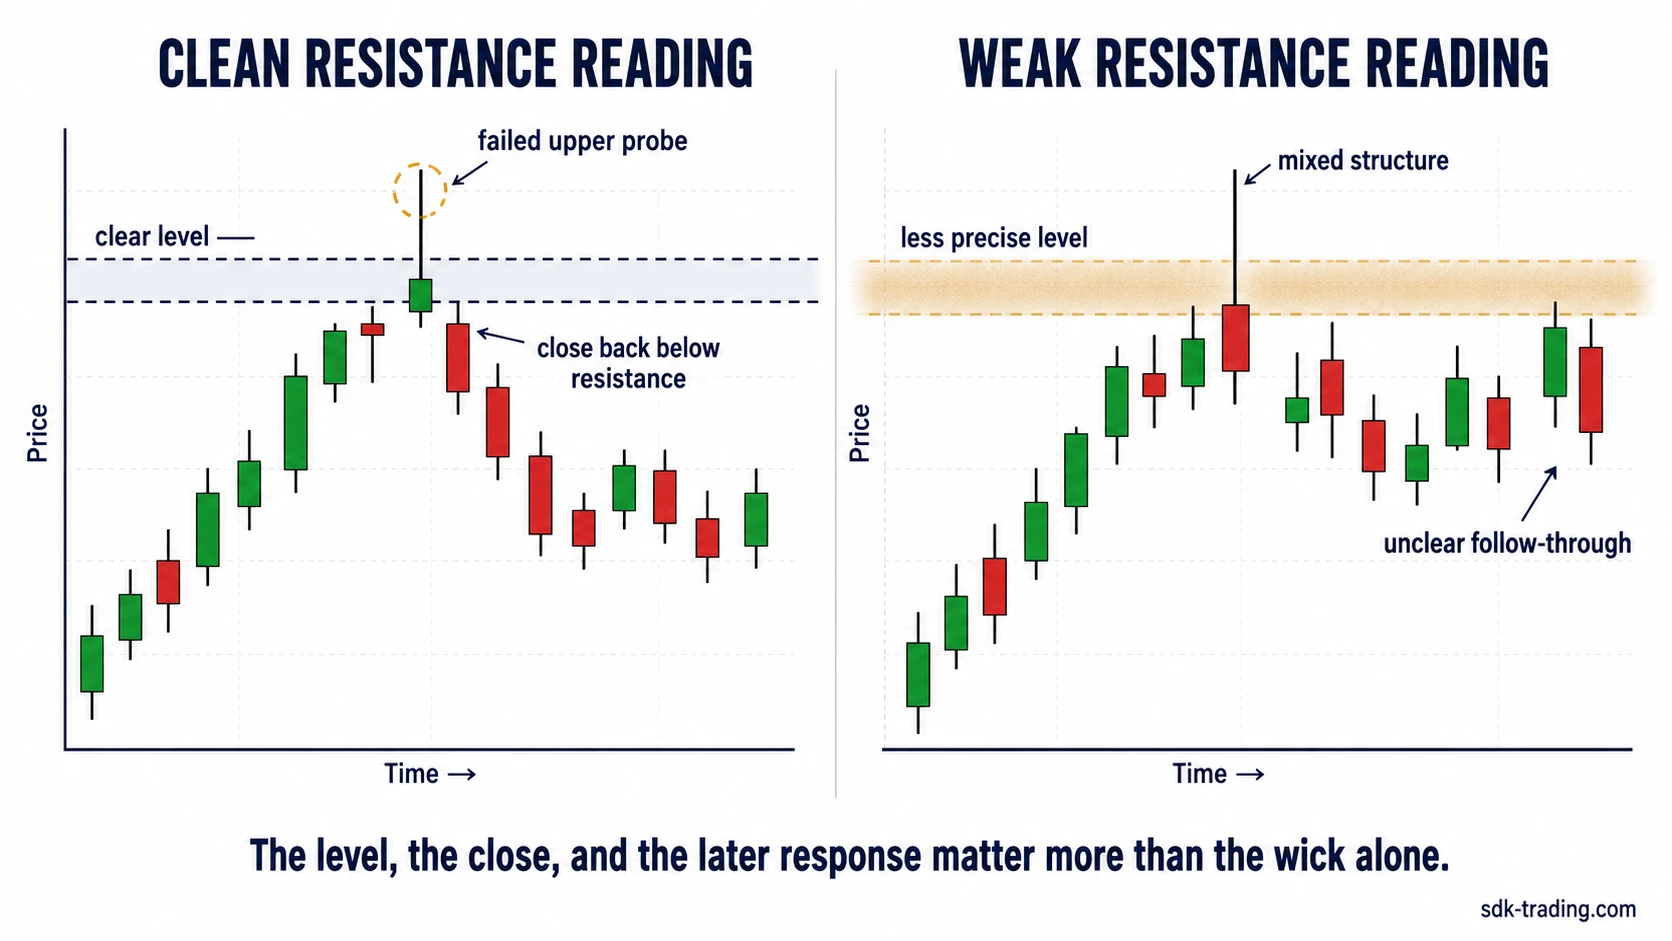
| Resistance condition | Possible reading | Main caution |
|---|---|---|
| Clear horizontal resistance with prior reactions | Buyers tested a known supply area and failed to hold above it. | Later candles still need to show that the area remains rejected. |
| Diffuse or poorly defined resistance | The wick may reflect temporary volatility rather than clean rejection. | The level may be too vague to support a strong interpretation. |
| Repeated upper wicks near the same area | The area is being tested repeatedly. | Repeated tests can weaken resistance if price starts holding higher. |
| Close back below the tested area | The upside probe failed to hold. | The reading weakens if buyers quickly reclaim the candle high. |
Failure Modes Around the Level
The most common mistake is treating the first upper wick at resistance as if rejection has already been proven. A wick only shows that price traded higher and came back. It does not prove that the market has finished testing the area.
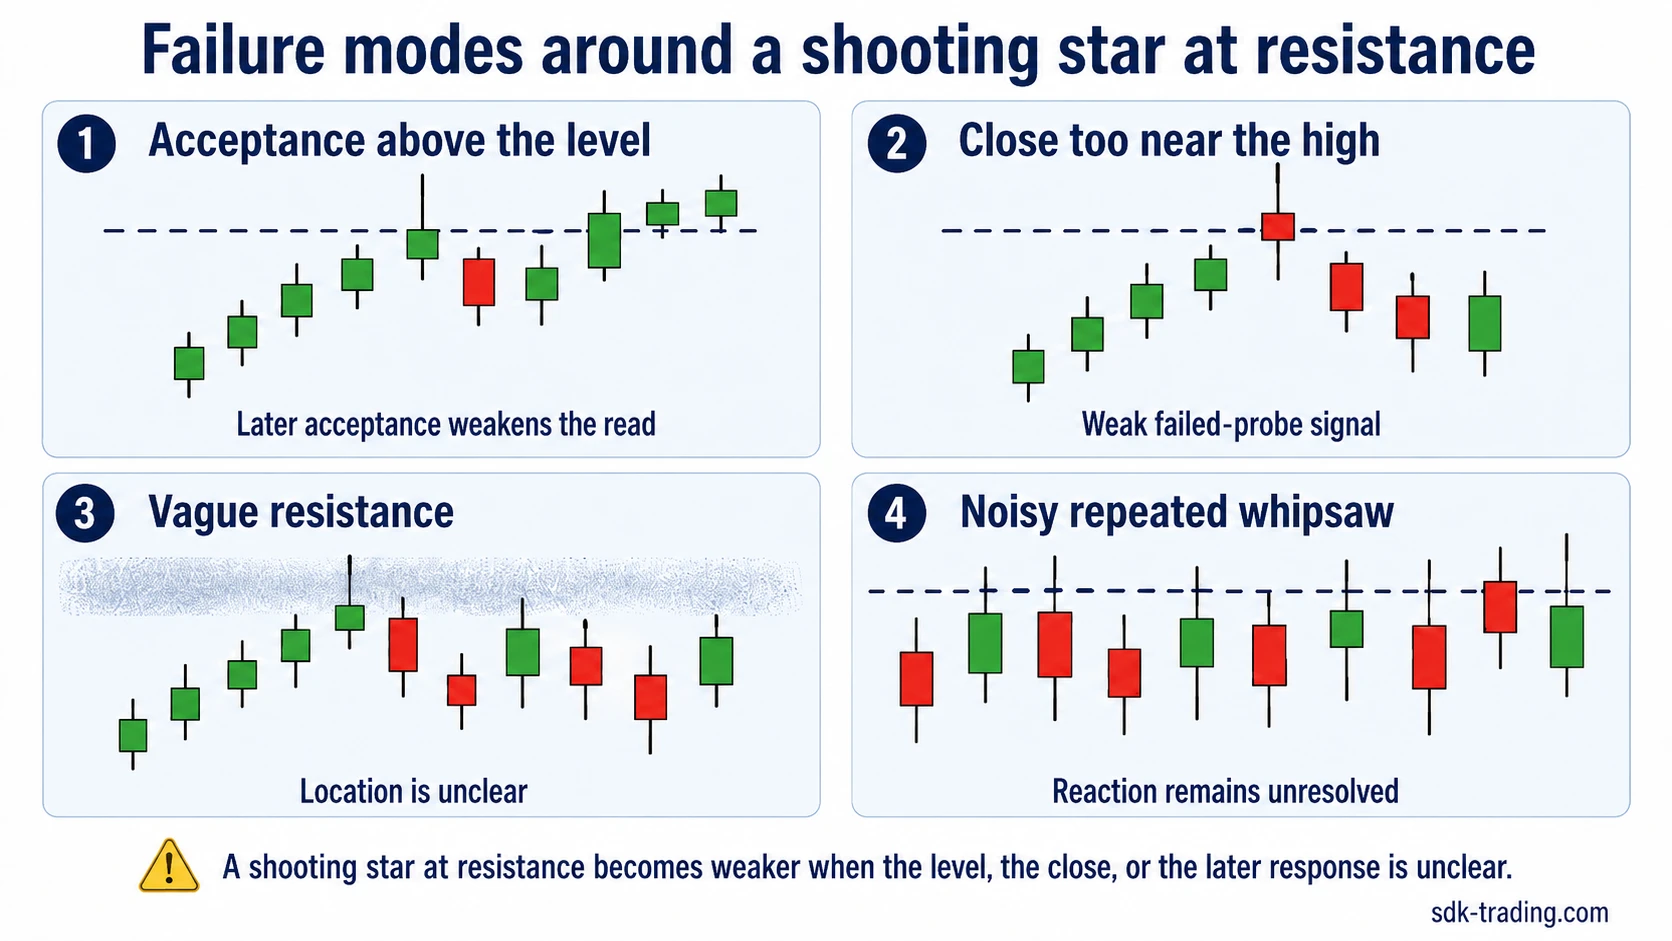
| Trigger condition | Common misread | Safer interpretation | Invalidation clue |
|---|---|---|---|
| Long upper wick forms at visible resistance | The candle is treated as completed rejection. | The candle marks a failed probe only if price cannot accept above the area. | Later candles close and hold above the Shooting Star high. |
| Price briefly trades above resistance before closing below it | The break is called a failed breakout too early. | The move remains a test until later candles show rejection or acceptance. | Buyers reclaim the level and build closes above resistance. |
| Resistance is broad, messy, or untested | The wick is treated as precise level rejection. | The candle may only show hesitation inside a loose supply area. | Price keeps rotating around the level without moving away from it. |
| Small body with uncertain close location | The candle is forced into a strong rejection reading. | The structure may be closer to indecision if both sides of the range were active. | Price stays balanced around the candle range instead of rejecting the top. |
Why Acceptance Above Resistance Changes the Reading
A breakout attempt needs acceptance, not just a brief print above resistance. If price trades above the level but closes back below it, the candle records failed acceptance. If later candles close above the same area and hold there, the earlier rejection loses force.
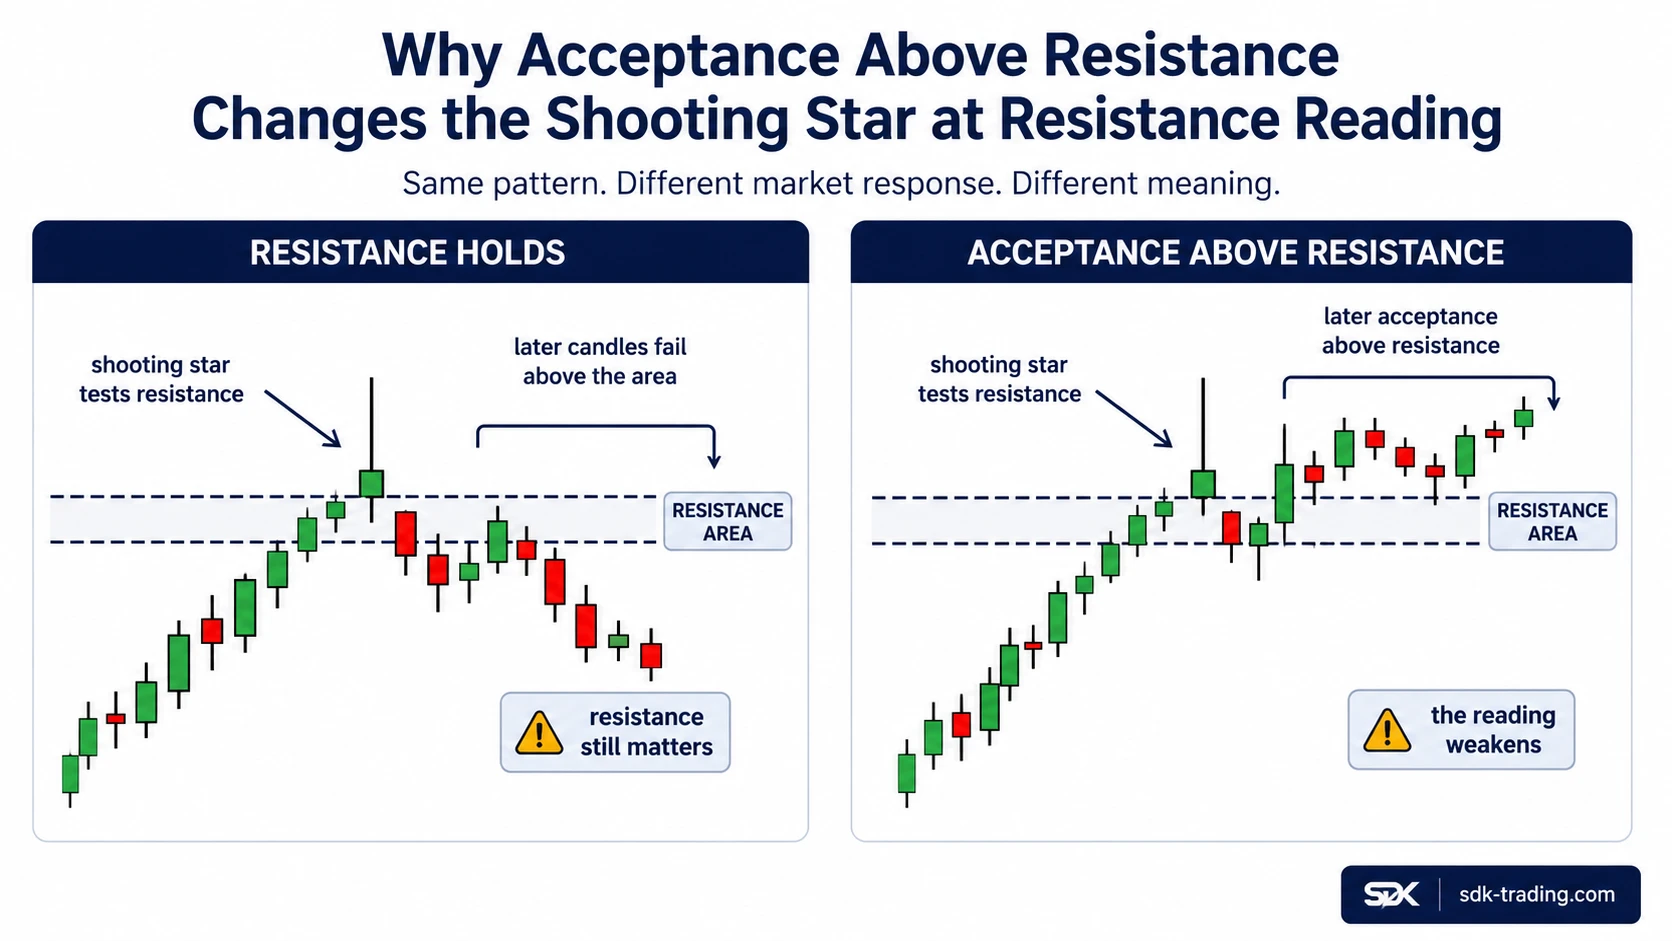
The candle high becomes a useful reference because it marks the area buyers failed to hold. Acceptance above that high means the market has reclaimed the rejected zone. The earlier rejection reading becomes less defensible because price is no longer treating the upper wick as a rejected extreme.
Limitation: a Shooting Star at resistance does not prove that resistance will hold. It only identifies a test where buyers failed to keep price above the area at that moment.
Example: Failed Probe Above Resistance
Price advances into a prior resistance area after the upward push has already started to slow. The next candle briefly trades above the old high, but the move does not hold. The candle closes back below the resistance area and leaves a long upper wick.
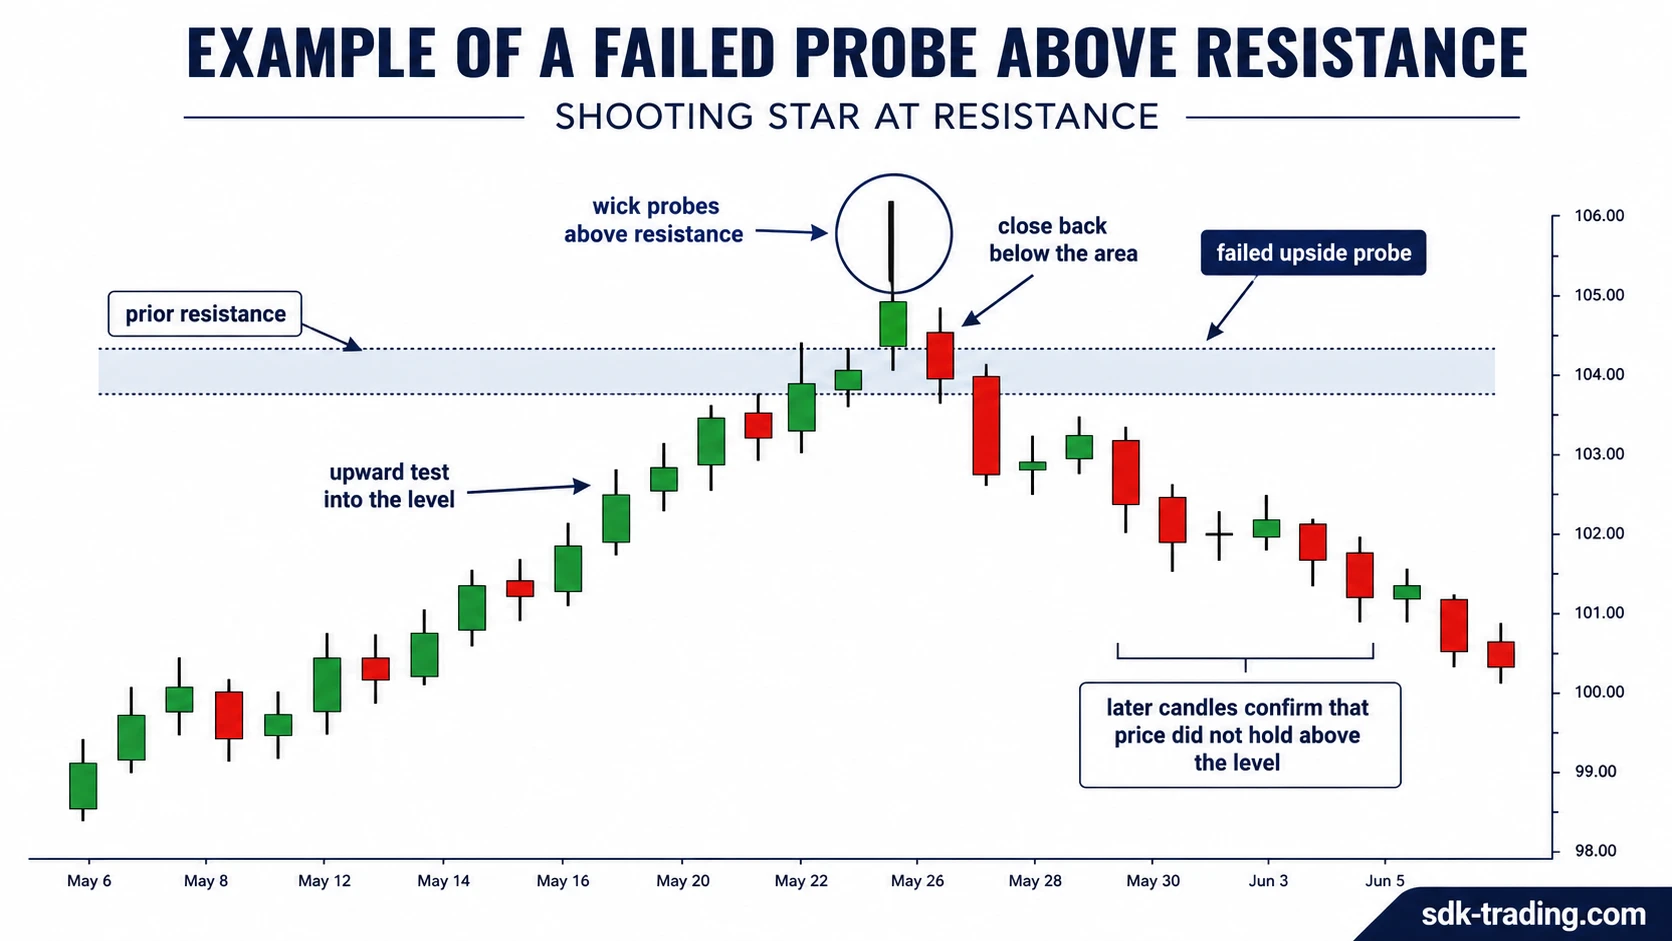
The common misread is to call the wick a finished rejection. The incomplete part is that the market has only shown a failed probe so far. The rejection reading becomes stronger if the next recovery attempt stalls below the tested area and price keeps moving away from resistance.
The reaction loses quality if buyers reclaim the candle high and begin closing above resistance. If the body is very small and price stays balanced around the candle range, comparison with a doji candlestick may be more useful than forcing a strong rejection reading.
When the Reading Is Useful, Weak, or Unresolved
The resistance reading is most useful when the candle appears at a visible level, not in open space. A prior high, repeated rejection zone, or failed breakout attempt gives the upper wick a clearer job: it records an attempted move above an area where buyers needed to show control.
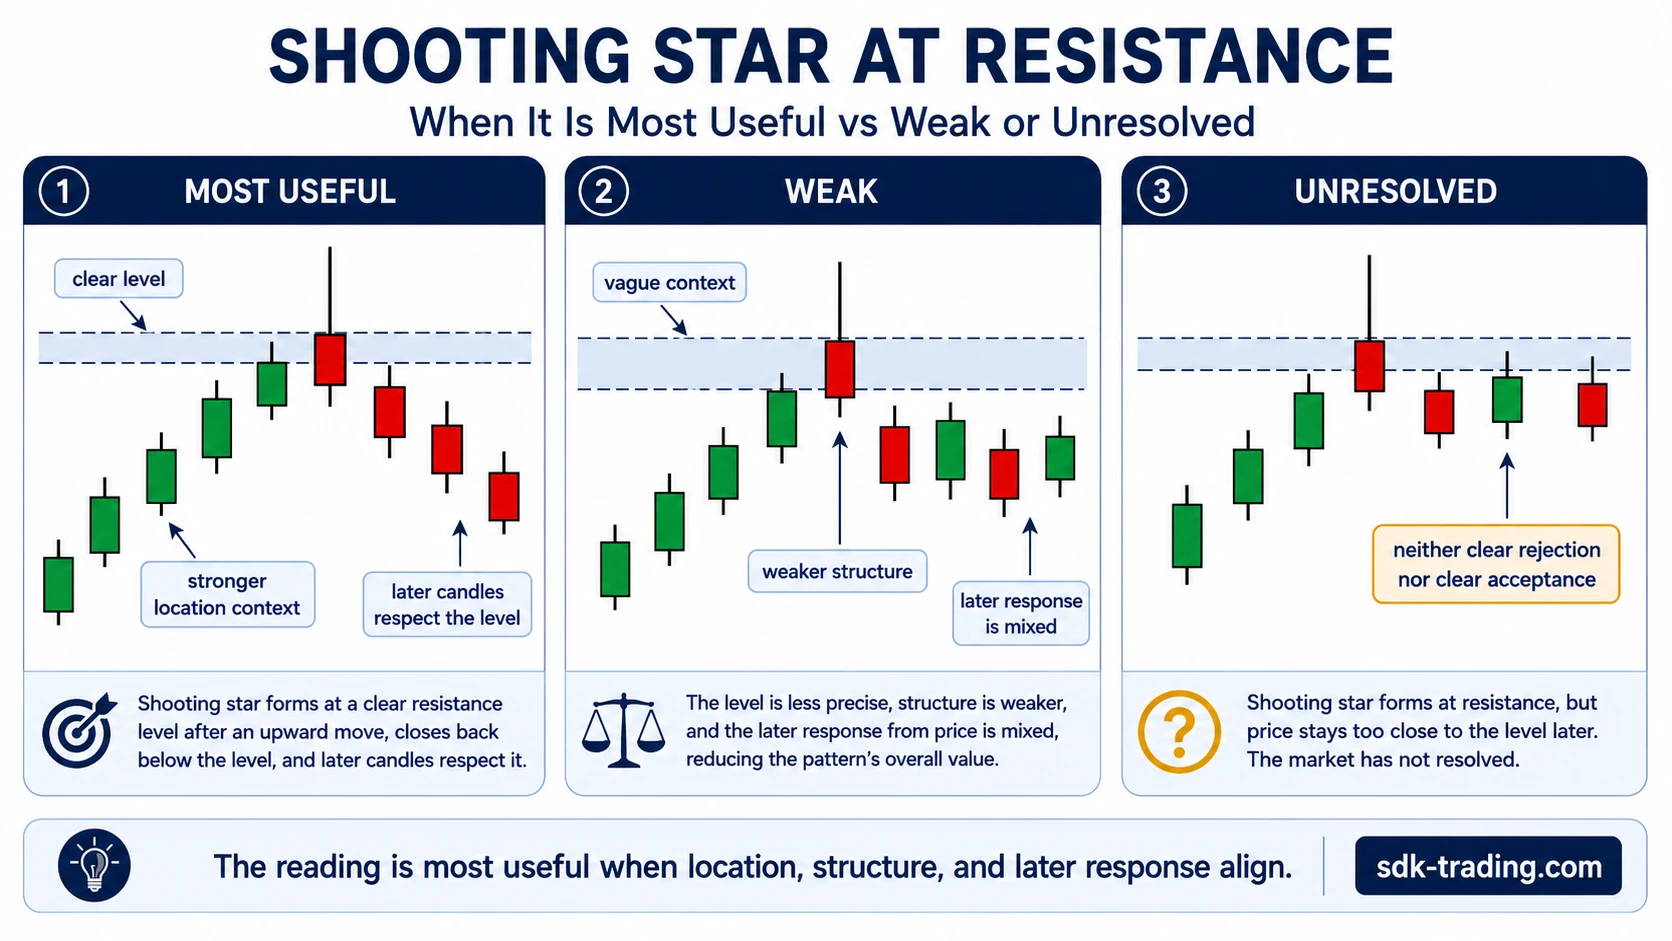
| Reading state | What supports it | What to avoid assuming |
|---|---|---|
| Most useful | Clear resistance, prior upward pressure, clean Shooting Star structure, close back below resistance, and later candles respecting the level. | Do not treat it as a guaranteed reversal. |
| Weak | The level is vague, structure is mixed, or the close does not show a clean failed probe. | Do not force a strong rejection reading from wick length alone. |
| Unresolved | Price stays near the level without clearly rejecting it or accepting above it. | Do not call the level rejected before later behavior clarifies the response. |
Common mistake: treating every upper wick near resistance the same way removes the most important variable: whether the market actually failed to accept higher prices.
How It Differs From General Shooting Star Confirmation
General Shooting Star confirmation focuses on what happens after the candle forms. Resistance-specific interpretation starts one step earlier: it asks whether the candle tested a meaningful resistance area before the later reaction is judged.
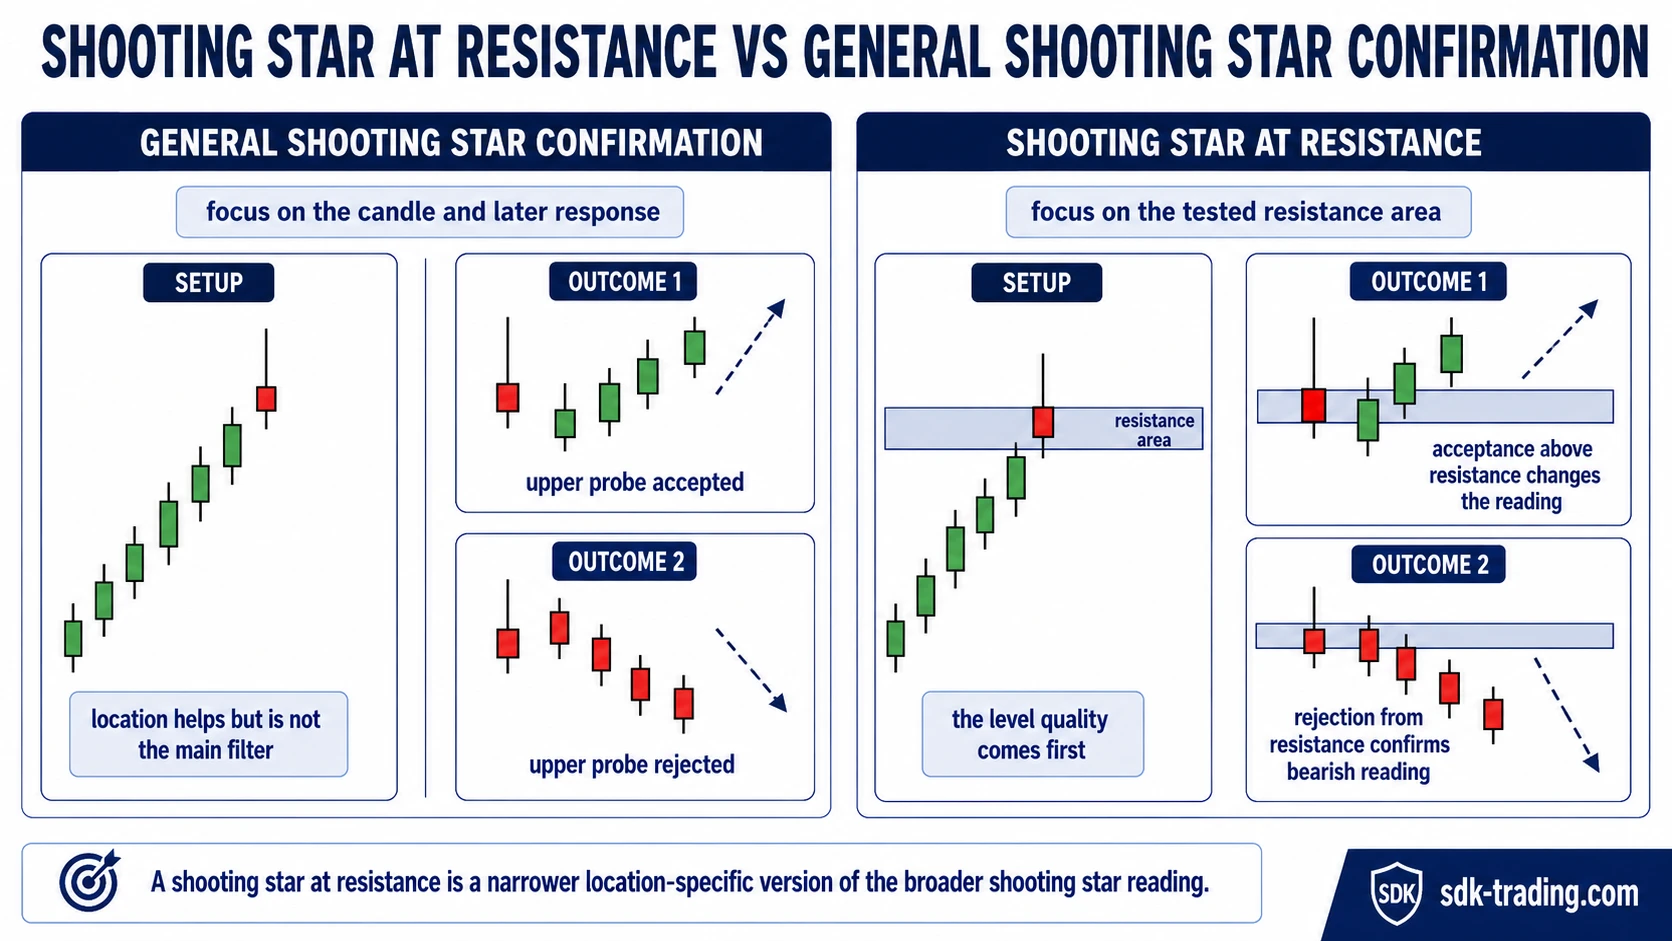
A later bearish candle may support the reaction, but it does not fix a weak level. If the resistance area was unclear, the Shooting Star can still be a poor read even when the next candle moves lower. If the level was clear and buyers fail to reclaim it, the rejection reading becomes more coherent.
The broader Shooting Star confirmation question focuses on follow-through. The resistance version adds a location filter: what exactly did the wick test, and did price later accept or reject that same area?
FAQ
Does a Shooting Star at resistance confirm rejection?
No. It marks a possible failed upside test. Rejection becomes clearer only when price fails to accept above the resistance area and later candles do not reclaim the candle high.
What makes the resistance reading more meaningful?
The reading is more meaningful when the level is visible, the upper wick tests that level, the close returns below it, and later candles fail to hold above the tested area.
When does the bearish interpretation weaken?
It weakens when price reclaims the resistance area, closes above the Shooting Star high, and starts holding above the level that previously rejected buyers.
Can the candle form slightly above resistance?
Yes. A brief move above resistance can still fit the reading if price fails to hold there and closes back below the tested area. Holding above the area changes the interpretation.
Why can a vague resistance area create a weak reading?
A vague resistance area makes it harder to know what the upper wick actually tested. The candle may show hesitation or volatility rather than a clean rejection of a known level.