A double top chart pattern is a bearish reversal structure that can form after an advance when price tests a similar resistance area twice, pulls back between the tests, and later weakens around the intervening trough or neckline.
The two highs do not need to match exactly. A stronger classification depends on the prior advance, the quality of the second test, the depth of the trough, and whether price later treats the neckline area as lost support instead of simply touching it.
Definition: A double top is a two-test topping pattern in technical analysis. It forms when an advance reaches resistance, pulls back into a trough, retests a similar high, and then reveals whether sellers can control the area around the trough or neckline.
Double Top Diagnostic Summary
- A double top starts with a prior advance, not with two random highs inside any range.
- The first and second peaks should test a similar resistance area, but exact equality is not required.
- The trough between the peaks creates the neckline area used to judge later weakness or failed weakness.
- The case becomes more defensible when the second test is rejected and price holds below the trough area.
- The structure remains unresolved when price stays range-bound, reclaims the highs, or accepts above resistance.
What Is a Double Top Chart Pattern?
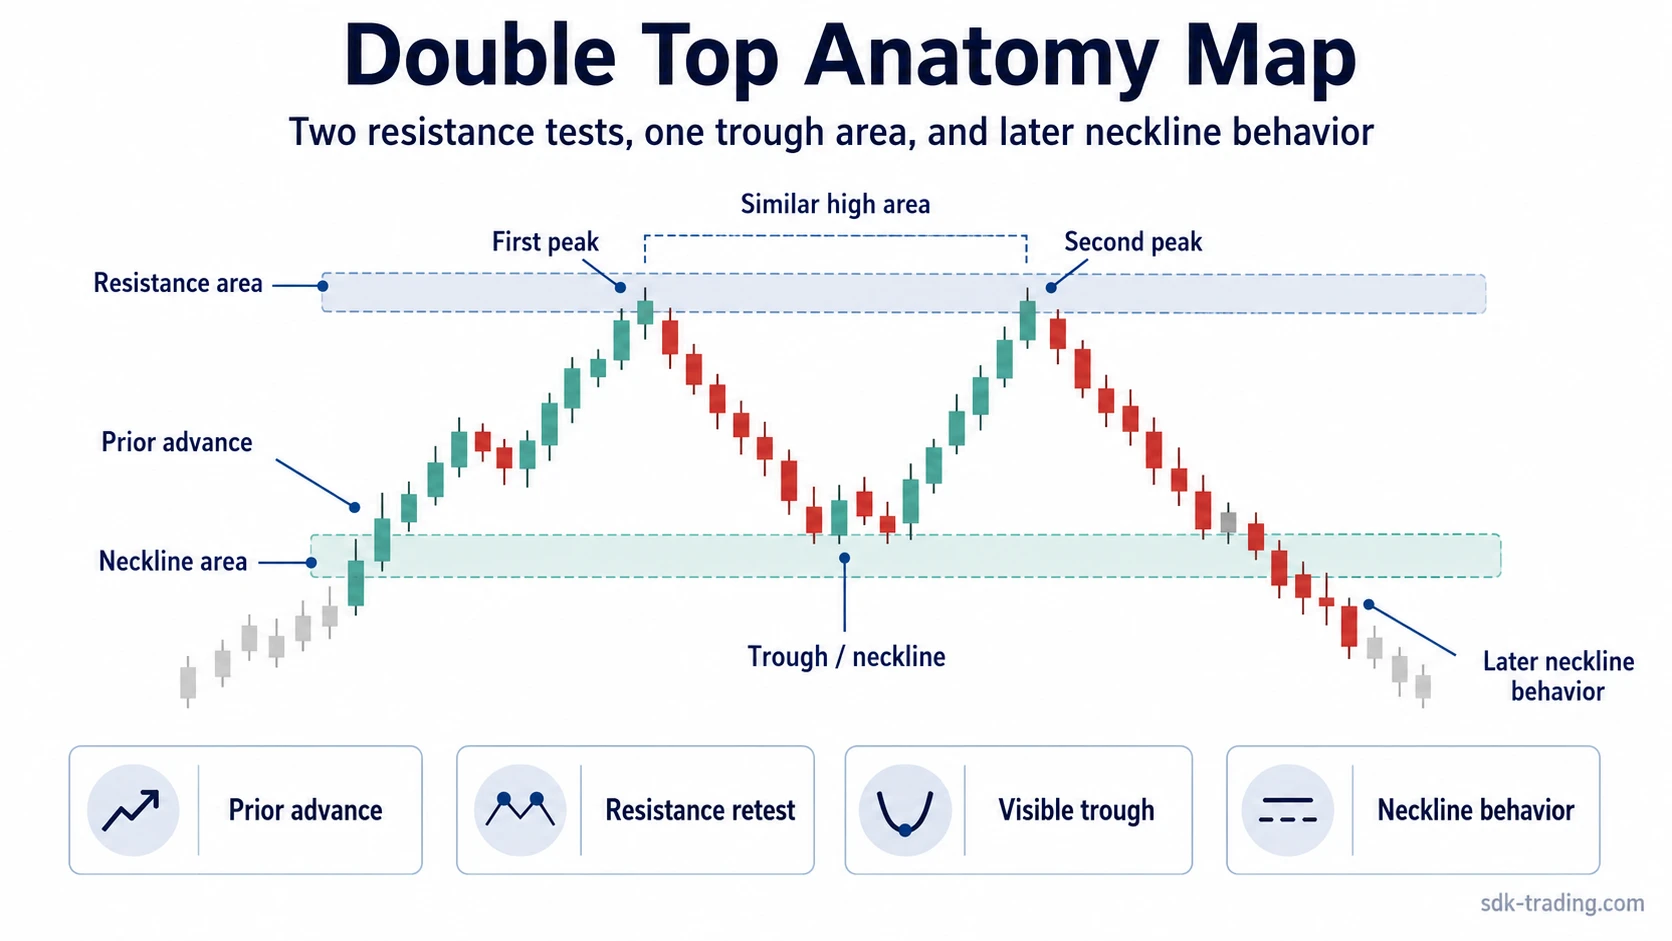
A double top chart pattern is a reversal pattern built around two attempts to advance through the same upper area. The first peak marks the initial resistance test. The pullback creates a trough. The second peak retests the resistance area and shows whether buyers can extend the advance or whether the market is beginning to reject higher prices.
The pattern belongs to reversal chart pattern analysis, but the shape alone is incomplete. Two similar highs can also appear inside a sideways range. A double top interpretation becomes more meaningful only when the middle trough is clear enough to act as a neckline and later price behavior shows that the market is no longer accepting the upper area.
Equal-high tolerance matters. A second high can be slightly below or slightly above the first high and still function as a resistance retest. The important question is whether the market accepts the area above resistance or fails to hold it and shifts attention back toward the trough.
How a Double Top Forms
The structure usually begins with an advance into a resistance area. After the first peak, price pulls back far enough to create a visible trough. A second advance then tests the same upper area. If that second test cannot hold above resistance, the chart starts to show a possible topping attempt rather than a clean continuation.
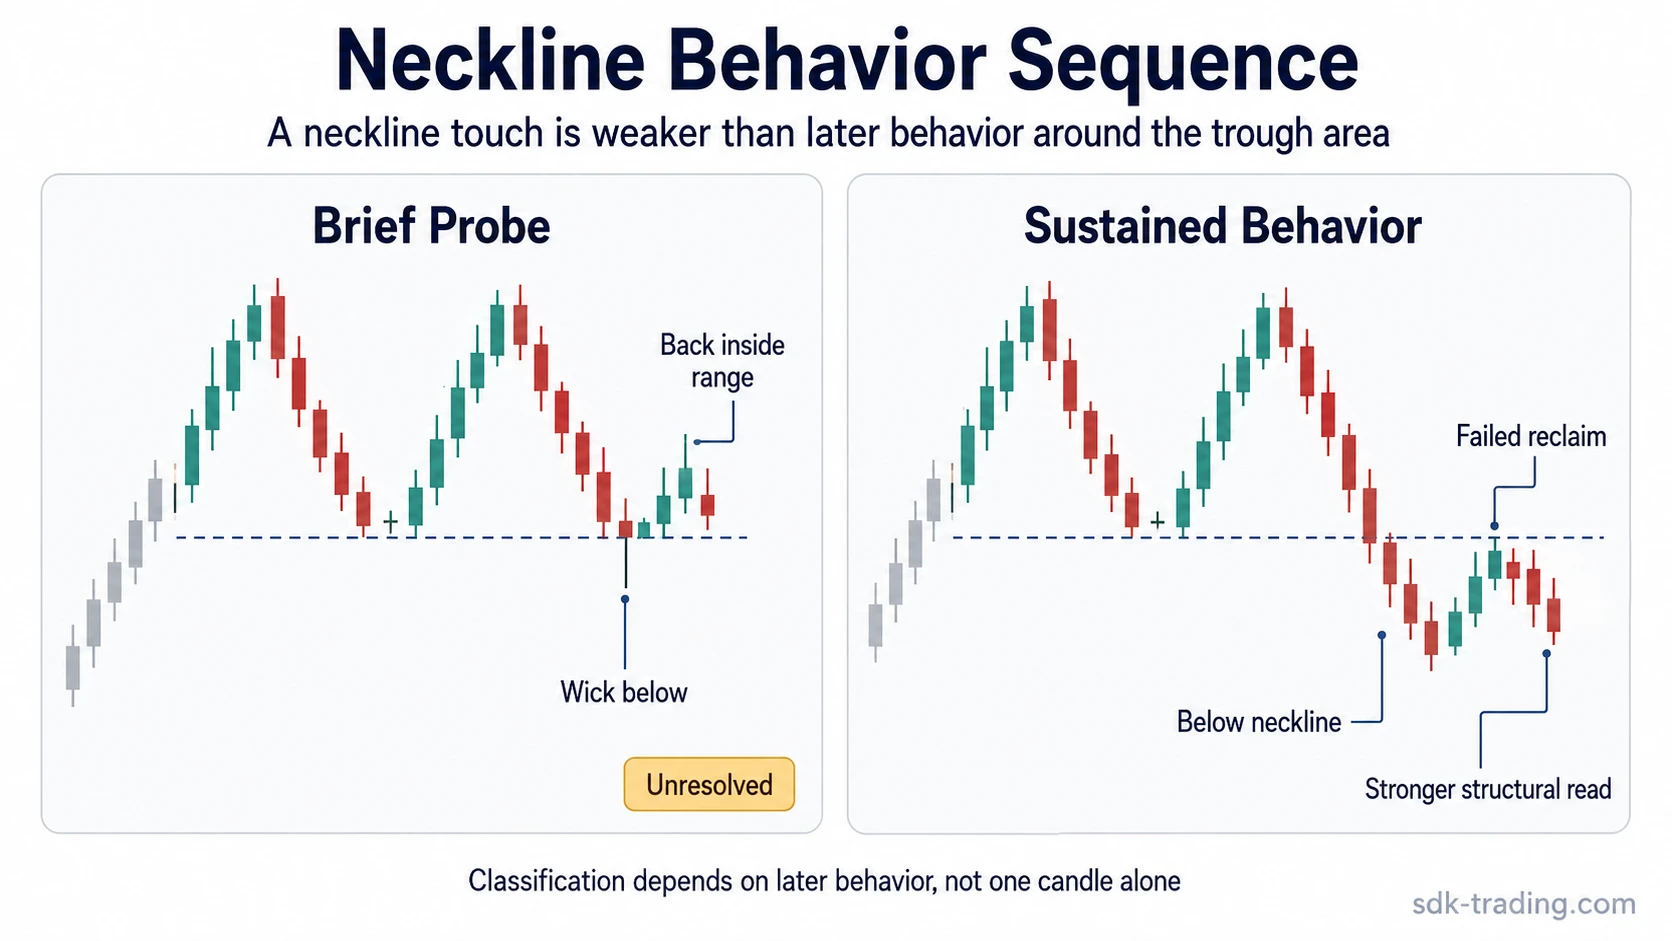
Neckline behavior is the main boundary between an unfinished shape and a stronger double top reading. A wick below the trough can show pressure, but it is weaker evidence than price spending enough time below that area to suggest the prior support zone is no longer being defended cleanly.
Volume can add context, but it should not carry the interpretation by itself. Heavy activity near the second peak may show a contested resistance area, while weak follow-through after a neckline break can leave the structure unresolved. Price result, second-test quality, and later behavior around the trough remain more important than a single volume observation.
Double Top Anatomy
The main parts of a double top can be separated into observable chart features. The pattern is clearer when each part has a distinct job instead of blending into a choppy range.
| Component | What to observe | Why it matters |
|---|---|---|
| Prior advance | Price rises into a meaningful upper area before the first peak. | Without an advance, two highs may only describe range resistance. |
| First peak | The market reaches resistance and pauses or rejects. | It creates the first reference point for the later retest. |
| Trough / neckline | Price pulls back enough to form a visible low between the peaks. | The trough becomes the boundary used to judge later weakness. |
| Second peak | Price retests the prior high area without needing an exact match. | The quality of the second test shows whether buyers can hold the upper area. |
| Neckline behavior | Price moves below the trough area and fails to reclaim it cleanly. | Persistent weakness below the trough supports the topping interpretation. |
| Failed reading conditions | Price reclaims the highs, accepts above resistance, or stays range-bound. | Those conditions weaken or invalidate the double top reading. |
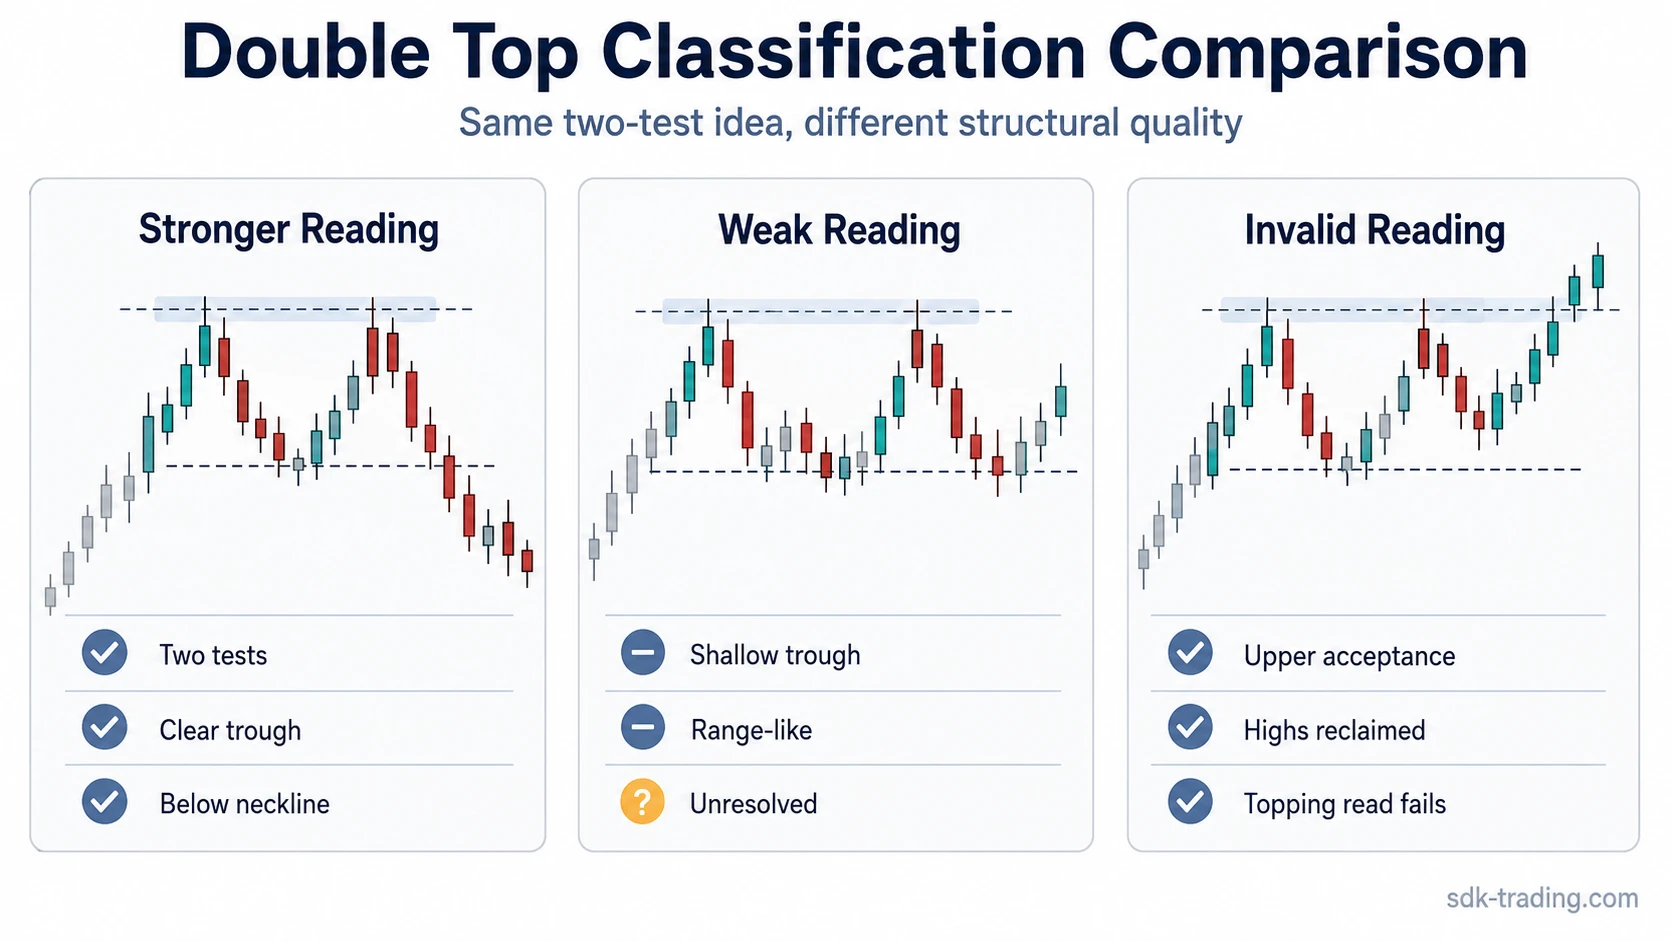
Clean, Weak, and Invalid Double Top Readings
A double top is more useful when the two-peak shape is connected to structure. The same outline can be clean, weak, or invalid depending on the prior advance, the trough quality, the second-test reaction, and later behavior around the neckline.
| Reading | What the structure shows | What strengthens it | What weakens or invalidates it |
|---|---|---|---|
| Clean reading | A clear advance reaches resistance, pulls back into a distinct trough, then retests a similar high. | The second test is rejected and price later holds below the trough or neckline area. | Only minor hesitation near the highs without a real trough keeps the reading incomplete. |
| Weak reading | Two highs appear, but the prior advance is unclear, the trough is shallow, or the structure looks like a range. | The case improves only if later price action rejects the upper area and shows sustained weakness below the trough. | Choppy movement around the neckline, immediate reclaim, or continued range behavior keeps the structure weak. |
| Invalid reading | The market tests resistance twice but then accepts above the peak area or fails to break down from the range. | There is no strong double top reading unless upper acceptance fails and the trough area becomes relevant again. | Accepted breakout above both highs, sustained higher prices, or no meaningful neckline failure invalidates the topping read. |
Common Double Top Misreadings
Two similar highs are not enough. A market can test the same resistance area twice and still remain inside a range if the pullback between the highs is shallow and price never treats the trough as a broken boundary.
A neckline wick is also not the same as sustained weakness. A brief probe below the trough may show pressure, but a stronger reading needs later behavior that fails to reclaim the trough area rather than a single temporary break.
A second high slightly above the first high does not automatically cancel the structure. It can still be a resistance test if the market fails to hold the breakout. The reading deteriorates when price accepts above the high area and the supposed second peak becomes continuation rather than rejection.
Common mistake: Calling every pair of similar highs a double top removes the most important part of the pattern: the shift from upper-area testing to pressure around the trough. The two peaks describe the surface; the structure comes from what happens between and after them.
Double Top Example in Context
Price advances into a prior resistance area, pulls back far enough to create a visible trough, and then returns to test the same upper area. The second test briefly pushes near the first high but cannot stay above it. Later movement trades below the trough area, stalls on the next recovery attempt, and fails to reclaim the former neckline cleanly.
That sequence gives the double top reading more structure because the market has moved from resistance testing to pressure around the neckline. A weaker version would show two similar highs but no accepted move below the trough. In that case, the highs may describe resistance, while the broader structure remains a range.
Limitation: A double top can fail if price breaks the neckline briefly and then reclaims the range. Failed weakness below the trough keeps the reading unresolved and can shift the chart back toward range continuation.
Double Top vs Related Chart Patterns
A double top is easiest to separate from nearby patterns by counting the tests and checking the shape of the topping process.
| Related pattern | Main difference | Diagnostic boundary |
|---|---|---|
| double bottom | It is the opposite two-test structure, built around two lows after a decline. | Double top tests resistance from below; double bottom tests support from above. |
| rounding top | It develops as a gradual topping arc rather than two distinct resistance tests. | Double top depends on two visible peaks and a trough; rounding top depends on a slower loss of upside progress. |
| triple top | It has three resistance tests instead of two. | Triple top can show stronger range behavior, while double top focuses on the second test and neckline reaction. |
| Head and shoulders | It uses three peaks, with the middle peak usually higher than the two shoulders. | Double top does not require a higher middle peak; it depends on two comparable resistance tests. |
Limitations of the Double Top Pattern
The main limitation is false structure. A market can print two nearby highs, break the trough briefly, and still return to the range. The double top reading is therefore less about the label and more about whether the market rejects the second test and keeps pressure below the trough area.
Trend strength can also change the interpretation. In a strong advance, a second resistance test can become a pause before continuation. If price accepts above both highs, the topping interpretation loses force and the structure should be treated as failed or unresolved.
Reliability also changes with market context. A double top near a major resistance area may carry more structural weight than a small two-peak formation inside random noise. Even then, the pattern should be read as conditional evidence, not as certainty about what price must do next.
FAQ
Is a double top bullish or bearish?
A double top is usually read as a bearish reversal pattern because it forms after an advance and tests resistance twice. The bearish reading is stronger only when price later shows sustained weakness around the trough or neckline area.
Do the two highs in a double top need to be exactly equal?
No. The two highs only need to test a similar resistance area. A second high can be slightly below or slightly above the first high if later behavior shows whether the market rejected or accepted that area.
What confirms a double top chart pattern?
The reading strengthens when price rejects the second resistance test and later holds below the intervening trough or neckline area. A brief wick below the trough is weaker evidence than sustained behavior below it.
Can a double top fail?
Yes. A double top can fail if price reclaims the neckline, remains in a range, or accepts above the two high area. Those conditions weaken the topping interpretation and can invalidate the pattern.
What is the difference between a double top and a triple top?
A double top has two resistance tests separated by a trough. A triple top has three resistance tests and often creates more range ambiguity before the market resolves the structure.