A piercing pattern candlestick is a bullish two-candle structure that appears after downside pressure: a bearish candle is followed by a bullish candle that opens lower and closes above the midpoint of the prior bearish real body without fully engulfing it.
Definition: The piercing pattern is defined by the second candle’s close: it must recover above the midpoint of the prior bearish real body while remaining below the prior candle’s open.
Key Points
- The piercing pattern is defined by a bullish second candle closing above the prior bearish body’s midpoint.
- The second candle should open in a lower area before recovering into the prior real body.
- If the second candle fully takes over the prior real body, the structure moves closer to bullish engulfing.
- Wicks can add context, but the real-body relationship defines the pattern.
- Later loss of the recovered body area weakens the reading.
What Is a Piercing Pattern Candlestick?
A piercing pattern candlestick is classified as a bullish two-candle candlestick formation because it appears after downside pressure and shows a partial recovery into the previous bearish candle’s real body. The important word is partial: the second candle does not need to cover the whole prior body, but it must recover more than half of it.
The midpoint rule is the boundary that separates a valid piercing pattern from a weaker bullish reaction. A bullish close below the prior body’s midpoint may still show buying interest, but it does not meet the classic piercing pattern test.
The pattern is not a trading instruction by itself. It is a structural clue that selling pressure was challenged during the second candle.
The Bullish Midpoint Close Rule
The piercing pattern is defined by where the second candle closes inside the first candle’s real body. The bullish close must recover more than half of the prior bearish body; wick movement alone is not enough.
| Component | Required condition | Why it matters |
|---|---|---|
| Prior candle | Bearish real body | Creates the body that the second candle must recover into. |
| Second candle | Bullish real body | Shows that buyers recovered part of the prior bearish body. |
| Opening condition | Second candle opens below the prior close or lower area | Preserves the downside-pressure context before the recovery. |
| Midpoint rule | Second candle closes above the midpoint of the prior bearish real body | Confirms that the recovery penetrated more than half of the prior body. |
| Non-engulfing boundary | Second candle closes below the prior candle’s open | Keeps the structure separate from bullish engulfing. |
| Wick behavior | Useful as context, not the core definition | Wicks can show rejection or volatility, but they do not replace the body test. |

In continuous markets, the opening gap may be less clean than in session-based markets. The safer diagnostic focus is whether the second candle begins from a lower-pressure area and then closes above the prior bearish body’s midpoint without fully taking over that body.
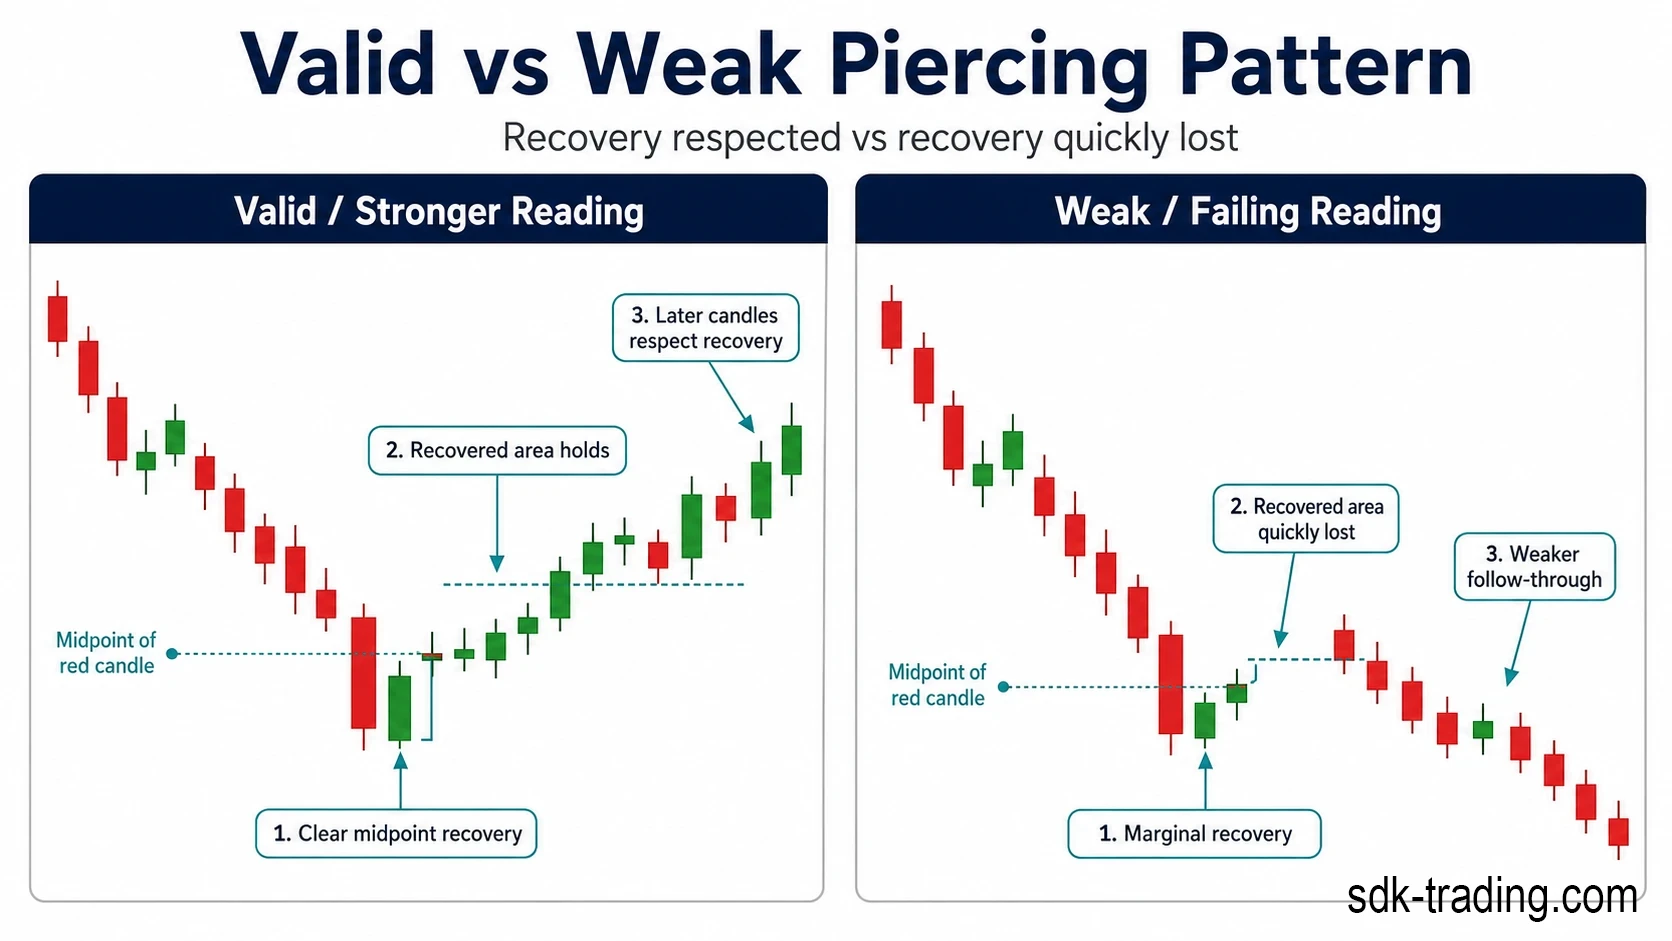
What Makes the Pattern Valid or Weak?
The candle pair defines the pattern, but later candles decide whether the recovered body area is accepted or quickly rejected.
| Diagnostic question | Stronger reading | Weaker or invalid reading |
|---|---|---|
| What is it? | A two-candle bullish recovery into a prior bearish real body, with the second candle closing above the prior body midpoint. | A small bullish bounce that does not recover enough of the prior bearish body. |
| What is it not? | It is not a full real-body takeover. The second candle still closes below the prior candle’s open. | If the second candle fully covers the prior real body, the structure moves closer to bullish engulfing. |
| What strengthens it? | A close clearly above the midpoint, followed by later candles holding the recovered body area. | A marginal midpoint close that is immediately lost on the next candles. |
| What weakens it? | The pattern remains more defensible while price stays inside or above the recovered body area. | The reading weakens when price quickly returns below the midpoint or rejects the second candle’s body. |
| What invalidates the reading? | The reading remains more defensible while the recovered body area is not quickly erased. | The reading is no longer defensible if later candles accept back below the recovered area and the midpoint recovery fails. |
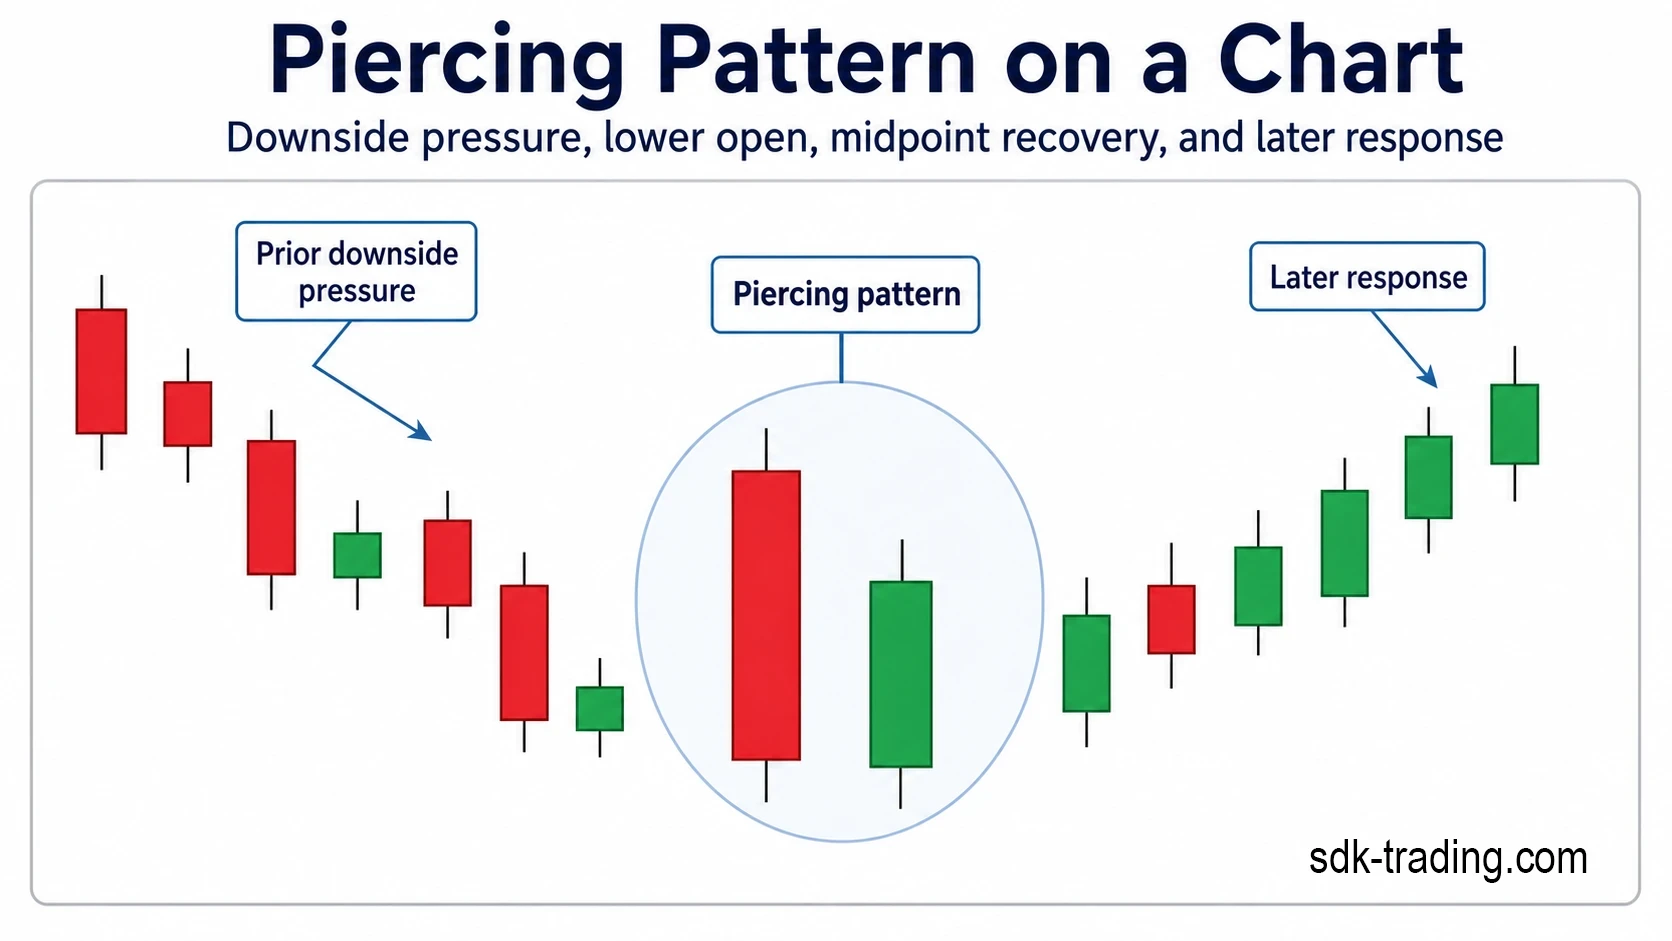
Example: Piercing Pattern in a Downward Chart Sequence
A common chart sequence starts with several candles pressing lower, followed by a bearish candle that extends the downside move. The next candle opens in a lower area, then recovers into the prior bearish real body before the close.
The example becomes a piercing pattern only if that second candle closes above the prior body’s midpoint while staying below the prior open. If the next candles quickly fall back through the recovered area, the structure remains visually valid but the reading weakens.
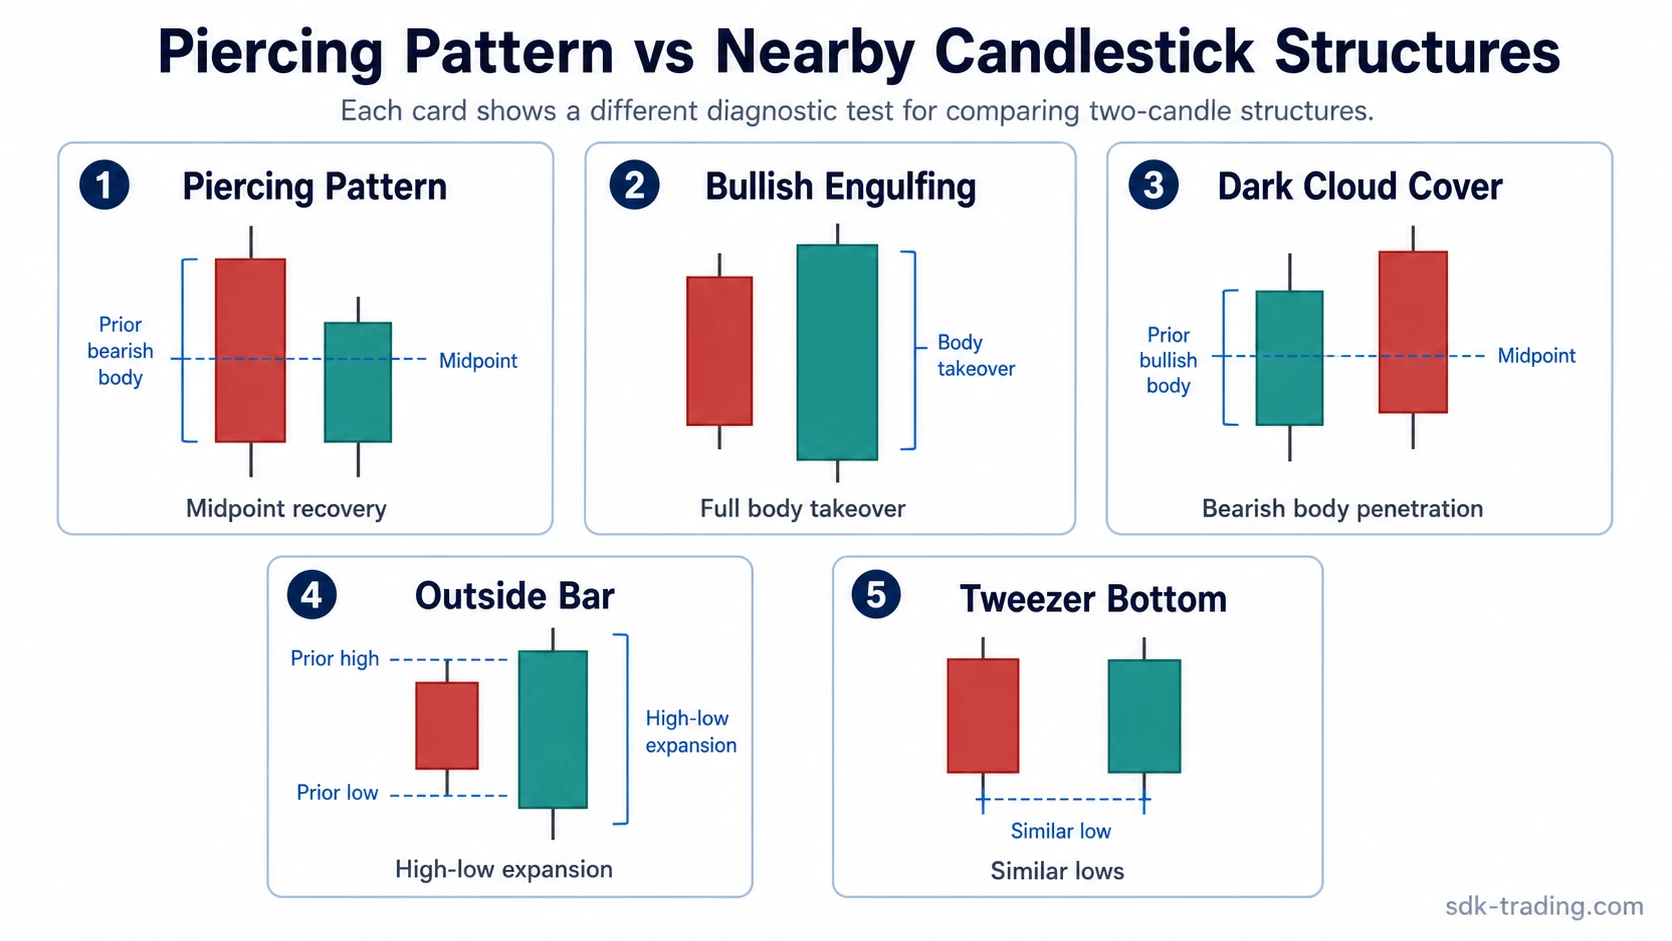
Piercing Pattern vs Nearby Candlestick Patterns
The piercing pattern is often confused with nearby double-candlestick structures. The cleanest distinction is the test being applied: midpoint penetration, full body takeover, full range expansion, or similar lows.
| Pattern | Main diagnostic test | How it differs from piercing pattern |
|---|---|---|
| Piercing pattern | Second candle closes above the midpoint of the prior bearish real body. | Partial body recovery is enough, but full body takeover is not required. |
| Bullish engulfing | Second candle’s real body fully covers the prior real body. | The recovery is stronger in body-coverage terms and no longer stops at the piercing boundary. |
| Dark cloud cover | Bearish counterpart where the second candle penetrates into a prior bullish body. | The direction is reversed: it is a bearish body-penetration structure, not a bullish one. |
| Outside bar | Second candle expands beyond both the prior high and the prior low. | The test is full high-low range expansion, not real-body midpoint recovery. |
| Tweezer bottom | Two candles form a similar-low structure near the same lower area. | The focus is repeated lower-area rejection, not whether the second body closes above the prior body midpoint. |
A piercing pattern can appear near a similar-low area, but a tweezer bottom is a separate diagnostic test. The pattern names should stay separate unless both criteria are actually visible.
Common Mistakes When Reading a Piercing Pattern
| Mistake | Why it is wrong | Cleaner diagnostic check |
|---|---|---|
| Calling a close below the midpoint valid | Any bullish second candle after a bearish candle is not enough. If the second candle closes below the prior bearish body’s midpoint, the required body penetration is missing. | Check the prior real-body midpoint before labeling the candle pair as a piercing pattern. |
| Overweighting the wick | A long lower wick can show rejection of lower prices, but wick behavior does not define the pattern. | Use wicks as context only. The defining feature is the second candle’s close inside the prior real body and above its midpoint. |
| Treating the candle pair as a complete decision | The two-candle structure can show that sellers lost control during the second candle, but later price behavior still matters. | Check whether the next candles hold or lose the recovered body area. |
| Confusing partial recovery with full takeover | When the second candle closes above the prior open and fully covers the prior real body, the structure moves away from piercing pattern logic. | Separate midpoint recovery from full real-body takeover before comparing the pattern with bullish engulfing. |
FAQ
Is piercing pattern the same as piercing line?
Yes. In candlestick trading terminology, piercing pattern and piercing line refer to the same two-candle bullish structure: a bearish candle followed by a bullish candle that closes above the midpoint of the prior bearish real body.
What makes a piercing pattern valid?
A valid piercing pattern needs a prior bearish real body, a bullish second candle, a recovery into the prior body, and a close above the midpoint of that prior bearish body without fully engulfing it.
Does the second candle need to engulf the first candle?
No. If the second candle fully engulfs the prior real body, the structure moves closer to bullish engulfing. A piercing pattern requires partial recovery above the midpoint, not full body takeover.
Does wick length define a piercing pattern?
No. Wick length can add context, but the real-body relationship defines the pattern. The key test is whether the bullish second candle closes above the midpoint of the prior bearish real body.
What weakens a piercing pattern reading?
The reading weakens if the market quickly loses the recovered body area, closes back below the midpoint, or fails to show later acceptance after the bullish recovery candle.