A bearish breaker block is a price-action structure where a former bullish order block fails, price accepts below it, and the same area later behaves like resistance from the underside.
The bearish label depends on the relationship between the old bullish zone and later price behavior. A single break, wick, or brief probe below the zone does not complete the reading. The classification becomes more defensible only when price remains below the failed zone and later struggles to reclaim it.
Definition: A bearish breaker block is the bearish version of a breaker block: a prior bullish reference zone that fails, is accepted below, and then acts as an overhead reference area on a later return.
Key Points
- A bearish breaker block usually begins with a failed bullish order block.
- The bearish reading depends on acceptance below the former bullish zone.
- A later return from the underside helps test whether the failed zone is still relevant.
- A wick through the zone is not enough to classify the structure cleanly.
- The reading weakens or becomes invalid if price reclaims and accepts above the former zone.
What is a bearish breaker block?
A bearish breaker block forms when a bullish reference zone loses its supportive role and becomes an overhead area that price cannot easily reclaim. The key idea is role failure: the area that previously supported bullish interpretation no longer holds that role after price breaks below it and later reacts from beneath it.
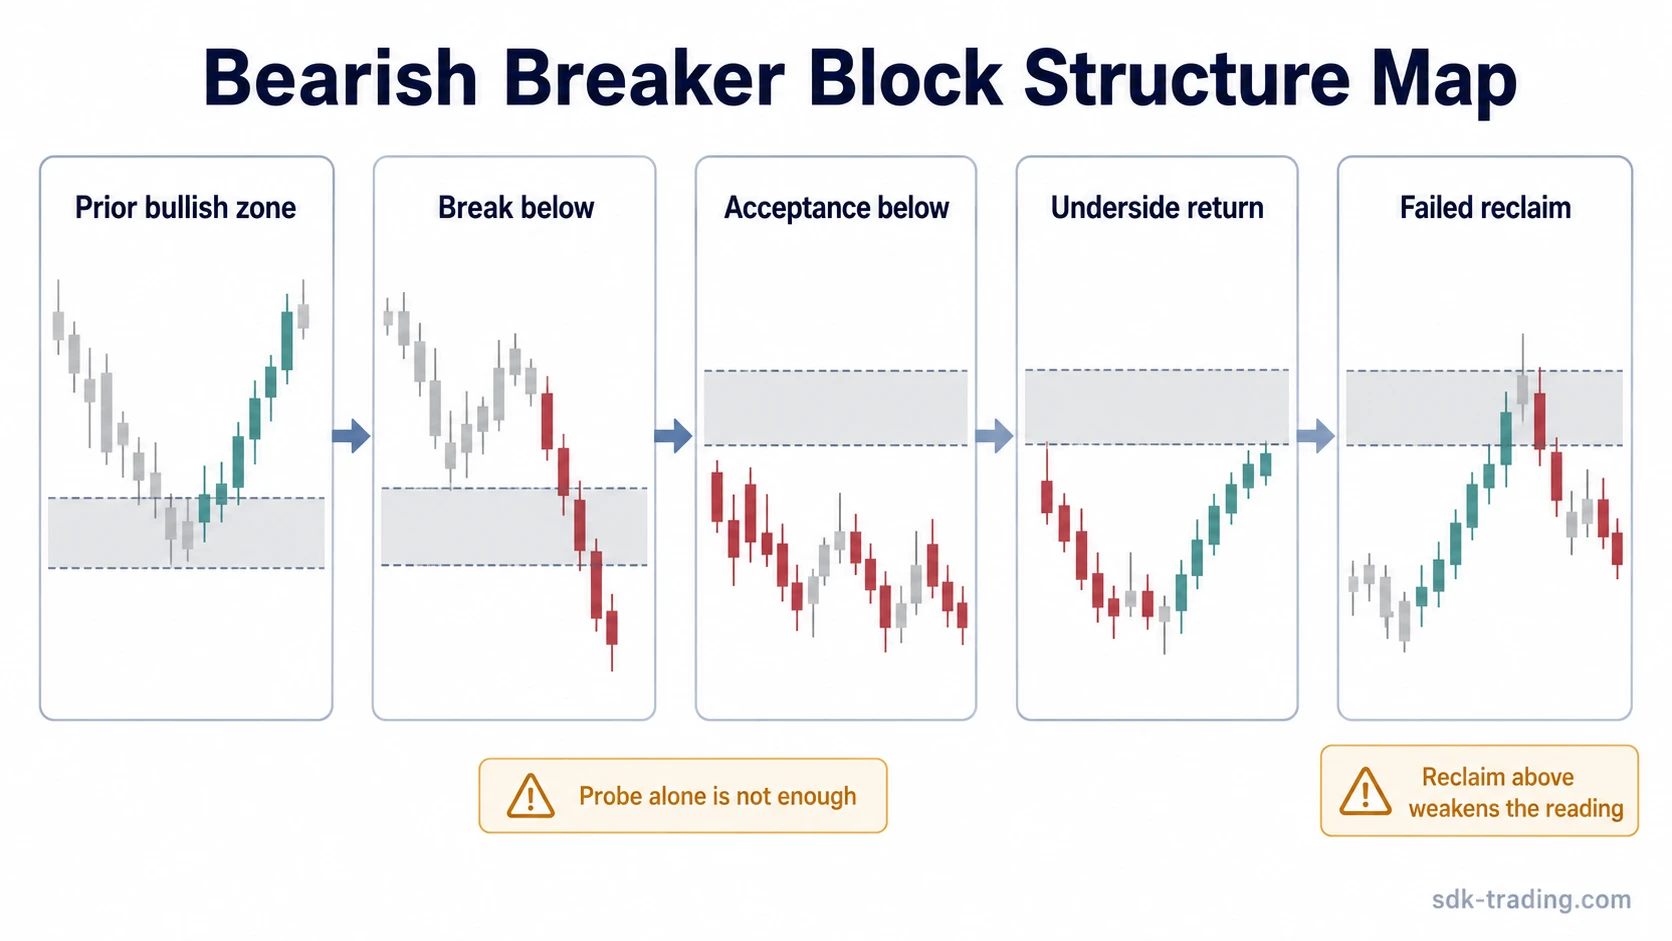
The structure belongs to price-action and ICT/SMC-style chart reading, but the useful part is observable behavior rather than a claim about hidden intent. The visible sequence matters more than the label itself: prior bullish zone, downside failure, acceptance below, underside return, and failed reclaim.
The bearish classification is narrower than a general resistance retest. A resistance retest can happen at many areas. A bearish breaker block needs the failed bullish-zone lineage before the bearish label is useful.
How a bearish breaker block forms
The formation starts with a bullish order block or bullish reference area that price initially treats as supportive. The structure changes when price breaks below that area with enough follow-through to show that the old bullish reading has failed.
After the break, the next question is acceptance. If price only dips below the zone and quickly returns above it, the bearish breaker reading remains weak. If price spends time below the former zone and later returns to its underside, the old area can become a test point for whether price can reclaim the former bullish zone.
| Stage | What to observe | Why it matters |
|---|---|---|
| Prior bullish zone | A visible area where bullish interpretation previously made sense. | The bearish breaker label needs a failed bullish reference, not just any broken level. |
| Downside break | Price moves below the zone with a clear change in behavior. | The old supportive role is challenged. |
| Acceptance below | Price remains below the failed zone instead of immediately reclaiming it. | The break becomes more than a brief probe. |
| Underside return | Price comes back toward the former zone from below. | The market tests whether the old area now acts as overhead resistance. |
| Failed reclaim | Price cannot sustain acceptance back above the former zone. | The bearish classification remains more defensible. |
What a bearish breaker block is not
A bearish breaker block is not every broken support area. A normal support break may lack the failed bullish order-block lineage that gives the breaker structure its specific meaning.
It is also not a wick below a zone. A wick may show a temporary probe, but the later relationship to the area decides whether the bearish label remains useful. The same probe can become weak or invalid if price quickly reclaims the former zone.
The label should not be used as proof of institutional intent. It is safer to describe what is visible: the old bullish zone failed, price accepted below it, and the later return could not reclaim the area.
Boundary: A bearish breaker block is a classification of chart behavior, not an execution instruction. The label helps describe failed bullish structure and later overhead behavior, but it does not decide position, timing, risk, or outcome.
Clean, weak, and invalid bearish breaker block readings
The most useful distinction is not whether price touched the zone. The stronger distinction is whether the old bullish zone has clearly failed and whether later price behavior continues to respect that failure.
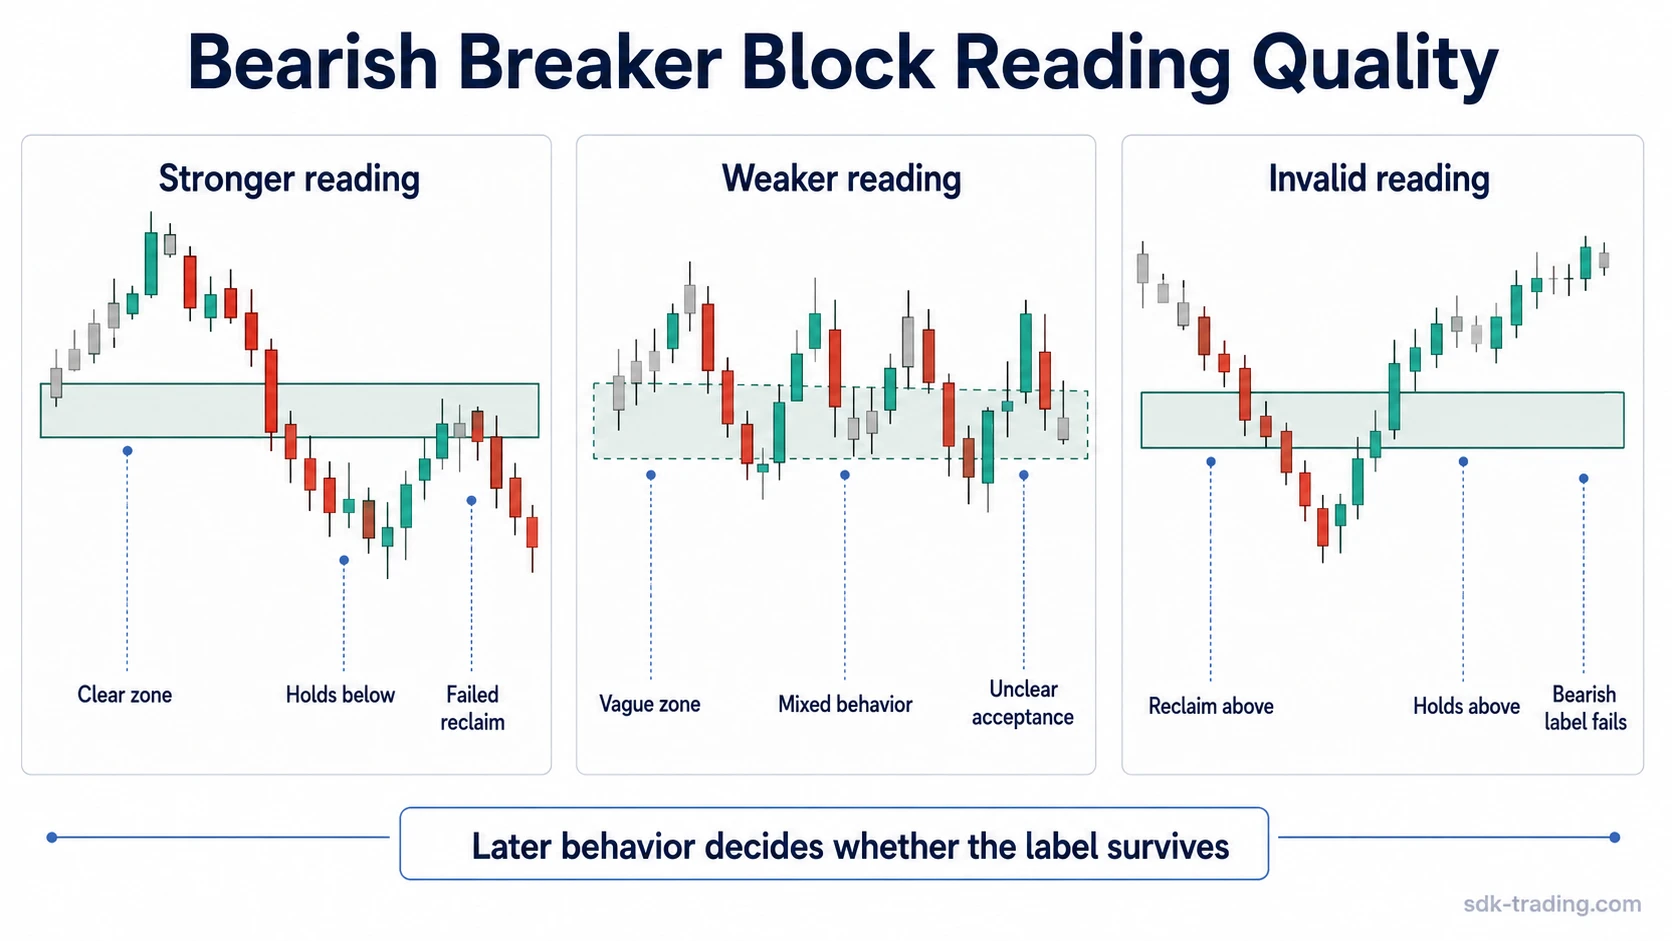
| Reading quality | Visible behavior | Interpretation boundary |
|---|---|---|
| Clean reading | Price breaks below a clear former bullish zone, accepts below it, returns from the underside, and fails to reclaim the area. | The bearish breaker label is more defensible because the old bullish role has failed and later behavior respects the underside. |
| Weak reading | The prior zone is unclear, the break is shallow, or price moves back and forth through the area without clean acceptance. | The label may be premature because the chart has not clearly separated failure from noise. |
| Invalid reading | Price reclaims the former zone and accepts above it after the attempted bearish break. | The bearish classification loses usefulness because the former bullish area has not remained failed. |
Reading quality note: Acceptance matters more than the first break. A fast move below the zone may start the question, but later behavior decides whether the bearish classification survives.
How to identify a bearish breaker block without treating it as a signal
Identification starts by locating the former bullish reference area. Without that starting point, the structure becomes too easy to confuse with ordinary resistance, random chop, or a simple failed bounce.
Next, compare the break with the behavior that follows it. A decisive break below the zone is more meaningful when price remains below the area and the next return cannot reclaim it. The underside response is the main test of whether the old bullish zone has become an overhead boundary.
Identification checklist:
- A prior bullish reference zone is visible.
- Price breaks below that zone with clear downside displacement or follow-through.
- Price accepts below the former zone instead of immediately reclaiming it.
- A later return approaches the underside of the failed zone.
- The return fails to establish acceptance back above the zone.
Bearish breaker block vs nearby concepts
Nearby price-action terms can look similar because they often involve a zone, a break, and a later test. The difference is the role of the old area and the direction of the failed structure.
| Concept | Main idea | Difference from a bearish breaker block |
|---|---|---|
| Breaker block | A failed order-block area that later acts in the opposite role. | The broader concept can include both bullish and bearish versions; the bearish version focuses on failed bullish structure becoming overhead resistance. |
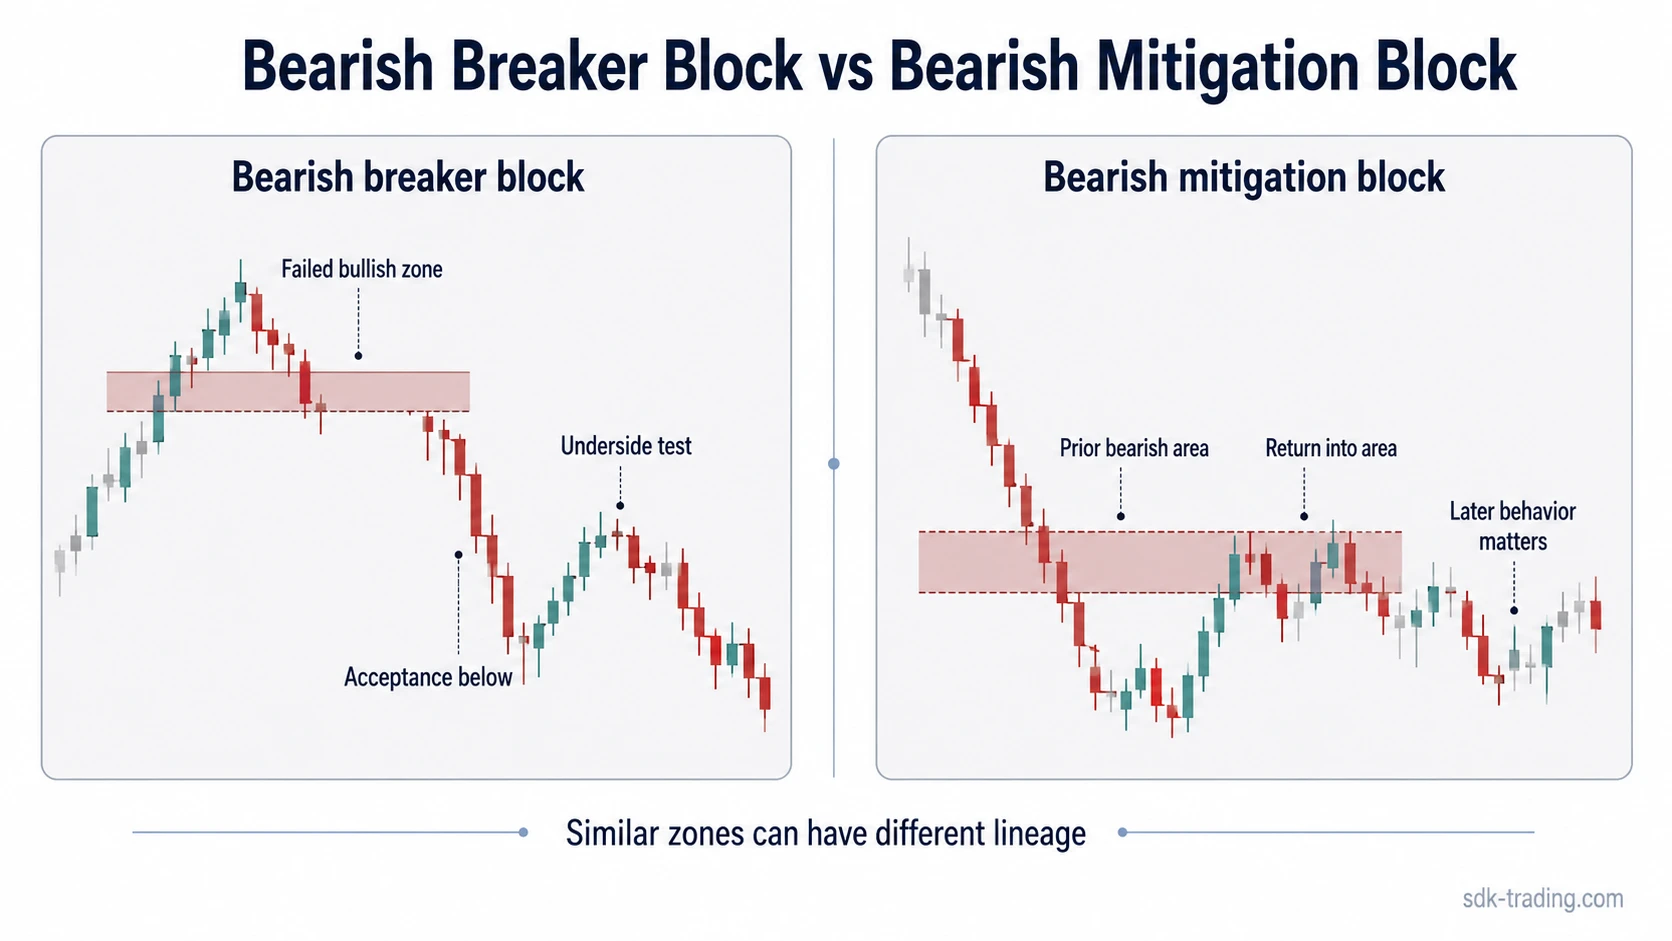
| Bearish mitigation block | A return into a prior area that may complete mitigation logic before bearish continuation is assessed. | A bearish mitigation block is not the same as a failed bullish order block becoming a bearish breaker. |
| Bullish breaker block | A failed bearish zone that later behaves as support after price accepts above it. | A bullish breaker block uses the opposite directional lineage. |
| Order block | A reference area used to read prior buying or selling activity. | A bearish breaker block needs the former bullish order block to fail before the bearish classification applies. |
| Displacement | A strong directional movement away from an area. | Displacement can support the break, but it is only one part of the full breaker sequence. |
Common false positives
The most common false positive is treating the first move below a zone as a completed bearish breaker block. The first move only creates a possible failure. Later acceptance and the underside response decide whether the structure still carries the bearish breaker meaning.
Another common mistake is using an unclear prior zone. If the bullish reference area is vague, the later bearish classification becomes vague as well. The cleaner the original zone, the easier it is to judge whether the area has actually failed.
Messy two-way movement through the same area also weakens the reading. When price repeatedly crosses above and below the zone, the chart may be showing indecision rather than a clean role change.
False-positive filter: A bearish breaker block reading weakens when the break lacks acceptance, the prior bullish zone is unclear, or price reclaims the former zone and begins holding above it.
Simple bearish breaker block example in context
Price builds a visible bullish reference area, reacts from it once, and then later breaks below the same area with stronger downside movement. After the break, price does not immediately regain the old zone. It remains below the area and later returns toward the underside.
If the return stalls beneath the former bullish zone and cannot hold above it, the role-change reading is cleaner. If price keeps crossing the area from both sides, the structure is still unresolved. If price reclaims the zone and begins holding above it, the bearish breaker label no longer fits the visible behavior.
The important change is the role of the old area. The former bullish zone must stop behaving like support and begin behaving like overhead resistance before the bearish breaker block label is useful.
Why the bearish label can fail
A bearish breaker block label can fail when price proves that the former bullish zone has not actually lost its role. The clearest failure is a sustained reclaim above the zone after the attempted break below it.
Failure can also appear through poor structure. If the chart lacks a clear prior bullish zone, if the break below the zone is only a quick probe, or if the underside test never develops, the bearish label has less diagnostic value.
Invalidation boundary: The bearish classification becomes unreliable when price reclaims the former zone and accepts above it. At that point, the chart no longer supports the idea that the former bullish area has remained failed.
FAQ
What does a bearish breaker block mean?
A bearish breaker block means a former bullish order-block area has failed, price has accepted below it, and the same area later behaves like overhead resistance from the underside.
Is every broken support area a bearish breaker block?
No. A bearish breaker block needs a clear failed bullish reference area, acceptance below that area, and later underside behavior. A broken support area without that lineage is only a broken support area.
Can a wick below the zone create a bearish breaker block?
A wick below the zone is not enough by itself. The reading needs later behavior that shows whether price accepted below the former zone or quickly reclaimed it.
What invalidates a bearish breaker block reading?
The reading becomes invalid when price reclaims the former bullish zone and accepts above it. That behavior means the old zone has not remained a failed overhead boundary.
How is a bearish breaker block different from a bullish breaker block?
A bearish breaker block starts from a failed bullish zone and later acts as resistance. A bullish breaker block starts from a failed bearish zone and later acts as support.