A breaker block is a price-action structure where a former order-block or reference area fails, price accepts beyond it, and the same area later acts from the opposite side.
In trading and SMC analysis, the important feature is the role flip. Former demand can become overhead supply after price breaks below it and fails to reclaim it. Former supply can become support after price breaks above it and holds from the other side.
Definition: A breaker block is a failed reference area that changes role after price breaks through it, accepts beyond it, and later reacts to the old area from the opposite side. A single wick or first break is not enough by itself.
Key Points
- A breaker block starts with a former reference area that fails instead of holding as expected.
- The reading depends on later acceptance beyond the area, not only the first break.
- A retest from the opposite side helps show whether the old area has changed role.
- Bullish and bearish breaker blocks describe the direction of the role flip.
- The reading weakens or fails when price reclaims the old area and holds beyond it.
What Is a Breaker Block?
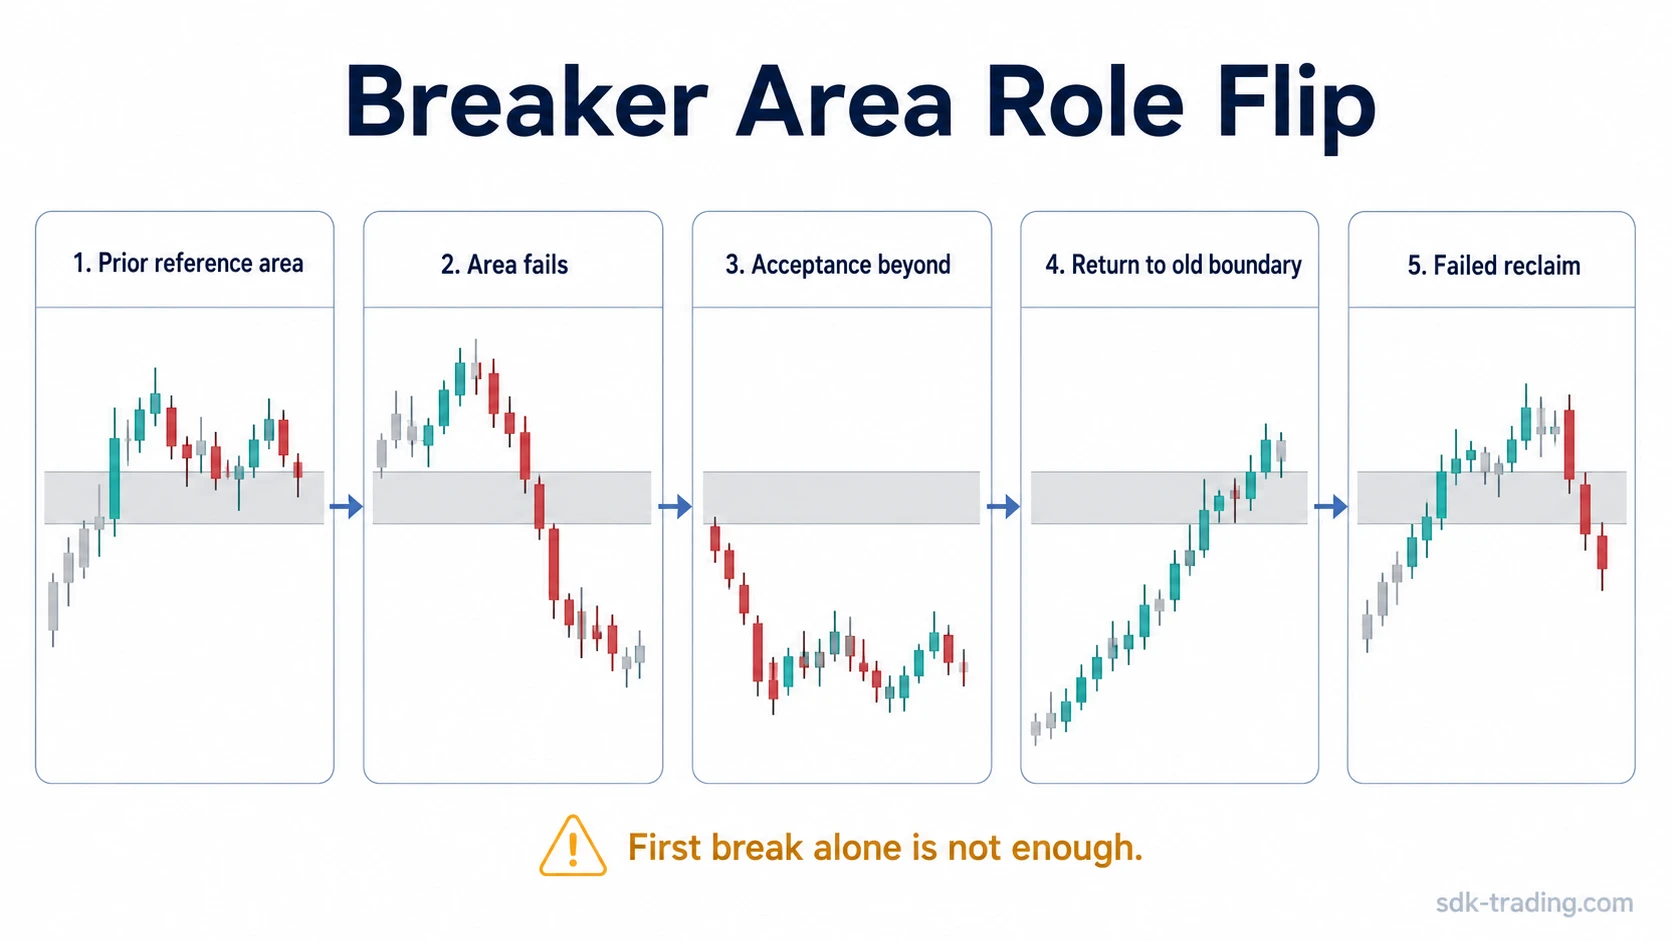
A breaker block is a trading structure built around failure. The market first leaves a visible reference area, then breaks through that area, and later treats it as a different kind of boundary.
The concept is closely related to an order block, but the two are not the same. An order block is the original reference area. A breaker block reading appears only after that area fails and later behaves differently from the other side.
The boundary is important. Not every broken support or resistance level becomes a breaker block. The area needs a prior structural role, a meaningful failure, acceptance beyond it, and later behavior that supports the role flip.
How a Breaker Block Forms
A breaker block usually develops as a sequence rather than as one candle or one level touch. The sequence matters because early price movement can look decisive before the market has shown whether the old area has truly changed role.
| Stage | What to observe | Why it matters |
|---|---|---|
| Prior reference area | Price reacts from a visible demand, supply, or order-block area. | The area gives the later failure a clear reference point. |
| Failure through the area | Price breaks through the former area instead of respecting it. | The original reading is challenged rather than confirmed. |
| Acceptance beyond the area | Price holds beyond the area instead of immediately returning inside it. | Acceptance helps separate a structural break from a temporary probe. |
| Return to the old area | Price revisits the former boundary from the opposite side. | The retest checks whether the old area has changed role. |
| Failure to reclaim | Price cannot hold back through the old area. | The breaker reading becomes more defensible when reclaim attempts fail. |
How to Identify a Breaker Block
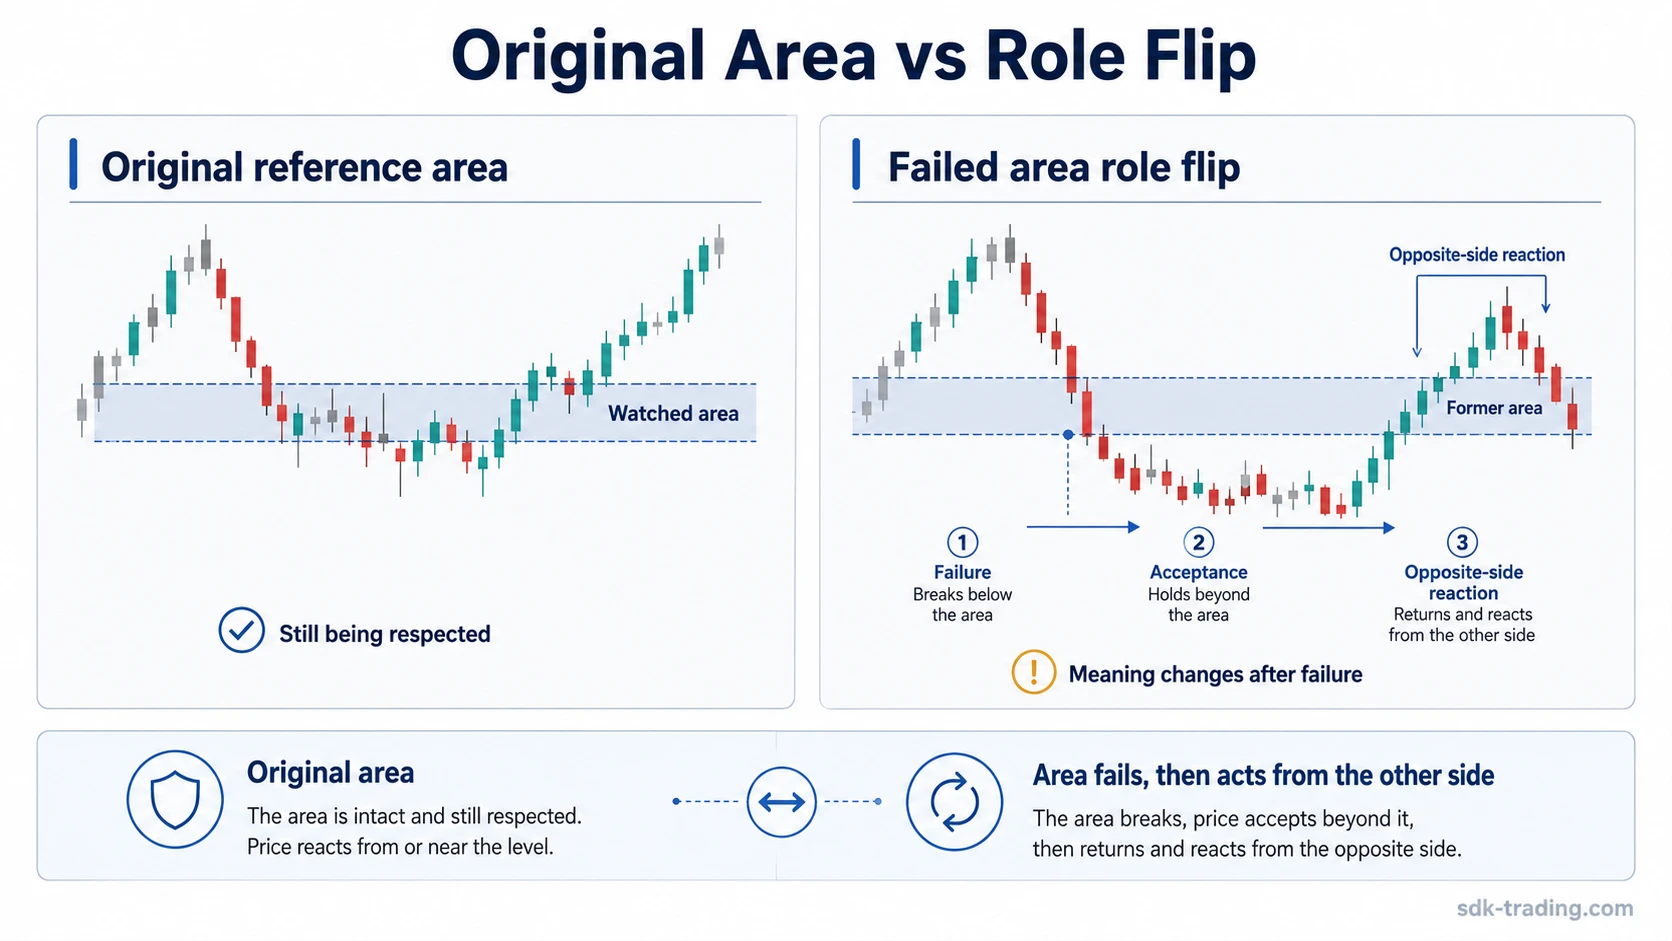
Identification starts with the old area, not with the break alone. A cleaner reading has a visible prior zone, a break that changes the state of that zone, and later behavior that respects the new side of the boundary.
Useful observables include the quality of the break, whether price remains accepted beyond the area, how the retest behaves, and whether reclaim attempts hold or fail. The more unclear those pieces are, the weaker the breaker block reading becomes.
Reading note: A breaker block is not confirmed by the first move through a zone. The later test of the old area usually carries more diagnostic value than the initial break.
Breaker Block vs Order Block
The easiest way to separate the two concepts is to ask whether the reference area has held or failed. An order block is the original area being watched. A breaker block reading appears after that area fails and later behaves from the opposite side.
| Concept | Main idea | What changes the reading |
|---|---|---|
| Order block | A prior reference area that traders watch for possible reaction or continuation context. | The area remains relevant while price still respects it structurally. |
| Breaker block | A former reference area that failed and later acts from the opposite side. | The reading depends on failure, acceptance beyond the area, and later role-flip behavior. |
Bullish and Bearish Breaker Blocks
A bullish breaker block forms when a former supply or bearish reference area fails and later acts as support after price accepts above it.
A bearish breaker block forms when a former demand or bullish reference area fails and later acts as resistance after price accepts below it.
The directional label should not turn the concept into a prediction. It only describes the side of the role flip and the later behavior around the former area.
Breaker Block vs Mitigation Block
A breaker block depends on a failed area changing role. A mitigation block focuses more on a return into a prior reference area before later behavior decides whether the area remains meaningful.
Both can involve a revisit to an old area, but the logic is different. A breaker block needs failure and role flip. A mitigation reading focuses on how price returns into a previous reference area and what happens after that return.
Clean, Weak, and Invalid Breaker Block Readings
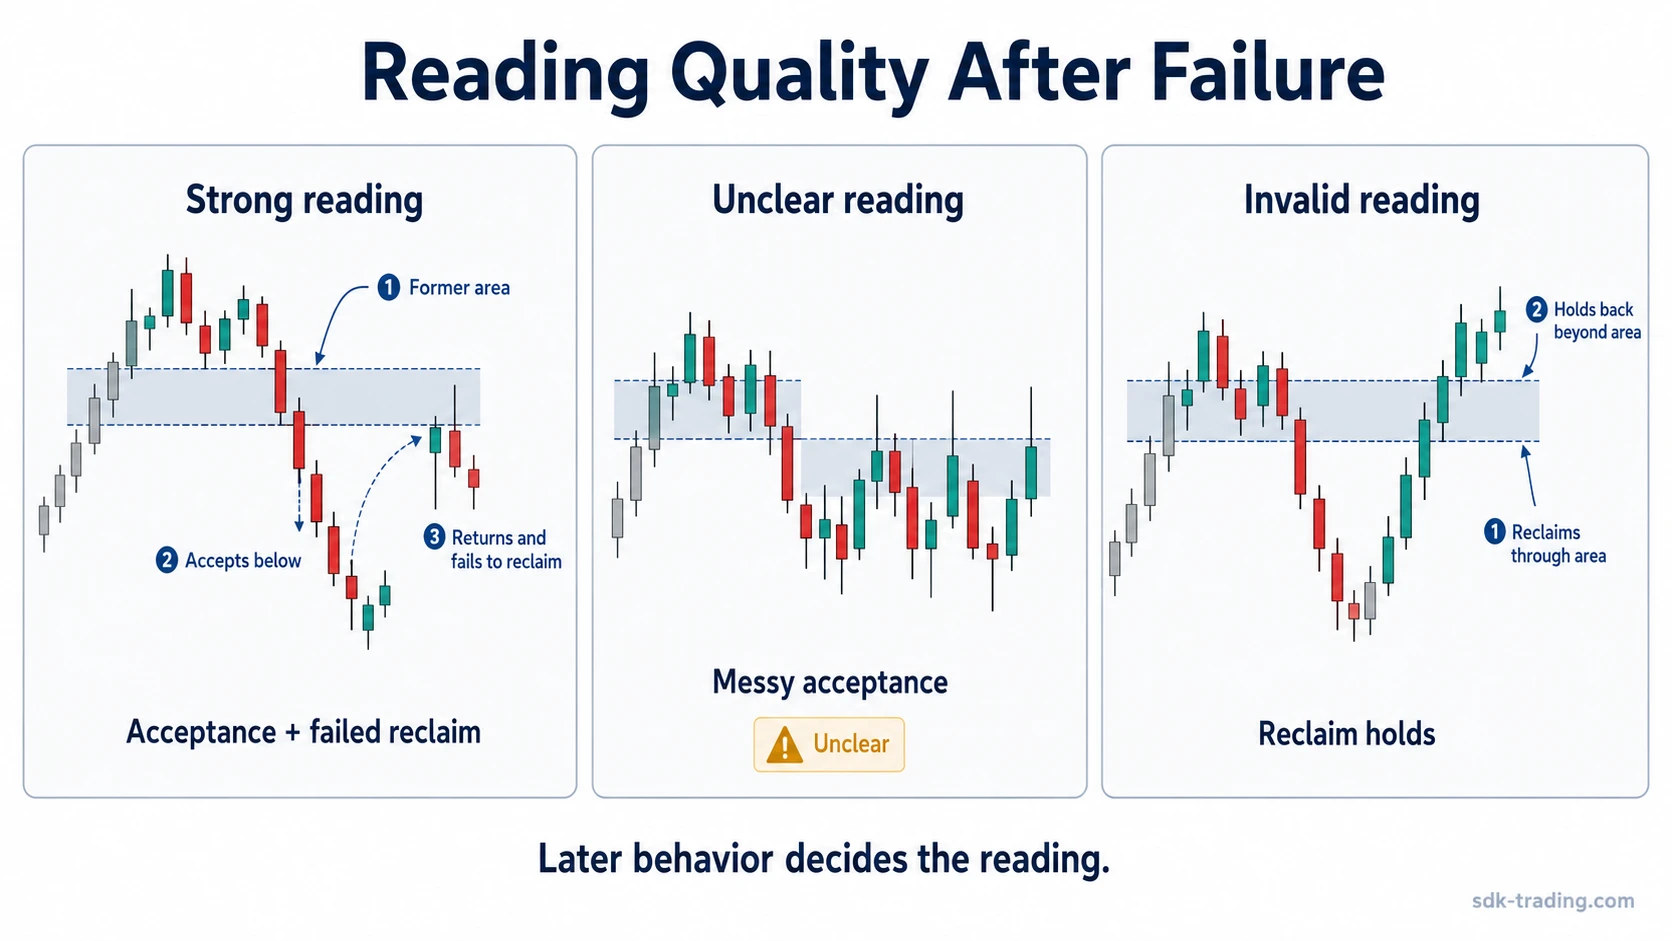
A useful breaker block reading separates a valid role flip from a move that only looks similar. The structure is clearer when failure, acceptance, retest, and failed reclaim behavior appear in a readable sequence.
| Reading quality | What the chart shows | Diagnostic interpretation |
|---|---|---|
| Clean reading | The old area fails, price accepts beyond it, returns to the opposite side, and fails to reclaim the area. | The role flip is easier to defend because the old boundary is tested after the break. |
| Weak reading | Price breaks the area, but acceptance beyond it is unclear or the retest is messy. | The structure may still be developing, but the breaker label is premature. |
| Invalid reading | Price breaks the area, then reclaims it and holds back through the old boundary. | The role flip has failed because the old area did not continue acting from the opposite side. |
Limitation: A breaker block reading is conditional. When price reclaims the former area and holds beyond it, the old role-flip idea no longer has the same support.
Common Mistakes When Reading Breaker Blocks
The most common mistake is treating the first break as the whole pattern. A break can be only a probe if price quickly returns through the same area and holds there.
Another mistake is labeling any broken support or resistance level as a breaker block. The cleaner version needs a recognizable prior reference area, a failure through that area, and later behavior that tests the new side of the boundary.
A third mistake is turning the label into a forecast. A breaker block can describe structure, but it does not prove what the next move must be. The reading remains tied to acceptance, reclaim attempts, and the quality of later price behavior.
Breaker Block Example in Context
Price reacts several times from a demand area, then breaks below it with follow-through instead of immediately returning inside the zone. Later, price recovers toward the underside of that same area but stalls there and cannot hold back above it.
That sequence supports a bearish breaker block reading more than the initial break alone. The reading would be weaker if price only wicked below the area and returned inside the zone. It would fail if price reclaimed the old area and continued to hold above it.
What Can Strengthen a Breaker Block Reading?
The reading is easier to defend when the old area is visible, the break holds beyond it, and the later retest cannot reclaim the former side. If one of those pieces is missing, the label should stay provisional.
Related concepts such as displacement, liquidity sweeps, inducement, and fair value gaps can add context, but they should not replace the breaker block sequence itself. The core question remains simple: did the old area fail, accept beyond, and change role from the other side?
FAQ
What is a breaker block in trading?
A breaker block is a failed reference area that price breaks through, accepts beyond, and later tests from the opposite side. The reading depends on failure and role flip, not only the first break.
Is a breaker block the same as an order block?
No. An order block is the original reference area. A breaker block reading appears after that area fails and later behaves from the opposite side.
How do you identify a breaker block?
Look for a prior reference area, a break through that area, acceptance beyond it, a later return to the old boundary, and failure to reclaim the previous side.
When does a breaker block reading fail?
The reading fails when price reclaims the former area and holds beyond it, because the expected role flip is no longer supported by later behavior.