A bullish breaker block is a price-action reading where a former bearish reference area fails after price accepts above it, then later behavior helps show whether that old area has lost its resistance role.
The label depends on sequence, not on a single candle. A prior bearish area must be visible, price must move beyond it with acceptance, and the later return must be read from the opposite side. When that return is orderly and the old area no longer behaves as resistance, the reading is cleaner. When acceptance is messy or price reclaims the old area in the wrong direction, the reading becomes weak or invalid.
A bullish breaker block is not a buy signal, reversal guarantee, or permission to trade by itself. It is a classification of how a failed bearish reference area is being treated after the market has moved through it.
What Is a Bullish Breaker Block?
A bullish breaker block is a former bearish reference area that stops working as resistance after price accepts above it. The idea is based on a role flip: an area that previously represented bearish pressure is no longer controlling the same side of price action.
The reference area is often described as a prior bearish order-block area, but the public reading should stay visible and structural. The important part is not a hidden cause inside the candle; it is the observable sequence of failure, acceptance above, and later behavior around the old area.
In the broader breaker block concept, the market first shows that a previous reference area has failed. The bullish version is the upward role-flip case: price moves above a former bearish area and the later reading asks whether that area is now being treated differently from the opposite side.
How a Bullish Breaker Block Forms
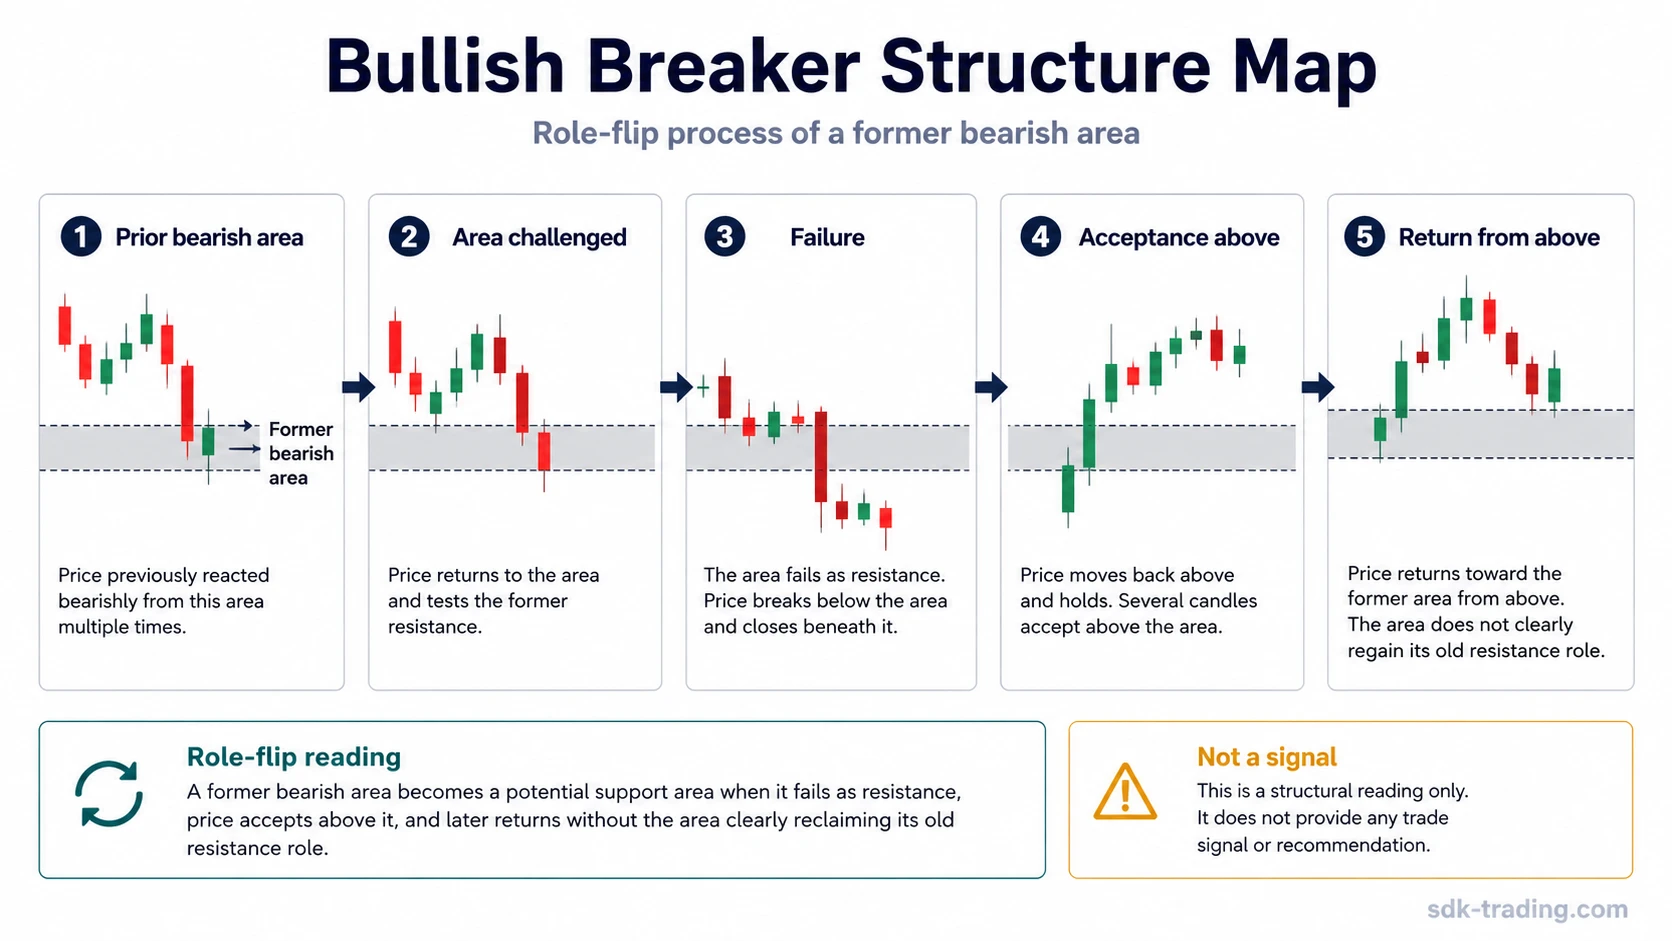
A bullish breaker block forms through a sequence. The sequence matters because a first push above a bearish area can be temporary, unclear, or quickly reversed. The reading becomes more useful only after price behavior shows whether the old area has truly lost its former function.
| Step | Visible behavior | Role in the reading |
|---|---|---|
| 1. Bearish reference area | A prior area exists where price previously reacted as resistance or bearish supply. | Creates the area that can later fail. |
| 2. Challenge | Price trades back into or through the prior bearish area. | Tests whether the area still has control. |
| 3. Failure | The area no longer holds price below it. | Shows the bearish function may be weakening. |
| 4. Acceptance above | Price spends meaningful time or closes beyond the area instead of only wicking through it. | Separates a possible role flip from a brief probe. |
| 5. Opposite-side behavior | Price later returns toward the old area and the reaction is assessed from above. | Clarifies whether the former resistance area is no longer acting the same way. |
The final step is what prevents the concept from becoming a simple “break above resistance” label. The later return does not create a trade instruction; it provides evidence about whether the old bearish area has changed role.
How to Identify a Bullish Breaker Block
Identification should start with the old area, not with the hoped-for bullish outcome. A clean reading needs a visible bearish reference area, a failure of that area, acceptance above it, and later behavior that does not let the old area reclaim its former resistance role.
| Check | What to look for | What it does not prove |
|---|---|---|
| Prior bearish area | A clear area where price previously reacted as resistance or bearish pressure. | It does not prove the area will fail later. |
| Failure of the area | Price moves through the area instead of respecting it as resistance. | It does not prove the move is accepted. |
| Acceptance above | Price holds beyond the old area with more than a single wick or brief probe. | It does not prove a guaranteed support reaction. |
| Return behavior | Price revisits the old area from the opposite side and the reaction can be observed. | It does not create an entry trigger by itself. |
| Old role not reclaimed | The former bearish area does not quickly regain control as resistance. | It does not guarantee continuation. |
| Context clarity | The surrounding structure supports a clean reading instead of overlapping, noisy movement. | It does not remove the need to define when the reading has failed. |
A bullish breaker block reading is strongest when the old bearish area, the failure, and the later opposite-side behavior are all visible. If only one of those pieces is present, the label is usually premature.
Clean, Weak, and Invalid Bullish Breaker Block Readings
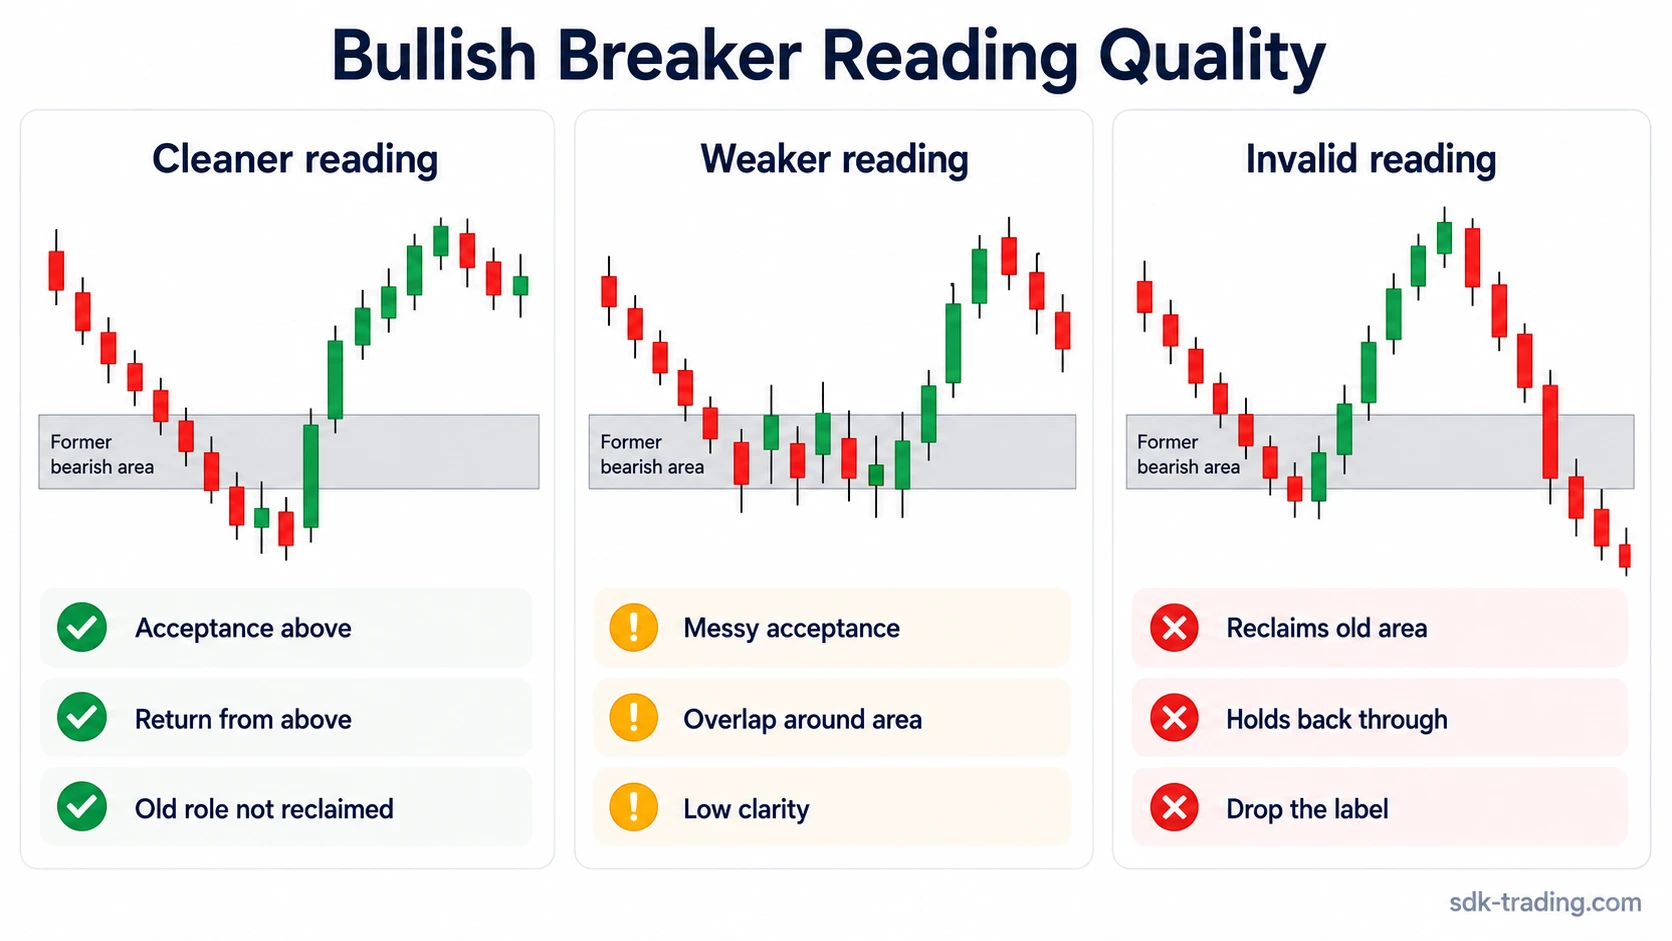
The useful distinction is not whether the label sounds bullish. The useful distinction is whether the visible behavior supports the role-flip reading cleanly, only weakly, or not at all.
| Reading quality | Visible behavior | Interpretation boundary |
|---|---|---|
| Clean | Price accepts above the former bearish area, returns in an orderly way, and the old area does not regain its resistance role. | This supports a stronger role-flip reading, but it is still not a guarantee or standalone signal. |
| Weak | Acceptance is messy, candles overlap around the area, or the return behavior does not clearly respect the opposite side. | The label may remain possible, but the classification has low clarity. |
| Invalid | Price moves back through the old area and holds in a way that restores the former bearish function. | The bullish breaker block label should be dropped or reconsidered. |
The clean / weak / invalid split keeps the label tied to observable behavior. A bullish label does not mean the market must continue higher; it only describes how the former bearish area is being interpreted after failure and acceptance.
Bullish Breaker Block vs Related Concepts
A bullish breaker block sits near several related price-action terms. The safest way to separate them is to ask what failed, which side price accepted beyond, and what later behavior is being evaluated.
| Concept | Main idea | Difference from bullish breaker block |
|---|---|---|
| Bullish breaker block | A former bearish reference area fails after price accepts above it. | The reading is upward role-flip logic after a bearish area loses its function. |
| Bearish breaker block | A former bullish reference area fails after price accepts below it. | It is the directional opposite: the failed area is read from the bearish side. |
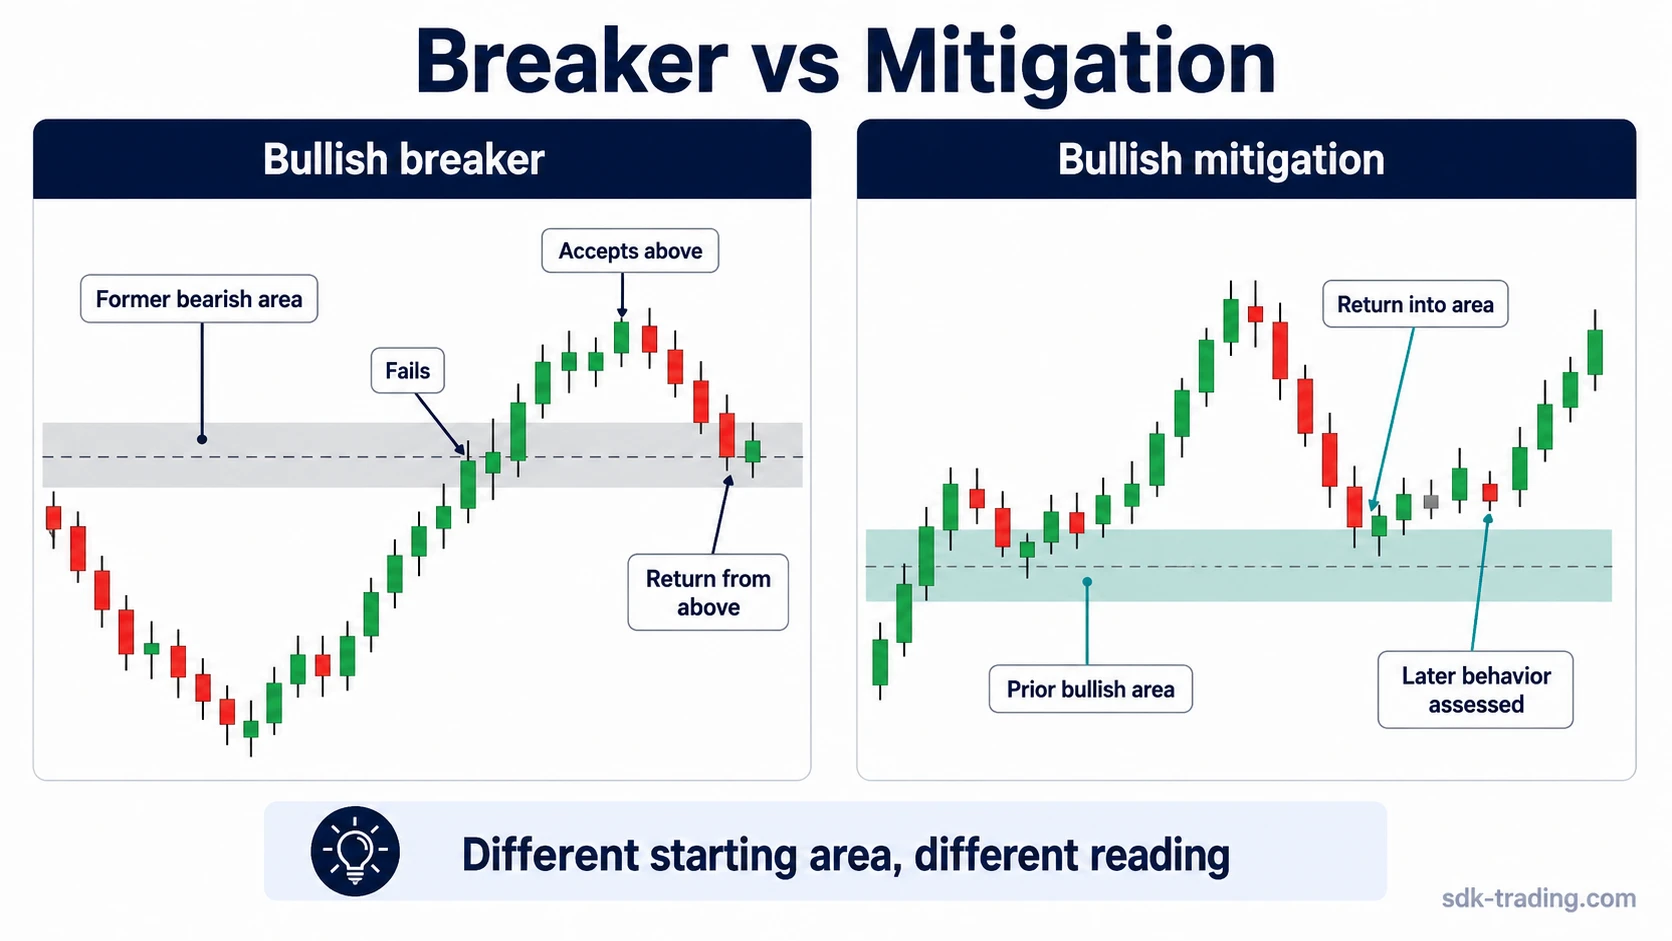
| Bullish mitigation block | A return into a bullish reference area where prior price behavior is being reassessed. | Mitigation focuses on revisiting a prior bullish reference area, while a bullish breaker block focuses on a failed bearish area and role flip. |
| Generic support | An area where price may react from below or above depending on context. | A bullish breaker block needs a specific prior bearish reference-area failure, not just any support reaction. |
| Displacement | A strong directional price move away from an area. | Displacement can be part of the sequence, but it is not the full breaker reading without acceptance and later behavior. |
The main boundary is simple: a bullish breaker block is not just a bullish reaction. It is a failed bearish reference area being assessed after price has accepted above it.
Common Bullish Breaker Block Misreadings
Any break above a bearish area is a bullish breaker block. A break can start the question, but it does not complete the reading. A wick through the area, a brief spike, or a fast rejection does not show acceptance. The classification needs later behavior that confirms or weakens the role-flip idea.
A bullish breaker block is automatically a buy signal. The label describes structure. It does not define entry, stop placement, target, position size, or trade permission. Treating the label as a signal adds rules that the structure does not define by itself.
The retest is the whole concept. The return to the old area matters because it tests the role flip, but the concept begins earlier. Without the prior bearish area, failure, and acceptance above, the later return has no clear breaker-block context.
A bullish breaker block and a bullish mitigation block are the same thing. Both can involve a return into an area, but the reference logic is different. A bullish breaker block depends on a bearish area failing; a bullish mitigation block focuses on behavior around a bullish reference area.
A wick through the area is enough. A wick can show that price tested the area, but it does not show acceptance by itself. The reading becomes more defensible when price holds beyond the area and later behavior does not restore the old bearish function.
Bullish Breaker Block Example in Context
A market has a visible bearish reference area where previous rallies stalled. Later, price trades back into that area and pushes above it. At that moment, the move is only a challenge to the old area; the bullish breaker block reading is not complete if price immediately slips back below.
The reading becomes cleaner if price accepts above the old area and then returns toward it without letting the former resistance role take control again. The reading stays weak if price keeps overlapping through the area with no clear acceptance. It becomes invalid if price moves back through the old area and holds in a way that restores the earlier bearish behavior.
This example is diagnostic only. It shows how structure, acceptance, and later behavior separate a cleaner role-flip reading from a weak or invalid label.
FAQ
Is a bullish breaker block based on a bearish order block?
It is often described that way, but the safer public definition is a former bearish reference area that fails after price accepts above it. The visible sequence matters more than assuming a hidden cause.
Is a bullish breaker block a buy signal?
No. A bullish breaker block is a structural reading, not a buy signal. It does not define entry, stop placement, target, position size, or trade permission.
What invalidates a bullish breaker block reading?
The reading is invalid or should be reconsidered when price moves back through the former bearish area and holds in a way that restores the old resistance behavior.
How is a bullish breaker block different from a bullish mitigation block?
A bullish breaker block starts with a bearish reference area failing after acceptance above. A bullish mitigation block focuses on price returning into a prior bullish reference area, so the reference logic is different.