A bearish mitigation block is a bearish-side price action structure where price revisits a prior bearish-origin area after a structural sequence has changed how that area is being read.
The concept depends on observable structure, displacement, and later behavior around the area. It classifies how price interacts with a prior bearish reference point, without treating the area as a required action or a prediction that the market must move lower.
Definition: A bearish mitigation block marks a prior bearish-origin area that price later revisits after the original move has been revisited, overlapped, or structurally challenged. The classification remains useful only while later behavior still respects the area as a meaningful structural reference.
Key Points
- A bearish mitigation block is a bearish-side structural label, not an automatic sell area.
- The classification depends on prior bearish movement, later displacement, and behavior during the revisit.
- The difference from a breaker structure depends on whether the old area has changed role after structural failure.
- The setup weakens when price repeatedly overlaps the area or accepts through it cleanly.
What Is a Bearish Mitigation Block?
A bearish mitigation block identifies a prior bearish-origin area that remains relevant when price returns to it after structure has changed. The concept belongs to price action and market structure analysis, where the focus is on how price leaves an area, returns to it, and either respects or accepts through it.
The broader mitigation block concept covers both directional variants. The bearish version narrows the interpretation to the supply-side sequence: a prior downward origin, a later revisit, and a test of whether that old area still matters.
The term should be read through chart behavior rather than assumed intent. Price may revisit an area for many reasons, so the useful question is whether later candles show containment, overlap, acceptance, or a clear change in structural role.
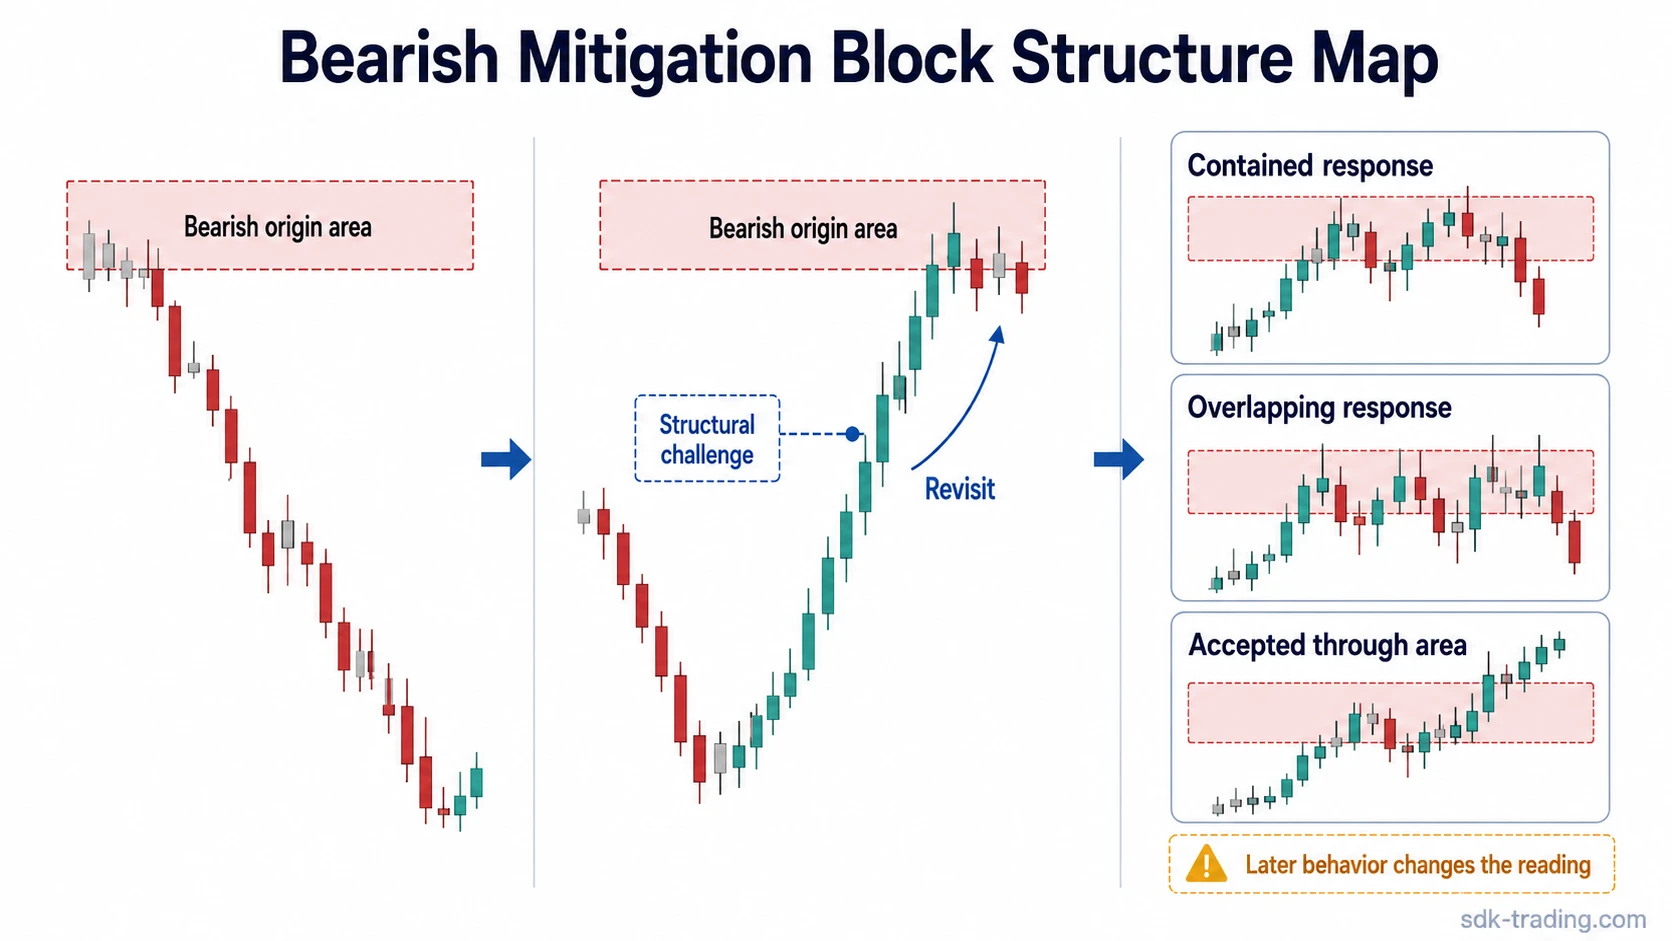
How a Bearish Mitigation Block Forms
A bearish mitigation block usually begins with an area where bearish movement originated. Price moves away from that area, later changes structure, and then revisits the prior reference point. The revisit creates a structural question: does the old bearish-origin area still act as a meaningful reference, or has price accepted back through it?
| Stage | What to observe | Why it matters |
|---|---|---|
| Bearish origin | Price leaves an upper area with visible downside movement. | The area becomes the candidate reference point for later review. |
| Structural change | Price creates a meaningful shift, displacement, or failed continuation around the prior move. | The old area is no longer read as a simple untouched zone. |
| Revisit | Price returns into or near the prior bearish-origin area. | The classification depends on whether price remains contained or accepts through the area. |
| Later behavior | Candles reject, overlap, stall, or move through the area. | The bearish mitigation label is supported, weakened, or invalidated by the response. |
How to Identify a Bearish Mitigation Block
Identification starts with structure, not with a single candle. A candidate bearish mitigation block needs a prior bearish-origin area, a reason that area is being revisited, and later behavior that shows whether the area still influences price.
Useful evidence: a visible bearish-origin area, a later structural shift or displacement, a return into the area, and price behavior that tests whether the area is still respected.
Weak evidence: a random retest of an old candle, unclear displacement, choppy overlap, or an area selected only because price touched it more than once.
A revisit alone is not enough. The candidate area, the sequence before the return, and the response during the test need to support the same interpretation. When those pieces conflict, the classification should remain tentative.
What It Is and What It Is Not
The cleanest use of the term separates the structural label from execution language. A bearish mitigation block describes how a prior bearish-origin area is being retested. It does not define a required action, a guaranteed reversal, or a complete trading model.
| Reading | Safe interpretation | Risky interpretation to avoid |
|---|---|---|
| Structural label | A prior bearish-origin area is being revisited and evaluated. | The area automatically controls the next move. |
| Containment | Price struggles to accept through the area and the reference remains relevant. | Every reaction from the area confirms a bearish outcome. |
| Weakening | Repeated overlap or unclear displacement reduces confidence in the label. | Repeated revisits make the area stronger by default. |
| Invalidation | Clean acceptance through the area can remove the bearish mitigation reading. | The label remains valid regardless of later structure. |
Bearish Mitigation Block vs Bearish Breaker Block
A bearish mitigation block focuses on a revisited bearish-origin area and whether price remains contained around it. A bearish breaker block focuses more on role change after structure fails and the prior area begins acting with a different function.
The key difference is role change. A mitigation reading reviews whether the old bearish-origin area still contains price, while a breaker reading needs evidence that failed structure has changed how the area functions.
The distinction is not just the candle location. A mitigation reading looks for the old area to remain relevant as a revisited reference. A breaker reading needs stronger evidence that the prior structure has failed and the area has changed role after that failure.
| Concept | Main question | Typical boundary |
|---|---|---|
| Bearish mitigation block | Is price revisiting a prior bearish-origin area that still matters? | Containment or failure around the revisited area. |
| Bearish breaker block | Has prior structure failed and changed the role of the area? | Structural failure plus evidence of role change. |
Bullish vs Bearish Mitigation Block
The bearish version starts from a bearish-origin area and reviews how price behaves when it returns to that area. A bullish mitigation block uses the opposite directional lens: a prior bullish-origin area is revisited and evaluated through later structure.
Both variants use the same broad idea of mitigation, but the directional evidence is different. The bearish side looks at supply-side origin and containment around an upper revisited area. The bullish side looks at demand-side origin and behavior around a lower revisited area.
Clean, Weak, and Invalid Readings
The strongest part of the bearish mitigation block concept is not the label itself. The value comes from separating clean structure from weak or invalid structure before the term is treated as meaningful.
| Reading quality | Observable behavior | Interpretation |
|---|---|---|
| Clean reading | Price revisits the prior bearish-origin area and fails to accept above it. | The bearish mitigation label remains structurally defensible. |
| Weak reading | Price overlaps the area several times, stalls without clean rejection, or moves through it unevenly. | The area may still matter, but the classification is less precise. |
| Invalid reading | Price accepts through the area and the old reference no longer contains the move. | The bearish mitigation label no longer fits the later structure. |
Common Mistakes
A common mistake is calling any return to a prior bearish candle a bearish mitigation block. The prior candle matters only if it belongs to a meaningful sequence and later behavior around the area supports the classification.
Repeated revisits are not automatic validation. Overlap can make the reference less precise because each pass through the area may reduce the clarity of containment. A level that is repeatedly crossed, absorbed, and reclaimed is harder to read than an area that receives one clear structural test.
The most important boundary is between chart evidence and inferred motive. The concept can describe how price interacts with a prior area, but it cannot prove why every participant acted there.
Bearish Mitigation Block Example in Context
Price drops from an upper area with clear bearish displacement. Later, price recovers into that same area, but the revisit becomes messy: several candles overlap the zone, and the market does not clearly remain below it. Several closes begin forming inside the old area rather than rejecting cleanly from it, which makes the label less precise.
A cleaner classification would require the old bearish-origin area to remain structurally meaningful during the revisit. If price accepts through the area and begins using it from the other side, the bearish mitigation reading should be reconsidered rather than forced onto the chart.
Mitigation and Breaker Boundaries
Mitigation terminology stays cleaner when the broader mitigation idea, bearish-side revisit, bullish-side revisit, and breaker role-change behavior remain separate. That separation prevents every return to a prior supply-side area from being labeled the same way.
FAQ
What is a bearish mitigation block?
A bearish mitigation block is a bearish-side price action structure where price revisits a prior bearish-origin area after a structural sequence has changed how that area is being read.
Is a bearish mitigation block the same as a bearish breaker block?
No. A bearish mitigation block focuses on a revisited bearish-origin area, while a bearish breaker block requires stronger evidence that prior structure has failed and the area has changed role.
When does a bearish mitigation block reading weaken?
The reading weakens when price repeatedly overlaps the area, when displacement is unclear, or when price begins accepting through the prior bearish-origin area instead of remaining contained around it.