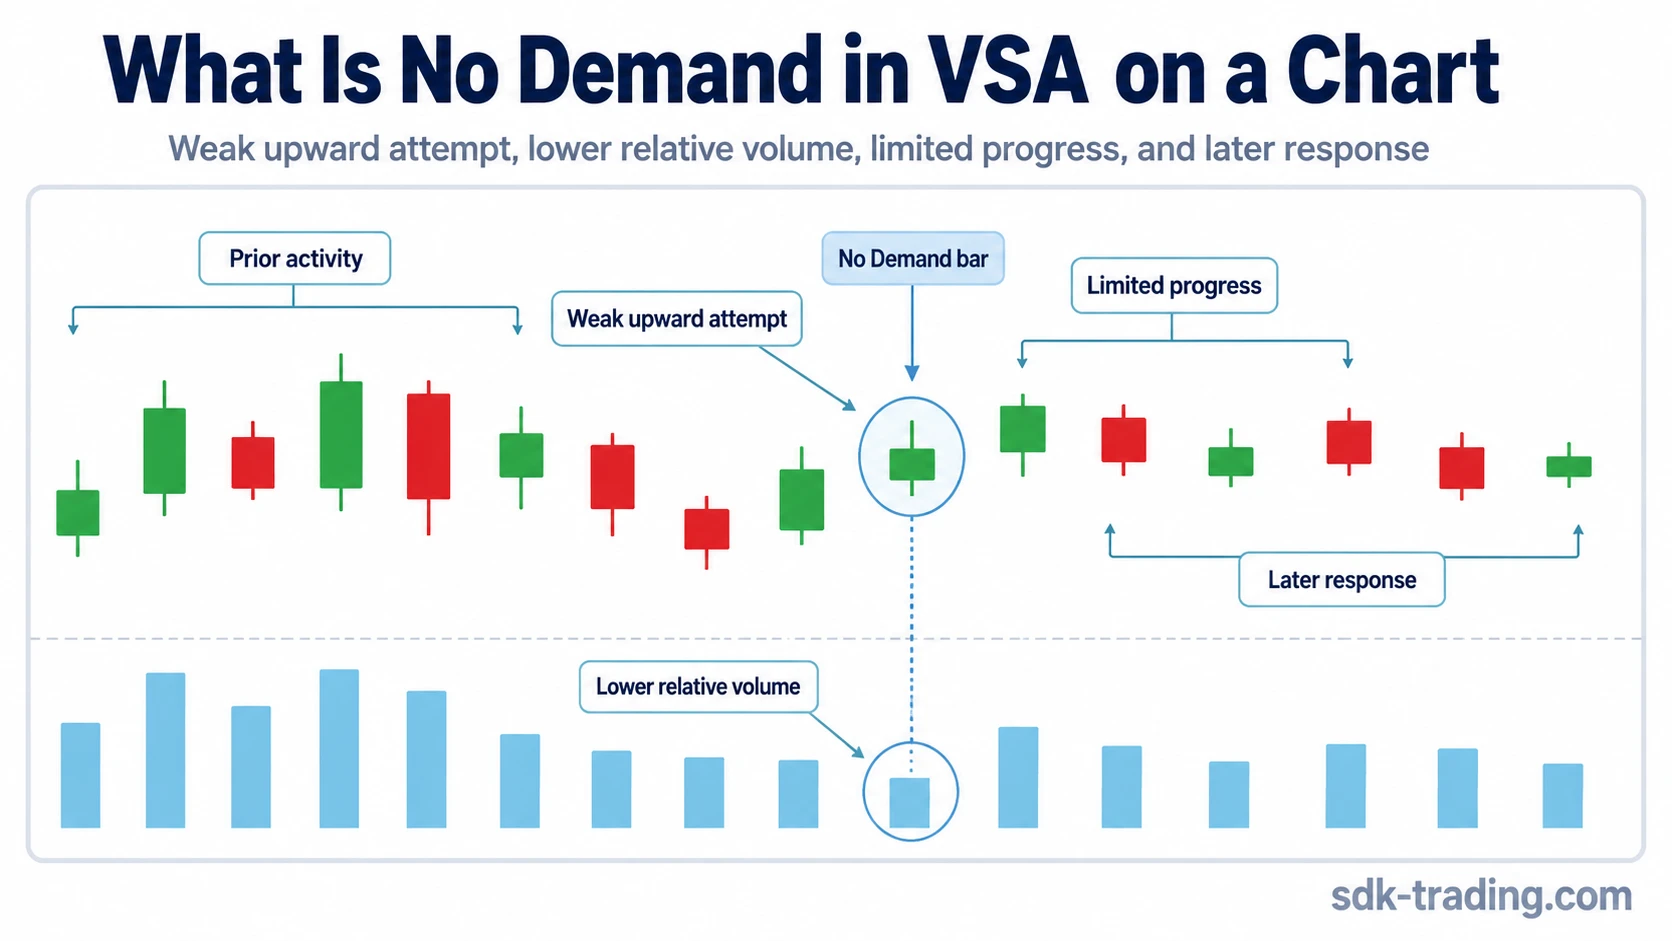
A No Demand reading in Volume Spread Analysis usually starts with an up bar or upward attempt that shows weak demand through reduced volume, limited upward progress, and poor follow-through after prior activity. In practical VSA language, this is often discussed as a low-volume up bar, but the low volume only matters when spread, close location, background, and the next response support the reading.
Key Points
- No Demand is a VSA interpretation of weak buying interest during an upward attempt.
- The reading usually depends on volume being low relative to recent activity, not low by an absolute universal threshold.
- The same low-volume up bar can mean different things after strength, after weakness, near resistance, or inside a quiet continuation.
- The next response is the main test: upward progress either fails, stalls, or attracts demand again.
What a No Demand Bar Means in Volume Spread Analysis
In VSA, No Demand describes an upward price attempt where buying pressure appears weak. The typical observation is an up bar, or an attempted up move, with lower volume than nearby bars, limited spread, and little evidence that buyers are willing to continue the move.
The important word is “reading.” No Demand is not simply a small candle, and it is not every low-volume session. It is an interpretation formed from the relationship between price progress, volume, spread, close location, prior background, and the next bars.
Definition: No Demand is a conditional Volume Spread Analysis reading where an upward attempt shows reduced participation, limited progress, and little evidence of committed buying. It suggests that demand may be insufficient, but the reversal case remains weak unless later price and volume behavior support it.
Typical No Demand checklist: an upward attempt, lower volume than nearby bars, limited spread, weak close location, and later failure to continue higher. The checklist matters only when the surrounding structure gives the weak up bar a reason to matter.
This makes No Demand different from a mechanical candlestick label. The bar is only the visible part of the reading. The surrounding market behavior decides whether the observation is meaningful.
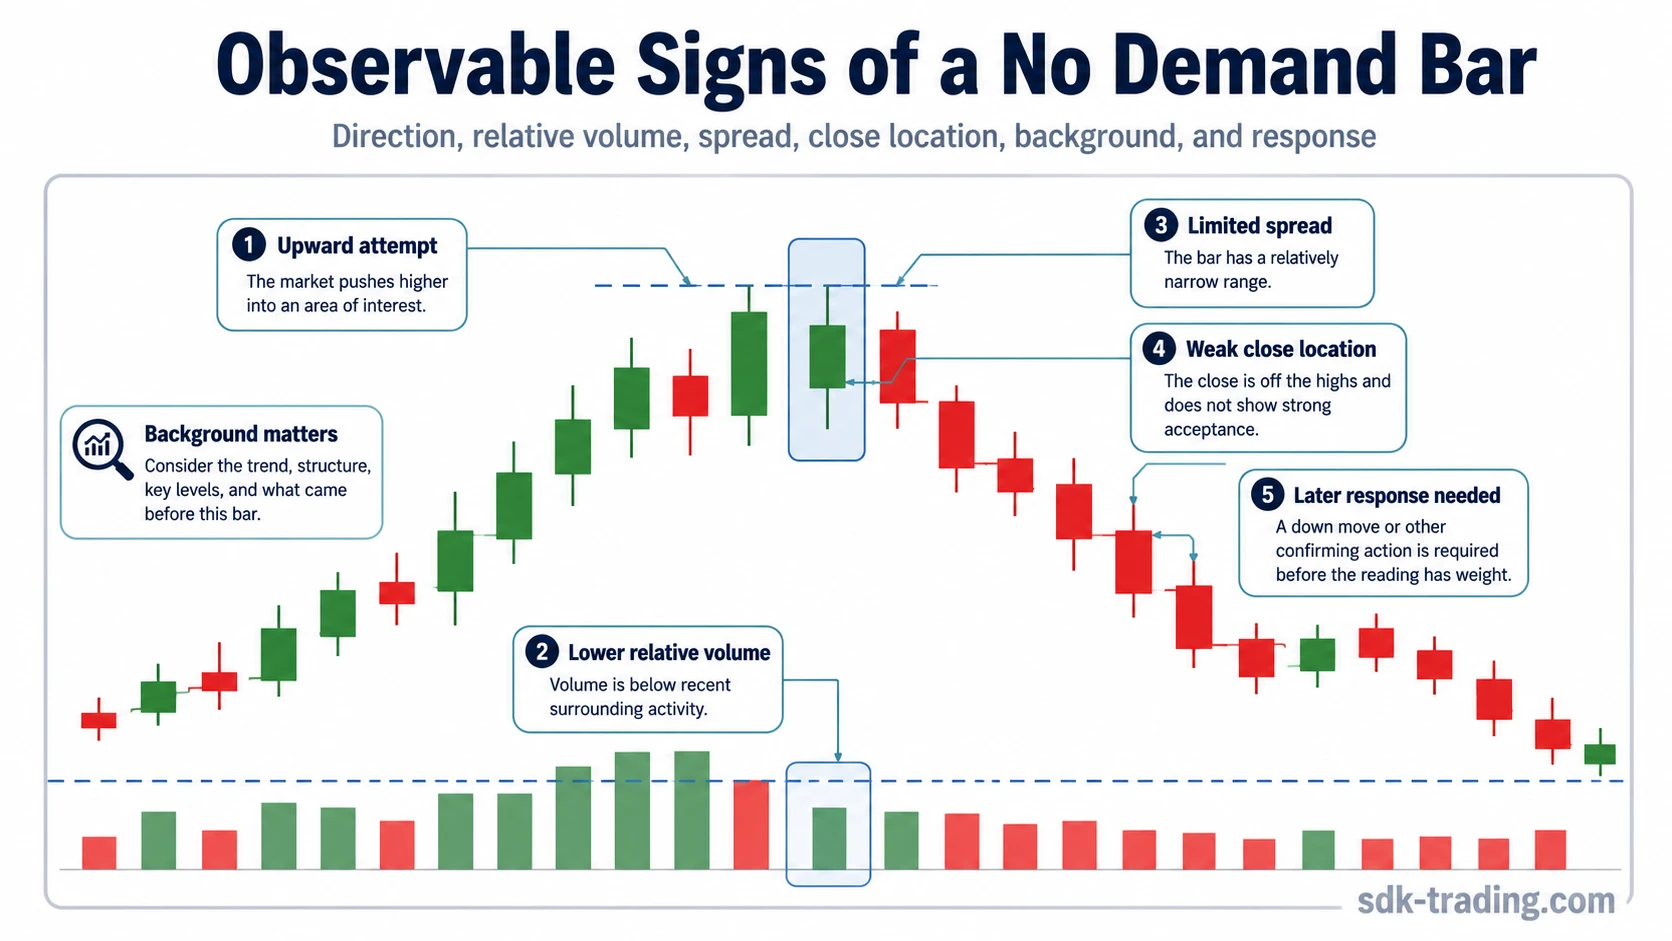
Observable Signs of a No Demand Bar
A No Demand bar starts with observable behavior: the direction of the attempt, the relative volume, the spread, the close, and the response that follows. Interpretation comes only after those parts line up.
| Observation | What it may suggest | Limit of the observation |
|---|---|---|
| Up bar or upward attempt | Price is trying to move higher. | Direction alone says little about demand quality. |
| Lower or reduced volume relative to recent bars | Fewer participants may be supporting the move. | Low participation alone does not identify who controls the next move. |
| Narrow or limited spread | Upward effort may be producing limited progress. | Limited progress still needs a later response. |
| Close that fails to show strong acceptance near the high | Buyers may not be pressing the move with conviction. | Close location needs background before it has meaning. |
| Prior weakness, resistance, or supply background | The No Demand reading may become more relevant. | Background increases relevance, but the next response still matters. |
| Next bars fail to continue higher | The weak-demand interpretation becomes more credible. | A stronger reading is still not a full trading plan. |
What No Demand Does and Does Not Prove
No Demand can suggest that an upward move lacks active buying support. The observation is useful because price alone can make a weak advance look acceptable until volume, spread, and follow-through are checked. It is also different from a buying climax, where the issue is heavy upside activity rather than quiet participation.
No Demand still does not prove that the market must fall. Low volume can appear before continuation, during temporary hesitation, during quiet conditions, or inside a stronger background where demand returns quickly.
Not a signal by itself: A No Demand bar should be treated as a warning or condition to evaluate, not as an instruction to sell, short, or exit.
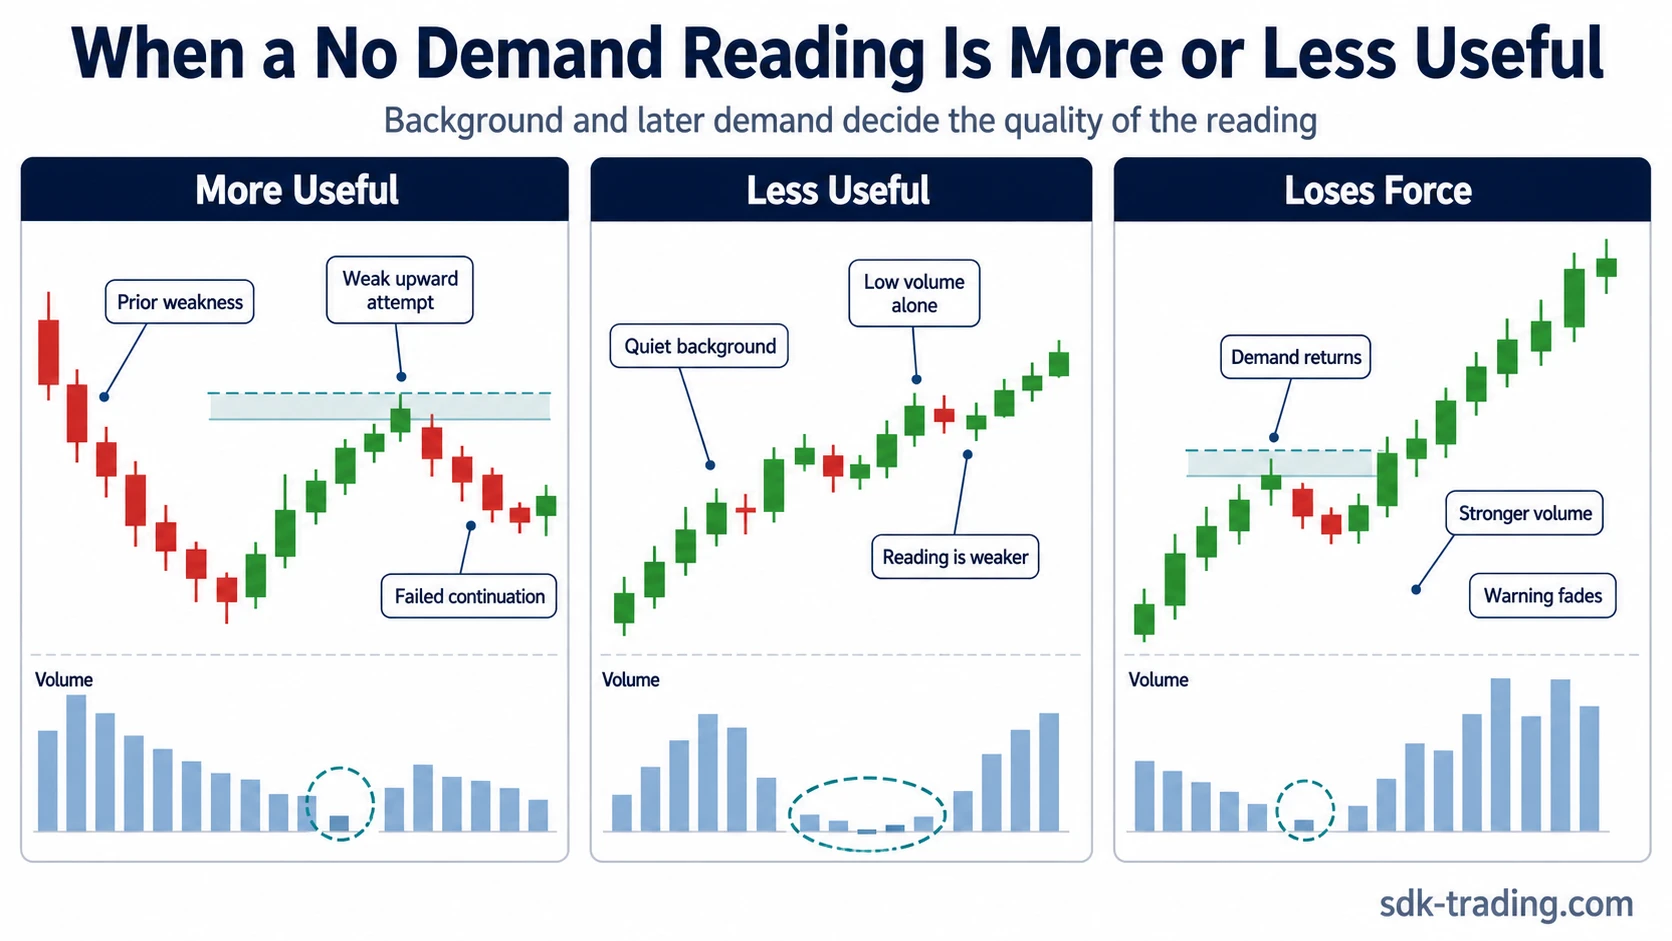
When a No Demand Reading Becomes More or Less Useful
No Demand carries more weight when the weak upward attempt appears where buying already looks fragile. After visible weakness or prior supply, a quiet rebound may show that demand is not strong enough to overcome the earlier selling background. This is different from a selling climax, where the focus is heavy downside activity and potential exhaustion rather than a low-volume upward attempt.
The reading is also more relevant near resistance after an advance, where a weak up bar may show that buyers are not supporting higher prices strongly enough. It loses value when later bars show wider spread, stronger volume, and cleaner acceptance higher.
| Condition | Effect on the reading |
|---|---|
| Prior weakness or visible supply | The weak-demand warning has a stronger background. |
| Near resistance after an advance | The bar may show that buyers are not supporting higher prices strongly enough. |
| Immediate demand returns on later bars | The original weak-demand warning loses force. |
| Quiet conditions inside a strong background | The bar may be only a pause, not meaningful weakness. |
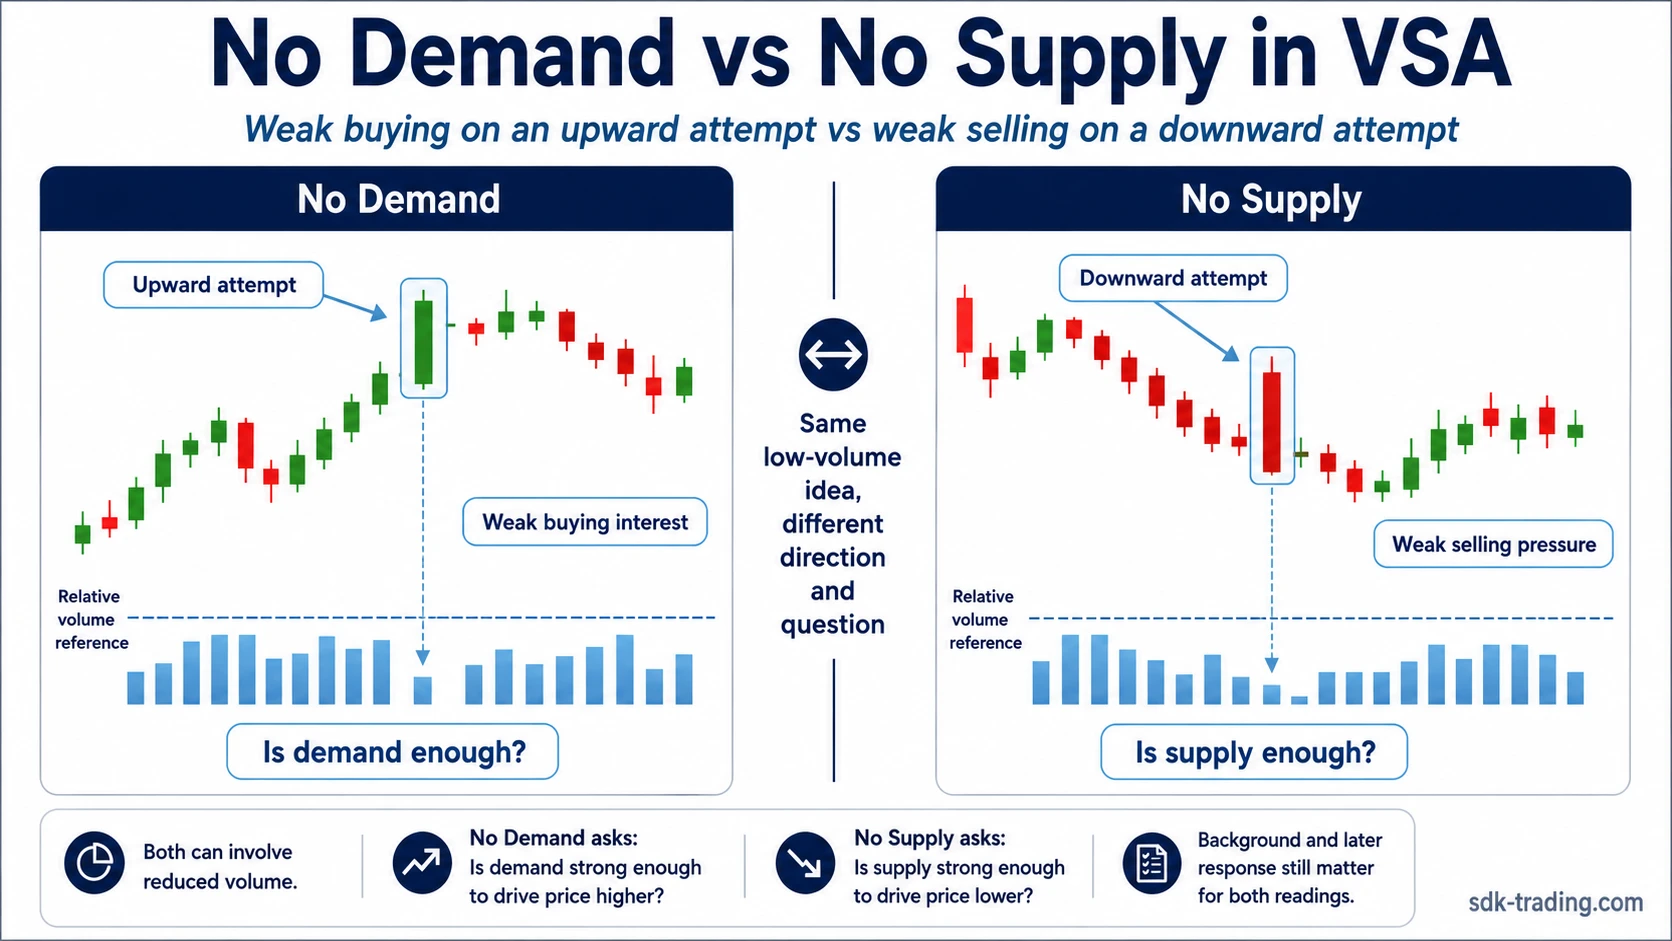
No Demand vs No Supply
No Demand and No Supply are often discussed together, but they are not the same reading. No Demand focuses on weak buying during an upward attempt. No Supply focuses on weak selling pressure during a downward attempt.
| Reading | Typical direction of the bar | Main question | Common mistake |
|---|---|---|---|
| No Demand | Up bar or upward attempt | Is there enough demand to support higher prices? | Calling any low-volume up bar bearish without context. |
| No Supply | Down bar or downward attempt | Is there enough selling pressure to push lower? | Calling every quiet pullback bullish without confirmation. |
The boundary matters because combining both into one vague “low volume” idea weakens the reading. Direction, background, spread, close, and later behavior all change the meaning.
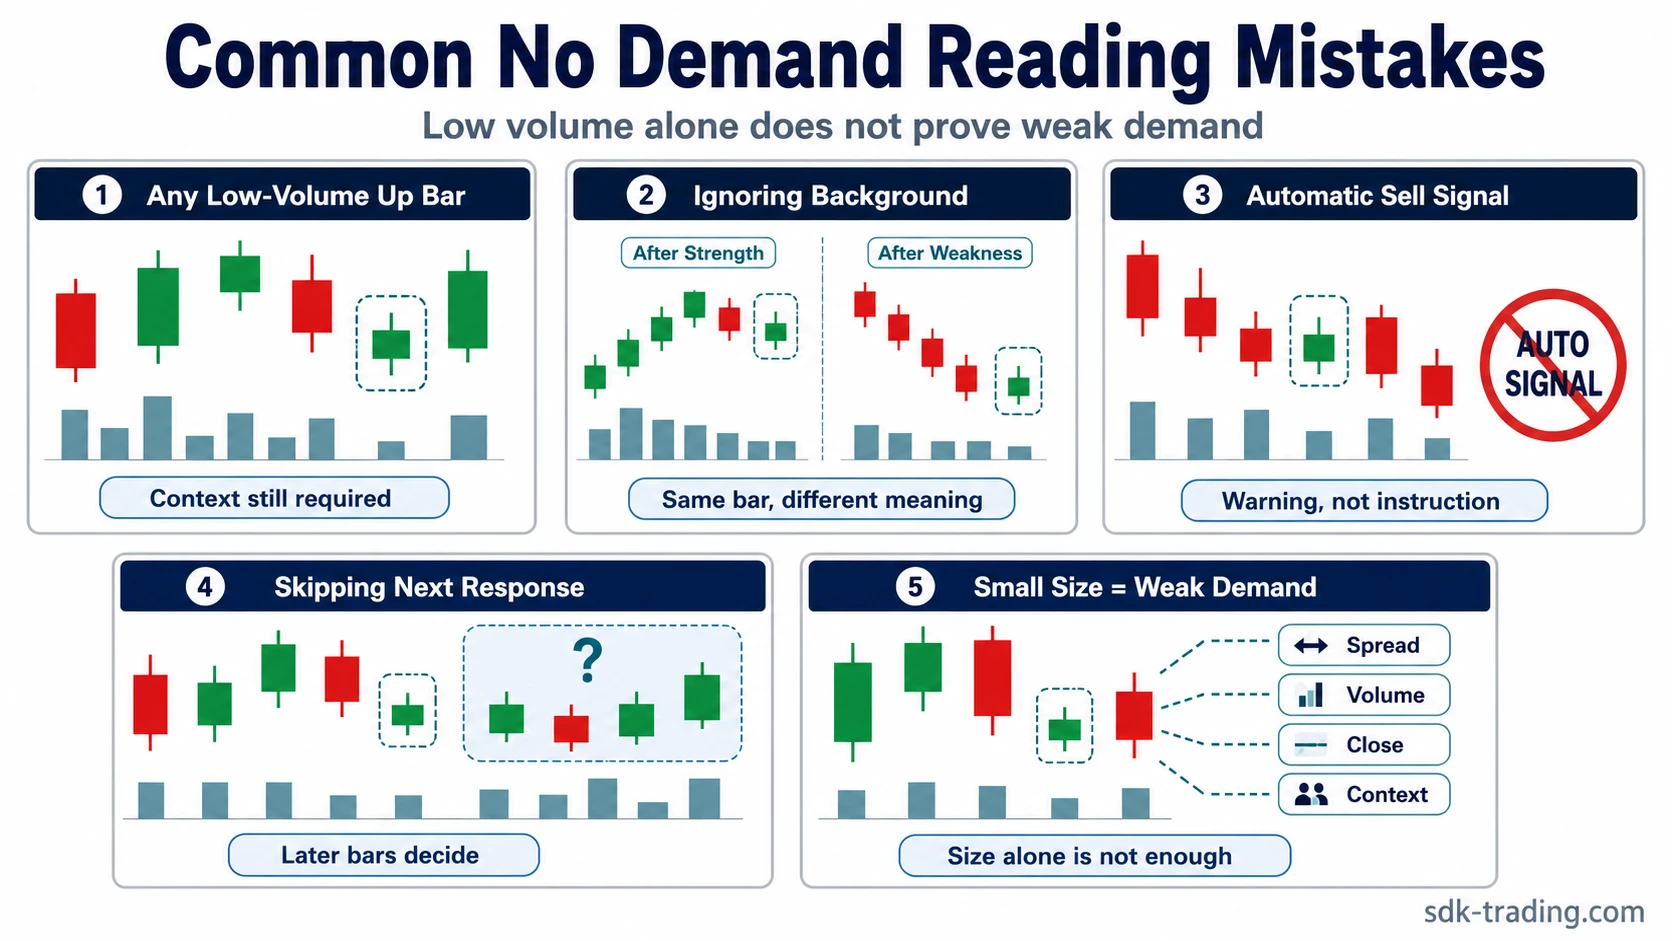
Common Mistakes When Reading No Demand
- Treating any low-volume up bar as No Demand. Volume should be judged relative to nearby activity and market context.
- Ignoring the background. A quiet up bar after strength is not the same as a quiet up bar after visible weakness or supply.
- Using No Demand as an automatic sell signal. The reading is conditional and should not become a standalone trading command.
- Skipping the next-bar test. Later behavior can confirm weak demand, invalidate the read, or leave the market unresolved.
- Confusing small size with weak demand. A narrow bar matters only when volume, spread, close location, and context support the interpretation.
When Weak Buying Interest Is Confirmed, Rejected, or Unresolved
The weak-demand warning gains credibility when a quiet up bar cannot attract continuation and the next attempt also fails to hold higher prices. It fades when demand returns through wider upward spread, stronger volume, and cleaner acceptance above the prior weak attempt. That renewed response should not be confused with stopping volume, which studies high activity after prior selling pressure rather than low participation during an upward attempt.
Some responses remain unresolved. If the next bars move sideways, produce mixed volume, or fail to accept clearly above or below the weak attempt, the No Demand observation should stay conditional rather than being treated as confirmed.

FAQ
What is No Demand in VSA?
No Demand is a Volume Spread Analysis reading where an upward attempt shows weak buying interest through reduced volume, limited spread, and poor follow-through. It is a conditional observation, not a guaranteed signal.
When does No Demand carry more weight?
No Demand carries more weight when the weak up bar is followed by failed upward progress, rejection of higher prices, or renewed supply. It loses force when volume returns and price accepts higher levels.
Does low volume always mean No Demand?
No. Low volume must be judged relative to recent activity, spread, close location, background, and later behavior. Quiet volume alone does not prove weak demand.
What confirms a No Demand reading?
The weak-demand interpretation gains weight when later bars fail to continue higher, reject the upward attempt, or show renewed supply after the low-volume up move.
How is No Demand different from No Supply?
No Demand usually refers to weak buying during an upward attempt. No Supply usually refers to weak selling pressure during a downward attempt.