A Marubozu is a single candlestick pattern with a large real body and little or no wick. It shows that one side controlled most of the candle from open to close, but the trading meaning depends on whether later price action accepts the pressure or quickly fades it.
The candle is recognized by structure first: a dominant body, minimal upper and lower shadows, and a close near one extreme of the candle. Its meaning comes later from context, location, and follow-through. A strong-looking Marubozu in the middle of noisy price action can carry less information than a cleaner Marubozu that appears after compression, near a relevant level, or inside an existing directional sequence.
Key Points
- A Marubozu is identified by a large real body with little or no wick.
- A bullish Marubozu closes near the high, while a bearish Marubozu closes near the low.
- The candle reflects one-sided pressure during that candle, not a guaranteed future move.
- Later acceptance of the candle range improves the reading; a quick return into the body weakens it.
- Body dominance, close location, trend context, and follow-through matter more than size alone.
What Is a Marubozu Candlestick?
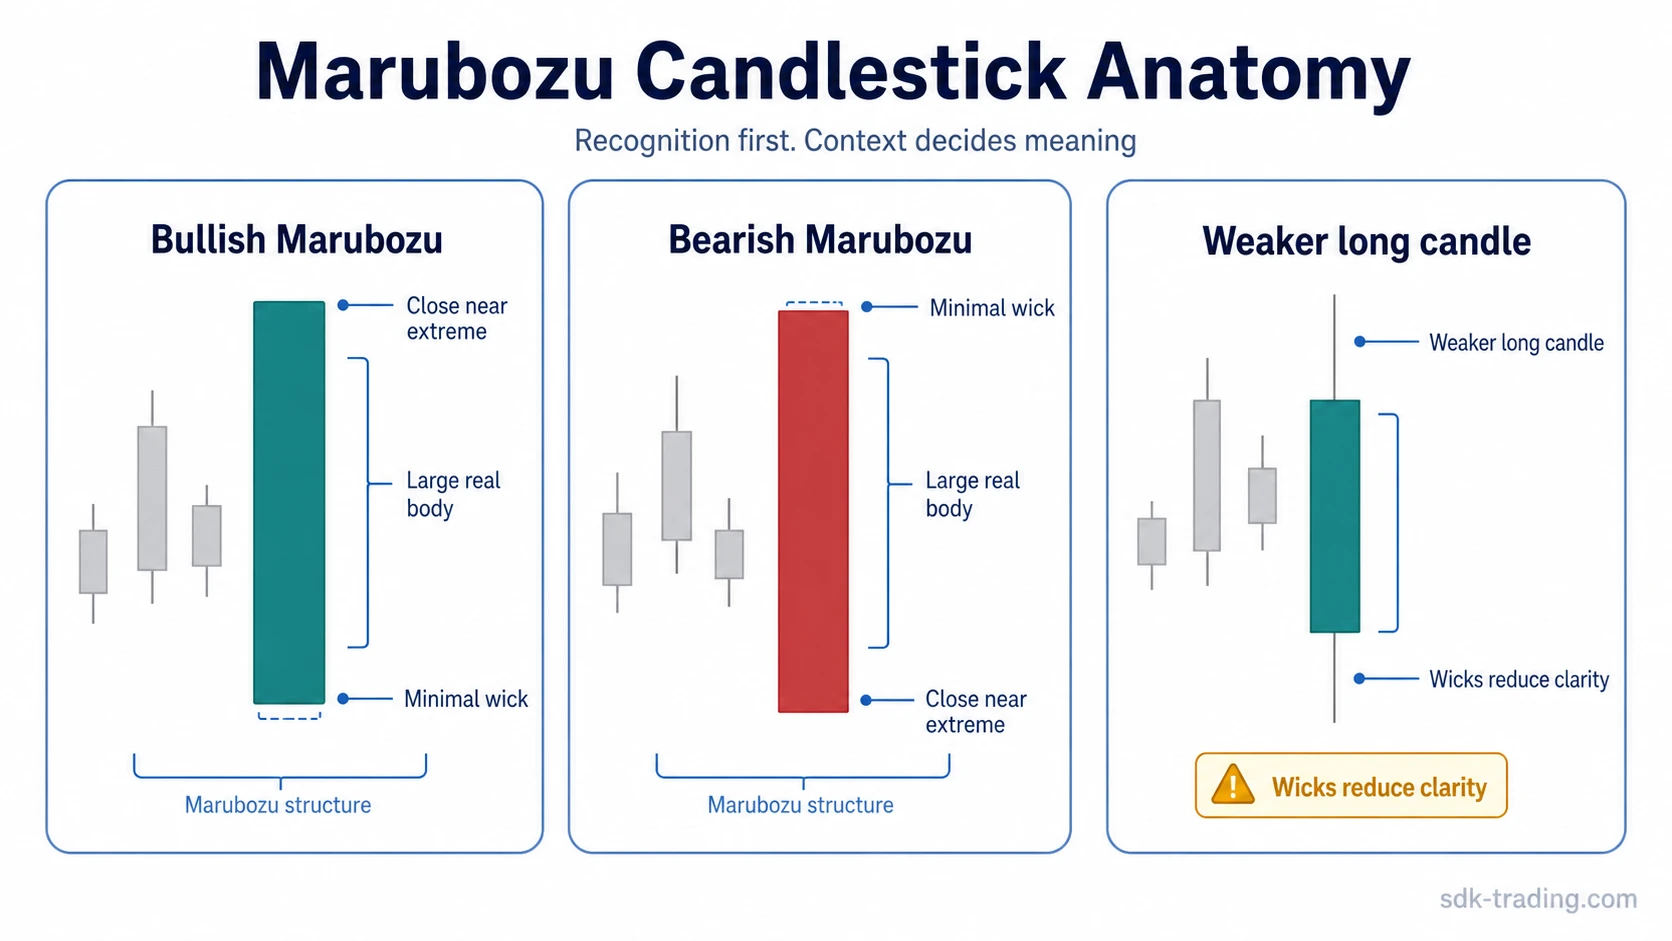
A Marubozu candlestick is a full-bodied candle where the open and close sit near opposite extremes of the range. In a clean bullish version, price opens near the low and closes near the high. In a clean bearish version, price opens near the high and closes near the low.
The absence or near-absence of wicks matters because it shows that the opposite side had little visible success during the candle. That does not mean the market must continue in the same direction. It means the candle recorded a strong directional push that needs to be judged against the surrounding structure.
A long candle is not automatically a Marubozu. A candle can be large but still contain meaningful upper and lower wicks, a weak close, or a position inside a choppy range. A Marubozu reading is cleaner when the real body dominates the candle and the close finishes near the extreme rather than drifting back toward the middle.
How to Identify a Marubozu
The first check is body dominance. The candle body should take up most of the candle’s total range. Small wicks can still appear, but large rejection shadows weaken the Marubozu reading because they show that the opposite side pushed price back during the same candle.
The second check is close location. A bullish Marubozu should close near the high of its range, while a bearish Marubozu should close near the low. A strong body with a weak close is better treated as a broad momentum candle, not as a clean Marubozu.
The third check is the candle’s relationship to prior candles. A Marubozu after a pause can show renewed displacement. A Marubozu after an already extended move can still show pressure, but it needs more caution if later candles reject the new area.
| What to check | Stronger Marubozu reading | Weaker Marubozu reading |
|---|---|---|
| Body size | The real body dominates most of the candle range. | The body is large but not dominant enough to show clean control. |
| Wick size | Upper and lower wicks are absent or very small. | Meaningful wicks show rejection during the same candle. |
| Close near extreme | The close finishes near the high in a bullish candle or near the low in a bearish candle. | The close retreats toward the middle of the candle range. |
| Relation to prior candles | The candle breaks away from compression, pause, or a clear directional sequence. | The candle appears inside noisy overlap with no clean displacement. |
| Follow-through | Later candles accept the Marubozu range or hold the important side of it. | Later candles stall, overlap, or fail to extend beyond the candle’s important area. |
| Return into candle body | Pullbacks stay shallow and do not erase the full-bodied displacement. | Price quickly returns into the body and erases the pressure. |
Bullish and Bearish Marubozu
| Type | Structure | Basic reading | What must happen next |
|---|---|---|---|
| Bullish Marubozu | Open near the low, close near the high. | Demand controlled most of the candle. | Later candles need to hold or accept the upper area. |
| Bearish Marubozu | Open near the high, close near the low. | Supply controlled most of the candle. | Later candles need to hold or accept the lower area. |
Neither version is automatically better or more reliable. Direction matters, but location and later acceptance decide whether the candle deserves more weight.
What a Marubozu Means in Trading
A Marubozu means that one side controlled the candle strongly enough to leave little or no visible rejection. That control can matter when it appears after compression, at a breakout point, after a pullback, or inside an already active trend.
The candle becomes more useful when it fits a broader sequence of single candlestick patterns in trending markets. A Marubozu that appears in line with an established directional move can show renewed pressure, while a Marubozu against the direction of the prior move may need more confirmation before its message is trusted.
The safest interpretation is pressure, not prediction. A Marubozu can begin a move, continue a move, or mark exhaustion if it appears late and is rejected quickly. The candle gives a clue about control during one period; the next candles decide whether that control remains relevant.
Recognition vs Interpretation
Recognition is the structural part. The candle either has body dominance, minimal wicks, and a close near one extreme, or it does not. That part can be checked directly from the candle.
Interpretation is broader. The same candle can mean different things depending on where it forms. A bullish Marubozu after a tight pause may show fresh demand. A bullish Marubozu after a long vertical move may show late pressure that needs to be tested. A bearish Marubozu below a broken support can show supply acceptance, while the same candle into a major support area can become vulnerable to failure if sellers cannot continue.
The mistake is treating the label as the conclusion. The name Marubozu describes the candle shape. The trading meaning depends on whether later price behavior confirms or rejects the pressure shown by that shape.
Marubozu Opening and Marubozu Closing
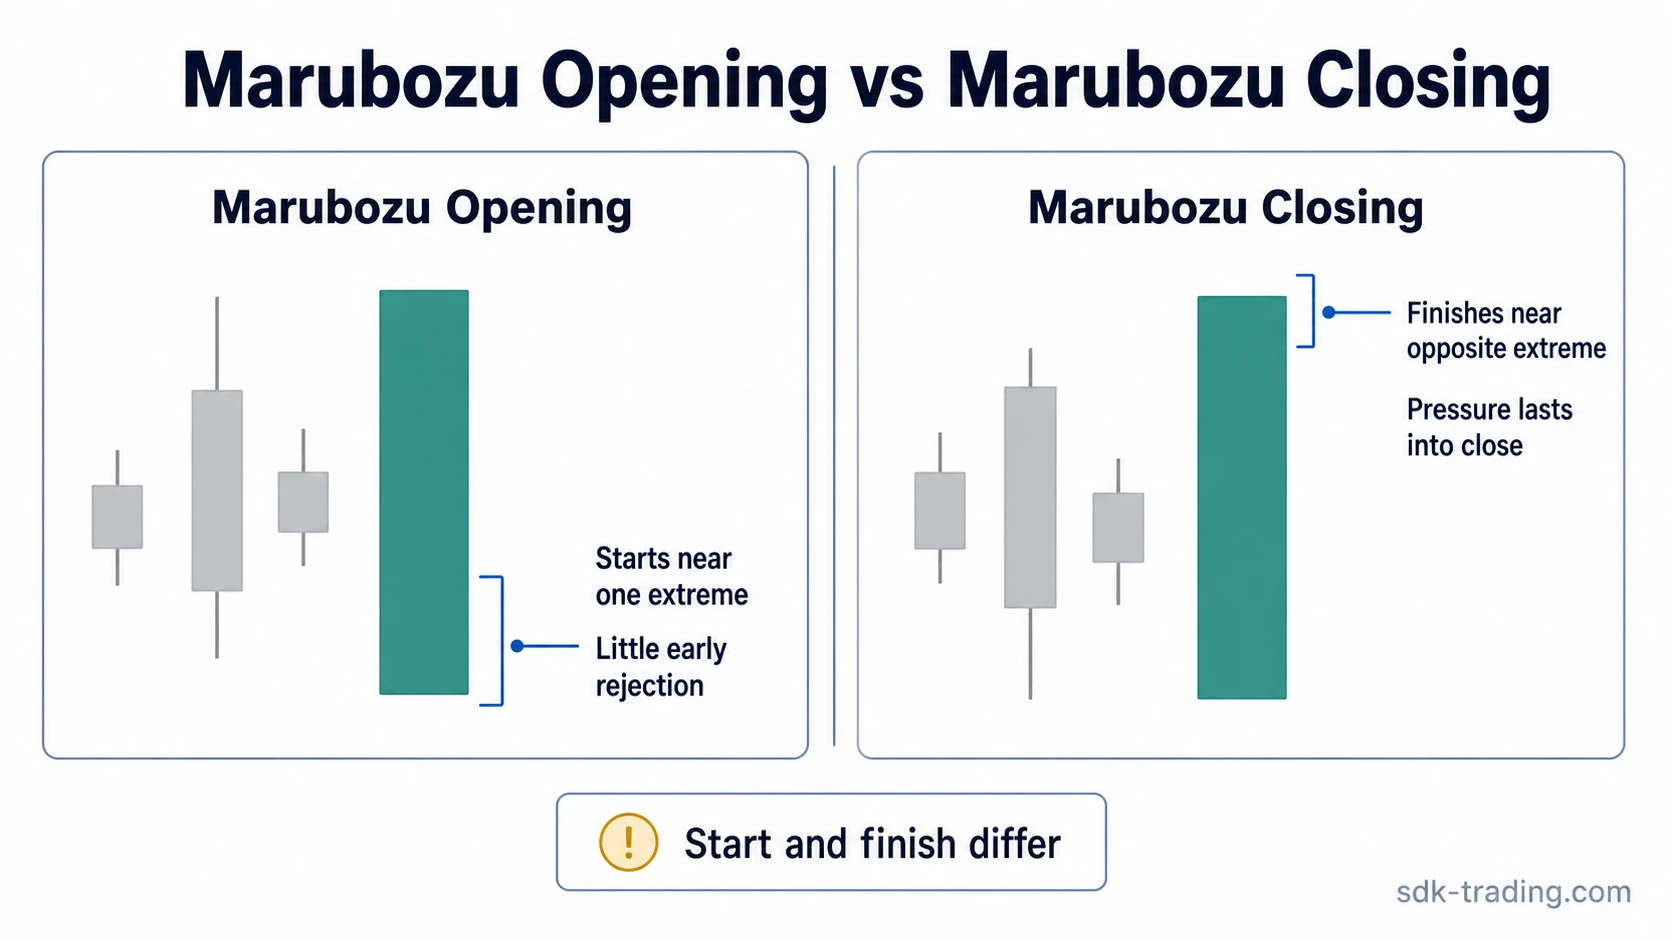
Marubozu Opening focuses on how the candle begins near one extreme. In a bullish version, the open is near the low; in a bearish version, the open is near the high. This tells you that pressure appeared early in the candle.
Marubozu Closing focuses on whether that pressure lasts into the close. A clean close near the high in a bullish candle or near the low in a bearish candle is important because it shows that the opposite side did not significantly reclaim the range before the candle finished.
The distinction matters because a candle can begin with pressure and still lose quality before the close. The main Marubozu reading should stay focused on the whole candle: body dominance, minimal wicks, close location, and what later candles do with that range.
Confirmation and Acceptance
Confirmation does not require one fixed next candle. It depends on whether later price behavior respects the area created by the Marubozu. In a bullish case, stronger confirmation can appear when price holds above an important part of the Marubozu body, accepts the upper area, or continues without immediately falling back into the prior range.
In a bearish case, stronger confirmation can appear when price stays near the lower side of the Marubozu, fails to reclaim the body, or continues below the area where the candle showed supply. A quick return through the body weakens the reading because it shows that the original pressure was not accepted for long.
This is why judging whether a Marubozu close holds or fails matters more than simply naming the candle. A strong close is useful only if the next sequence does not immediately erase it.

Simple Marubozu Example in Context
Imagine price has moved sideways for several candles, with overlapping bodies and limited progress. A bullish Marubozu then forms and closes near the high, outside that overlap. The candle shows that demand finally created clean displacement.
The next part decides whether the reading improves or weakens. If later candles hold near the upper part of the Marubozu body and do not fall back into the prior overlap, the pressure looks more accepted. If price immediately drops back through the body and returns into the earlier range, the Marubozu becomes less reliable because the market rejected the displacement.
The same logic works in reverse for a bearish Marubozu. The candle may show strong supply during one period, but the reading depends on whether price accepts lower levels or quickly reclaims the candle body.
Common Mistakes
The first mistake is calling every long candle a Marubozu. Size alone is not enough. A long candle with large wicks or a weak close may still show volatility, but it does not show the same clean control.
The second mistake is treating Marubozu as a standalone signal. Candles can warn, but structure decides. A Marubozu needs context: trend, level, prior compression, follow-through, and whether later candles accept or reject the body.
The third mistake is applying the same reading to every market. In fast-moving assets, including some crypto candlestick patterns, large candles can appear often. That makes close location, wick size, and later acceptance even more important because volatility alone can create misleading full-bodied candles.
When a Marubozu Reading Weakens
A Marubozu reading weakens when price quickly returns into the candle body. That return shows that the market did not accept the area created by the candle. The faster and deeper the return, the less weight the original pressure deserves.
Large wicks also weaken the reading. A candle with strong upper rejection after a bullish push or strong lower rejection after a bearish push is not as clean as a candle that closes near its extreme.
Poor location can weaken the reading as well. A Marubozu into a crowded resistance area, late in an extended move, or inside heavy overlap may still be meaningful, but it should not be treated the same as a clean displacement candle from a prepared area. The candle is strongest when structure, body dominance, close location, and later acceptance point in the same direction.
FAQ
What does a Marubozu candlestick mean?
A Marubozu candlestick means one side controlled most of the candle from open to close. In trading, it usually reflects directional pressure, but later price behavior decides whether that pressure remains accepted or fades back into the prior range.
Is Marubozu bullish or bearish?
A Marubozu can be bullish or bearish. A bullish Marubozu closes near the high of the candle, while a bearish Marubozu closes near the low.
Does a Marubozu need confirmation?
A Marubozu needs follow-through context, not a fixed confirmation candle. The reading improves when later candles accept the range or defend the important area, and weakens when price quickly returns into the body.
What is the difference between a Marubozu and a long candle?
A long candle only describes size. A Marubozu requires body dominance, little or no wick, and a close near the candle’s extreme.
What weakens a Marubozu reading?
Large wicks, a weak close, noisy overlap, poor location, and a fast return into the candle body can weaken a Marubozu reading.